Mastering the Linux command line can be akin to discovering a new world hidden within your computer. It’s a place where text reigns supreme, and a few keystrokes can wield immense power over your system. My personal voyage into this realm began with a Raspberry Pi, a compact yet mighty device that serves as a splendid vessel for learning Linux.
This blog is a friendly guide to help you navigate the basics of the Linux command line, with practical examples tailored for the Raspberry Pi terminal. Whether you’re setting up a server, programming a new project, or just satisfying your curiosity, these commands are your first steps into a broader universe.
Why the Linux command line?
Before diving into the commands, let’s address the elephant in the room: Why bother with the command line in an age of graphical user interfaces (GUIs)? For me, it’s about efficiency and control. Commands can often accomplish tasks in fewer steps than GUIs, and they allow you to perform complex operations by combining simple commands. Plus, understanding the command line deepens your comprehension of how Linux works, which is invaluable for troubleshooting.
Opening the terminal
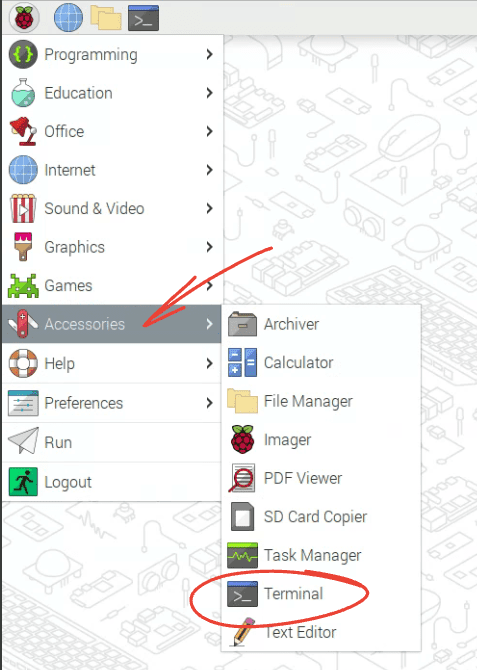
On your Raspberry Pi, the terminal is your gateway to the Linux command line. You can open it via the desktop interface by clicking the terminal icon, often found at the top or in the menu. If, for some reason, you don’t have that icon, you can instead go to “Accessories”> “Terminal”.

Launching Terminal on Raspberry Pi
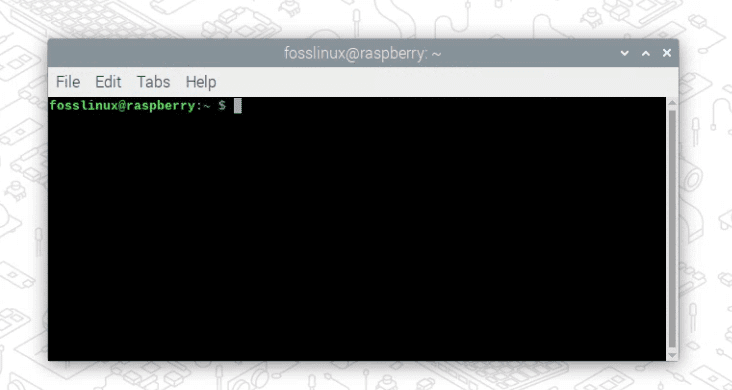
The window that pops up might look unassuming, but it’s your canvas for entering commands.

Raspberry Pi Linux Terminal
Basic navigation
pwd (Print Working Directory)
The pwd command reveals your current location in the file system. Think of it as asking, “Where am I?” in the vast hierarchy of folders (directories) on your system.
pi@raspberrypi:~ $ pwd
/home/pi
ls (List)
To see what’s inside the directory you’re in, use ls. It’s like opening a drawer to peek at its contents. I love this command for its simplicity and frequent utility.
pi@raspberrypi:~ $ ls
Desktop  Documents  Downloads  Music  Pictures  Public  Templates  Videos
cd (Change Directory)
When you need to move to a different directory, cd is your go-to command. Just type cd followed by the directory’s name or path. To go up one level, use cd ...
pi@raspberrypi:~ $ cd Documents
pi@raspberrypi:~/Documents $
Working with files and directories
mkdir (Make Directory)
Creating a new folder is as easy as mkdir followed by the name you wish to give the directory. It’s like planting a flag in uncharted territory.
pi@raspberrypi:~ $ mkdir Projects
pi@raspberrypi:~ $ ls
Desktop  Documents  Downloads  Music  Pictures  Projects  Public  Templates  Videos
touch
The touch command is your way of creating a new, empty file. It’s akin to laying the foundation stone for a building.
Creating a new file named example.txt within the Projects directory:
pi@raspberrypi:~/Projects $ touch example.txt
pi@raspberrypi:~/Projects $ ls
example.txt
rm and rmdir
Removing files and directories is handled by rm (for files) and rmdir (for empty directories). Be cautious with these commands; they’re like scissors that can’t distinguish between a mistake and intention.
To delete a file:
pi@raspberrypi:~/Projects $ rm example.txt
To delete an empty directory:
pi@raspberrypi:~ $ rmdir Projects
Example output:
Removing the example.txt file and then the Projects directory:
pi@raspberrypi:~/Projects $ rm example.txt
pi@raspberrypi:~/Projects $ cd ..
pi@raspberrypi:~ $ rmdir Projects
pi@raspberrypi:~ $ ls
Desktop Documents Downloads Music Pictures Videos
After removing, the Projects directory no longer appears in the list.
Viewing and editing files
cat (Concatenate)
The cat command displays the content of a file on your screen. It’s like pouring the contents of a bottle out to examine them.
pi@raspberrypi:~ $ cat example.txt
This is an example file.
nano
Nano is a user-friendly, text-based editor. Opening or creating a file with nano is like stepping into a minimalist’s office, where you can edit your text in peace.
pi@raspberrypi:~ $ nano example.txt
Managing processes
top
When you want to see what’s currently running on your Raspberry Pi, top is the command for you. It’s like having a dashboard that shows all the moving parts of your machine.
pi@raspberrypi:~ $ top
This output provides a dynamic view of system processes, CPU, and memory usage.
Sample output:
top - 15:29:31 up 1:22, 2 users, load average: 0.01, 0.02, 0.00
Tasks: 117 total, 1 running, 116 sleeping, 0 stopped, 0 zombie
%Cpu(s): 3.7 us, 1.0 sy, 0.0 ni, 95.0 id, 0.3 wa, 0.0 hi, 0.0 si, 0.0 st
MiB Mem : 926.1 total, 427.6 free, 330.1 used, 168.4 buff/cache
MiB Swap: 100.0 total, 100.0 free, 0.0 used. 492.7 avail Mem

PID USER PR NI VIRT RES SHR S %CPU %MEM TIME+ COMMAND
1234 pi 20 0 10368 2964 2684 R 6.7 0.3 0:00.07 top
...
kill
If there’s a process that needs to be stopped, kill followed by the process ID (PID) is your command. It’s the emergency stop button of the Linux world.
pi@raspberrypi:~ $ kill [PID]
Example:
To terminate a process, you first need its PID from top or another method. Suppose the PID is 1234:
pi@raspberrypi:~ $ kill 1234
This command doesn’t produce output, but it sends a signal to terminate the process with PID 1234. If successful, the process will no longer appear in the list of running processes when you next run top.
Wrapping up
This guide scratches the surface of what’s possible with the Linux command line, especially on a Raspberry Pi. Each command is a tool in your toolkit, and while some might become favorites, each has its moment to shine. I encourage you to experiment with these commands, explore further, and make this journey your own. The command line might seem daunting at first, but with practice, you’ll find it a powerful ally in your computing adventures. Happy exploring!
