
What can you achieve with your Pi, you might ask? The answer is that only your imagination is the limit. The good news with this machine is that you can use it wherever you are without necessarily having your Raspberry Pi physically with you via VNC Connect. This, therefore, means that you can take control over your Raspberry Pi from another device. The software is free for non-commercial usage; it only needs to be enabled.
How to use RealVNC on a Pi using the GUI method
If ports are opened and forwarded as required, VNC permits you to connect to another PC on the same network. You must have two computers connected to the same network for this tutorial. One will be the Raspberry Pi to which you will connect, and the other will run the RealVNC Viewer software. The Pi should run the Raspberry Pi OS in Desktop mode while the other PC should have an internet connection to aid downloading the Viewer software.
Step 1: Activate RealVNC on the Raspberry Pi
First, you are supposed to connect your Raspberry Pi to a display screen for this step so that you know the IP address of the Raspberry Pi connected to your home internet. You can then do away with the screen later.
Enable RealVNC using the Raspberry Pi Configuration tool
Click on the Raspberry Pi startup menu, then proceed to the Preferences, and in the same submenu, go ahead and select Raspberry Pi Configuration.
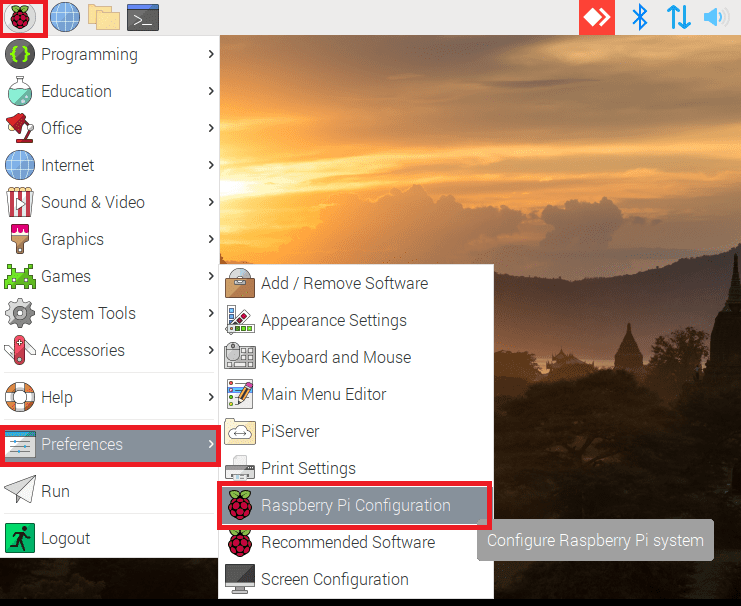
select the raspberry configuration
The tool will come up with several tabs; click on the interfaces tab to see the available options. A point to note here is that VNC is disabled by default.

enable VNC
Our goal is to enable the button by hitting “Enable” and pressing “OK.”
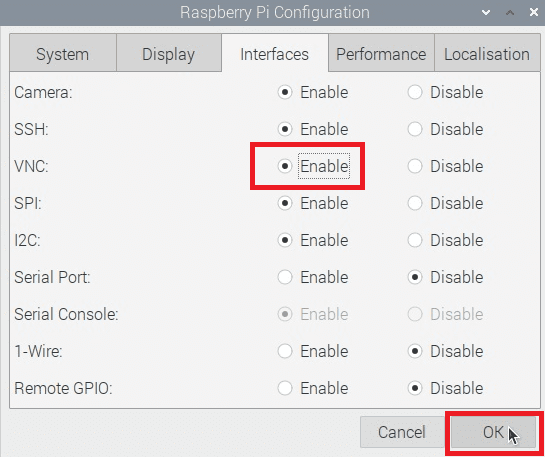
VNC enabled
After enabling, take a look at the taskbar, and you should notice a new icon with a V2 symbol to affirm that the software is now enabled.
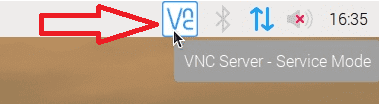
taskbar enabled VNC
Step 2: Obtain your Raspberry Pi RealVNC IP address and credentials
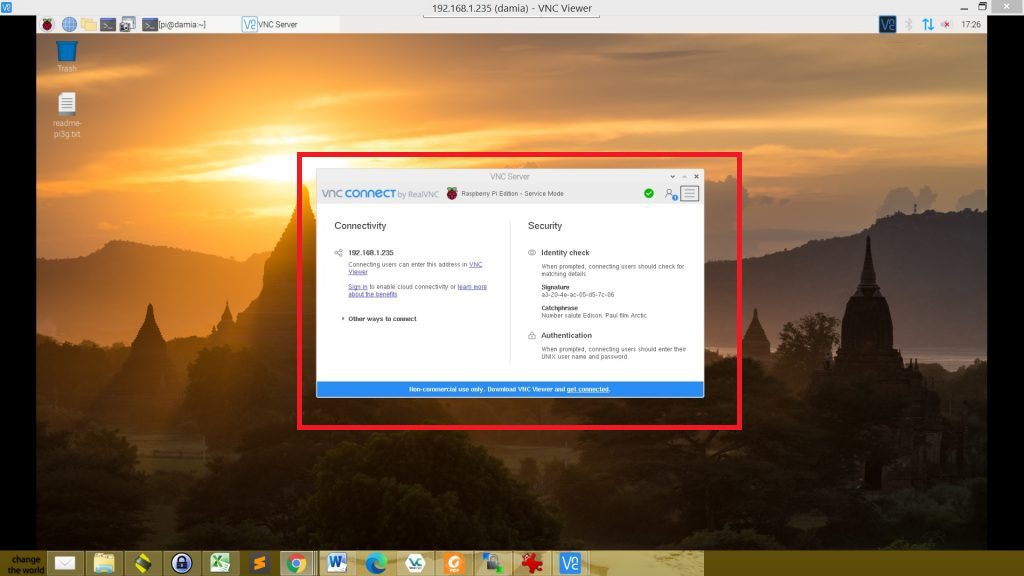
To have the ability to control your Pi remotely, you need to know or have the IP address of the Pi running the RealVNC Server to connect to it.
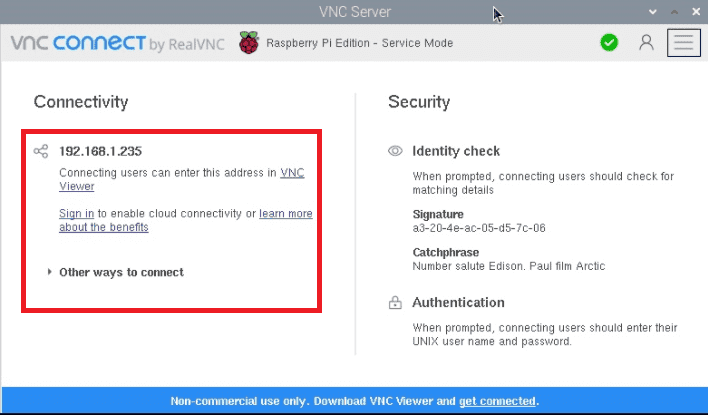
obtain the Pi IP address
Click on the new Icon (V2) in the taskbar using the left mouse button click, and a window showing all you need to get connected will appear as shown in the snapshot above. Remember to save this IP address somewhere, as you will need it later for connectivity purposes.
Step 3: Download and install the RealVNC Viewer
The subsequent steps should take place on your primary system, from which you wish to control the Pi remotely using the VNC software. To download the VNC software, visit RealVNC’s official website.
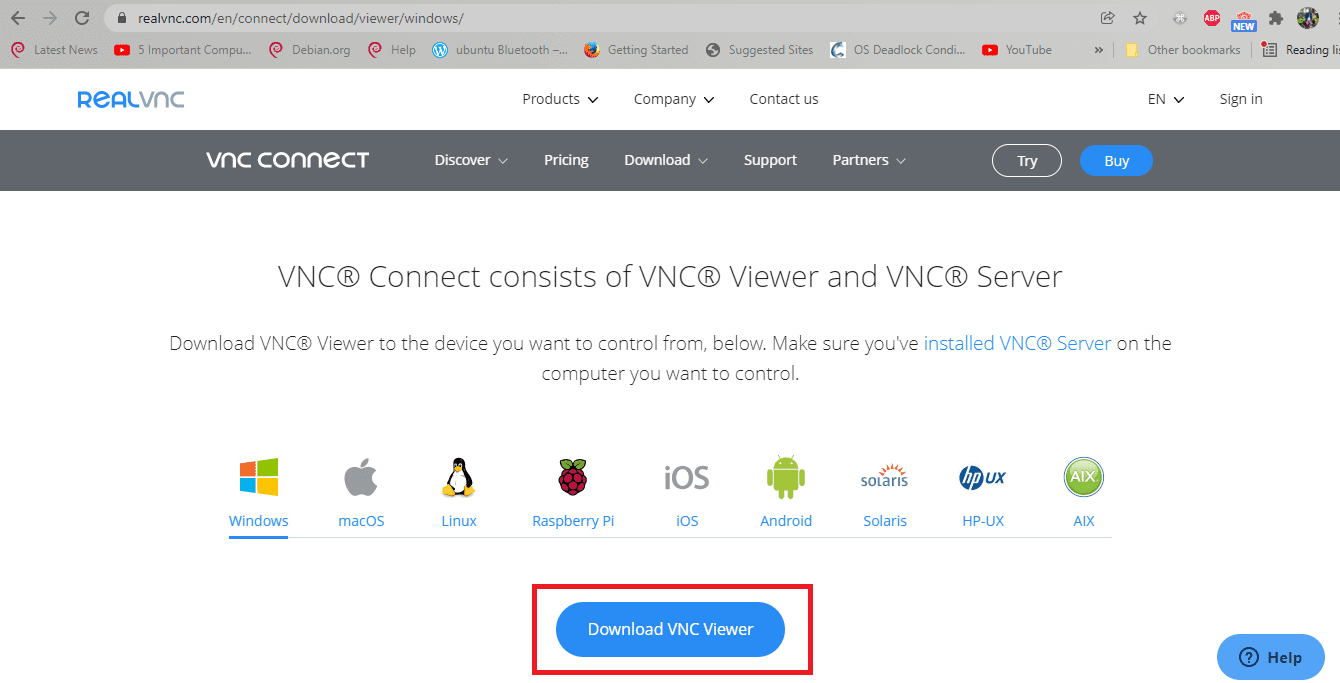
Download VNC viewer
Ensure you select the correct Operating system (Linux/Raspberry/macOS/Windows/iOS/Android/AIX/Solaris, among others)
After that, install the viewer software by the default procedure for your operating system. Then open the software by double-clicking on it.
Step 4: Run the VNC Viewer
Upon opening the software, you should see an empty dialogue box asking you to input a VNC Server address or search. Here, type in the IP address we earlier told you to save somewhere and click on the “connect to address or hostname” or just hit the “enter” button to initialize the connection.
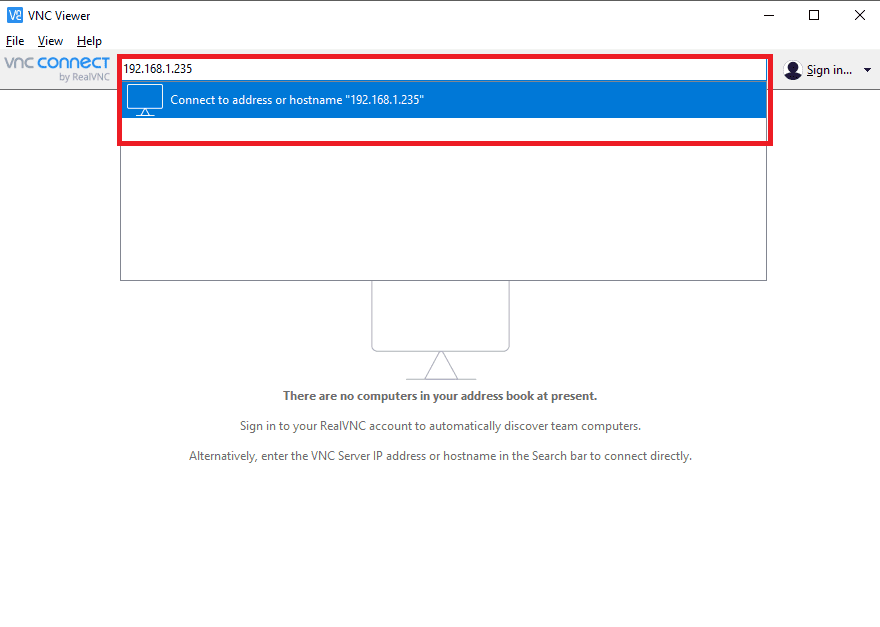
connect to viewer
Upon connecting, a dialogue box asking you to affirm your decision to connect the software to the given IP address will pop up. Here, we recommend cross-checking if the information (Catchphrase and signature) matches. If they do, select “Continue.”
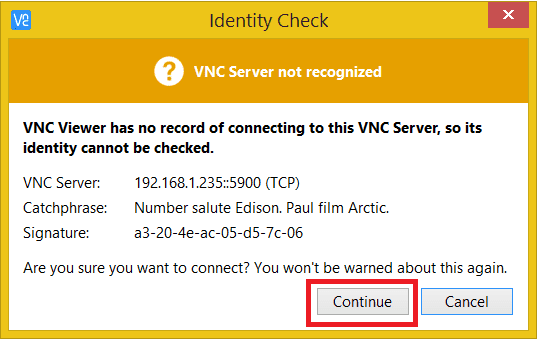
identity-check
Step 5: Authenticate with your Pi machine
Here, the VNC software will show you an authentication screen, requesting you to log in with your credentials (username and password).
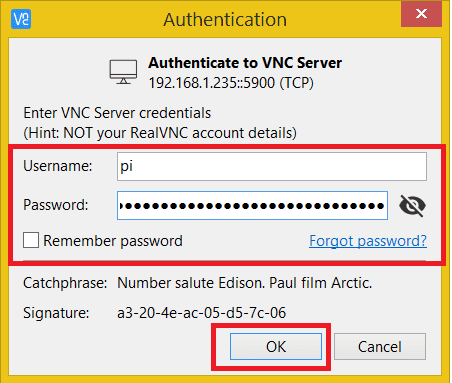
Credentials section
These are the credentials that you use to log in to your machine. In case you did not alter the default log-in credentials, or you don’t know the credentials, use “Pi” as the username and “raspberry” as the password and click “OK” to authenticate.
Upon clicking the “OK” button, a “Remember password” option will appear. If you need to link to your Pi once in a while, we recommend not enabling it. However, if you will be accessing it almost every time, you have to allow it by clicking “OK” to save the data.
A flaw in remembering the password is that anyone with access to your main PC will also access the Pi.
Step 6: Control and View your Pi using VNC
And boom! Here now, you can use your primary PC’s mouse and keyboard to interact with the Pi desktop utilizing the software. You can control your Pi using a second-party PC.
Control and view your pi
If you are keen enough, you should note that the V2 icon has turned to a different color to indicate a successful connection.

VNC should change color
If you move the mouse and the Pi board is still connected to the screen, you should see how the mouse moves on it. Then, click on the windows button, use the web browser, edit the documents; file management can all be done using the VNC Viewer.
If you fail to enable the VNC graphically on your Raspberry as we did, you may need to install the RealVNC from the repositories, which approximately takes five minutes.
To get the VNC Server on your Raspberry Pi, run the following codes:
First, update your computer’s repositories by running the following command:
sudo apt-get update
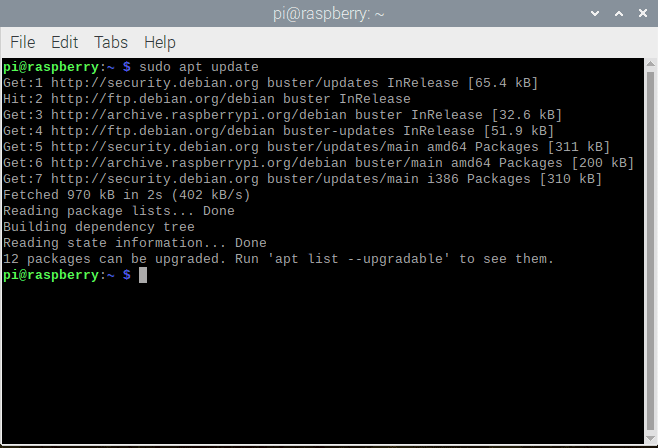
update machine
In case you find packages that need an upgrade, like in our case 12, run the following command:
sudo apt-upgrade
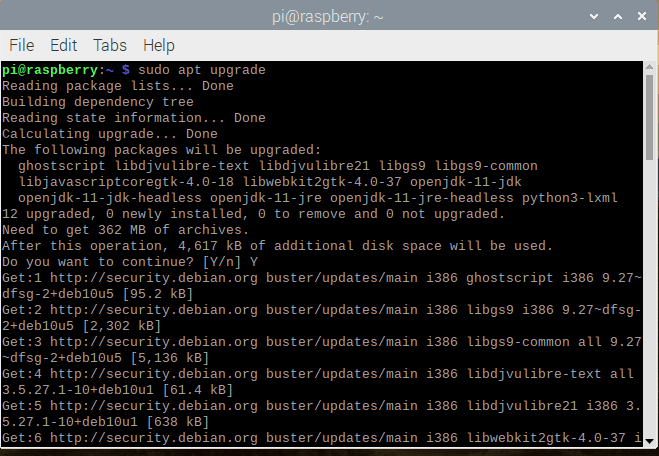
upgrade machine
After that, run the install command:
sudo apt-get install realvnc-vnc-server

install RealVNC server
After that, reboot your machine. Then, run the following command to configure the settings:
sudo raspi-config
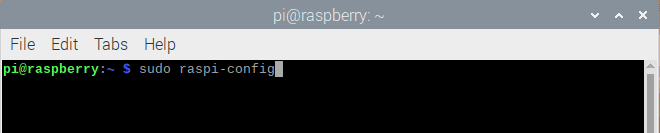
raspi-config command
Then navigate to Interface Options>VNC and hit “Yes.” Then select Finish or ESC to quit.

select interface options
The VNC server will automatically start each time you power your Pi. So you can now access a graphical desktop remotely then follow the steps we covered earlier in the article, and everything should be OK.
Note: If you have a headless Pi, which means it is not plugged into the monitor or does not run a graphical desktop, the VNC server can still offer graphical remote access with a virtual desktop.
Let us take you through some tasks and configurations with this software.
1: Running directly rendered applications such as Minecraft remotely
The VNC Server can remote display the Pi applications that now utilize rendered overlay, like the text console, the camera Pi module, and Minecraft.
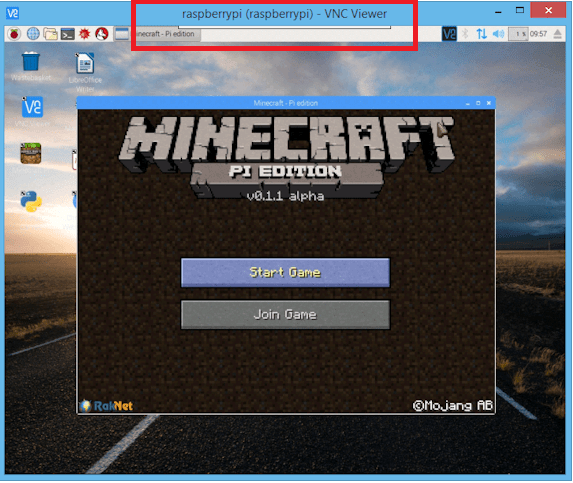
Minecraft
On the controlling device, run VNC Viewer and connect. If it is already connected, you will need to reconnect it again. To turn on this feature, open the VNC server dialogue, then move to “Menu>Options>Troubleshooting, and choose Enable direct capture mode.”
After turning the direct capture mode on, you might notice that mouse movements may seem erratic when using Minecraft remotely. As such, try pressing F8 to open the VNC Viewer shortcut menu and select Relative Pointer Motion to counter this issue.
In case the performance is not fixed, try out the following:
On your Pi, run the following command:
sudo raspi-config
- Then, maneuver to Advanced options>Memory Split and ensure that your GPU is at least 128MB.
Or
- Reduce your Pi’s screen resolution
2: Transferring files to and from your Pi
This task can be accomplished by connecting from VNC Viewer running on a Windows, macOS, or Linux desktop PC. To transfer files/data from your Pi, use VNC Viewer to open the VNC server dialogue remotely, select Menu>File transfer, and follow the detailed steps here.
To transfer files/data to your Pi, click the VNC Viewer![]() toolbar button and follow the instructions. Here are the detailed steps to follow.
toolbar button and follow the instructions. Here are the detailed steps to follow.
3. Printing to a local printer
Nothing feels useful as printing to a printer software attached to your Windows, macOS, or Linux PC if no printer is set up for your Pi. To set up a local printer, run the following command to help install CUPS (the Common Unix Printing System)
sudo apt-get install cups
After that, using the VNC Viewer, connect to your Pi and carry out whichever standard operation for printing you want to. To print out, the VNC Server directs the output to VNC Viewer and transfers it to your local printer. Take a look at more detailed info on remote printing here.
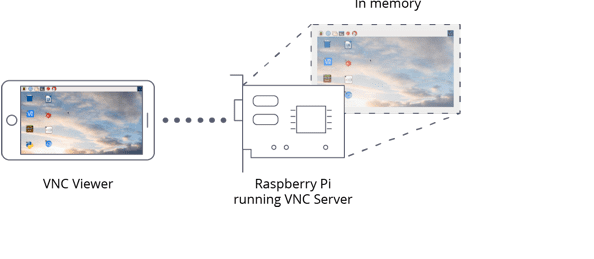
4. Creating and remoting a virtual desktop
If your Pi is headless, like we earlier said, it is not plugged into a monitor or embedded in a robot; it is unlikely to be running a graphical desktop.
The VNC Server can run in Virtual Mode to generate a resource-coherent virtual desktop at a premium, handing you graphical remote access even in situations where there is no actual desktop to remote. This Virtual desktop-only exists in your Pi’s memory.
create a remote virtual desktop
To run a virtual desktop on your machine, run the following command on your Pi terminal:
vncserver
Then take note of the IP address printed to the terminal, for instance, 192.168.x:x
Key in this information in the VNC Viewer of the device you will use to take control, and all should be well.
5. Stop a virtual desktop
If you were unaware, a virtual desktop remains still until you destroy it. To kill the processes running the desktop in case you no longer need it, run the following syntax:
vncserver -kill :<display-number>
Note that this command will terminate any current connections without issuing a warning. So, be keen.
6. Operating VNC server at the terminal
Did you know that you can efficiently operate the VNC server exclusively at the terminal or via SSH if you prefer? If you didn’t, then you are aware now.
Below is a compiled list of common commands for the Pi:
To start the VNC server now, run:
sudo systemctl start vncserver-x11-serviced.service
To start the VNC server at the next power-on session and every next boot, run:
sudo systemctl enable vncserver-x11-serviced.service
To stop/halt the VNC Server, run:
sudo systemctl stop vncserver-x11-serviced.service
To prevent the VNC server powering on at every boot, run:
sudo systemctl disable vncserver-x11-serviced.service
In case you need commands for Pi OS based on Debian 7, take a look at this page:
7. Troubleshooting the VNC Server
You might want to change your Pi’s screen resolution if:
- Your Pi is headless, and the default screen resolution is too small.
- The performance is not appealing. Find yourself a smaller screen because a smaller screen offers a more responsive experience.
To modify the resolution setting, run the command:
sudo raspi-config
After that, navigate to Advanced Options>Resolution and select your preferred option. A significant point to note is that you should reboot your machine after modifying the resolution settings for the changes to take effect.
8. Optimizing for Raspberry Pi Zero and Pi 1
If you own a Raspberry Pi Zero or Pi Model 1, and the performance is impaired, we suggest you try turning off encryption if you are sure that your private local network is secure enough. This, in turn, reduces CPU usage.
To turn off the encryption, follow the following steps:
Step 1: Open the VNC Server dialogue and select Menu> Options>Expert on your Pi machine
Step 2: Change the Encryption parameter to “AlwaysOff”
Step 3: Restart for the changes to take effect
In case the problem persists, try lowering your Pi’s resolution
Note: You cannot turn off encryption for cloud connections
Final Thoughts
We believe this article came in handy for those looking at running RealVNC on the Raspberry Pi and its benefits. With RealVNC, you can transfer files from and to your Pi, print to a printer if there is no printer setup for the Raspberry Pi, and establish a virtual desktop. Furthermore, you can run your Pi applications and games such as Minecraft, the Pi camera, remotely, and many more.