Whether you are using the official Raspberry Pi display or an external monitor to enable kiosk mode, save space, customize your setup, accommodate accessibility, or just want to use your Raspberry Pi in portrait mode, you can take advantage of the rotate screen feature in Raspberry Pi.
In this guide, we will walk you through the steps needed to change the orientation of your display; this tutorial will show you how to get it done. So, let’s get started and discover the simple steps to rotate your screen on your Raspberry Pi.
There are several reasons why someone might want to rotate the screen on their Raspberry Pi. Here are a few examples:
Kiosk mode: If you’re using your Raspberry Pi to set up a kiosk display, such as a digital signage or informational display, rotating the screen can allow you to utilize the available space better. For example, you might want to use a portrait orientation to show more information on a vertical surface, such as a wall-mounted display.
Space-saving: Rotating the Raspberry Pi screen can also help save space on a crowded desk or work surface. By using portrait orientation, you can reduce the footprint of your setup, making it easier to fit into tight spaces.
Customized use: Some people might want to rotate the screen on their Raspberry Pi for personal preference; it can be helpful in specific applications like reading books, looking at pictures, or browsing a website with a lot of vertical content.
Accessibility: Rotating the screen can also be helpful for accessibility, allowing people with limited mobility to interact more easily with their Raspberry Pis.
How to Rotate Screen in Raspberry Pi
There are several ways to rotate the screen on a Raspberry Pi, depending on the version of the operating system you are using and your specific setup. The following are among the methods people use to rotate screen in Raspberry Pi;
- Graphical User Interface(GUI)-Desktop
- Command Line Interface(CLI)
Method one: Rotating Screen in Raspberry Pi Graphical User Interface (GUI) -Desktop
Rotating the screen on a Raspberry Pi using the graphical user interface (GUI) is a straightforward process that can be done in a few easy steps.
In the recent version of Raspbian, you can go to the settings, look for Display and Orientation. There you can select the desired orientation. Here is a step-by-step guide on how to do it:
1. Log in to your Raspberry Pi and open the main menu.
2. Next, click on preferences –> Screen configuration.
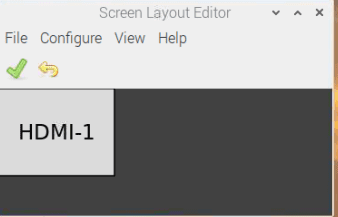
3. After clicking the screen configuration, a screen config window will pop up.

Configuration window
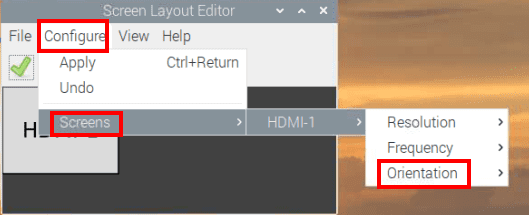
4. Click on “configure” then ‘screens’ to choose the desired rotating display from the connected displays list.
5. Click on the “Orientation” drop-down menu and select the desired rotation.

orientation
6. You can choose from “Normal,” “right,” “inverted,” or “left.”
7. Check the ‘apply’ for the system to apply the changes.
8. The screen will be rotated to the selected orientation.
9. You can also experiment with different or all rotation settings and find the one that works best for you.
Note: Some applications may not adapt to the rotation automatically; in such cases, you may have to adjust the settings of those applications to display correctly. Also, depending on the version of your Raspberry Pi, the settings location may vary, but the steps should be similar.
Method two: Using Command Line Interface(CLI).
You can also use the command line to rotate the screen in Raspberry pi. Contrary to the Raspberry Pi 3 and 2, the Raspberry Pi 4 has an updated video driver, so turning the screen using the boot configuration method is impossible. In this case, open a terminal and type the following command, changing it to the desired rotation;
DISPLAY=:0 xrandr --output HDMI-1 --rotate right
DISPLAY=:0 xrandr --output HDMI-1 --rotate left
DISPLAY=:0 xrandr --output HDMI-1 --rotate inverted
DISPLAY=:0 xrandr --output HDMI-1 --rotate normal
The ‘rotate right’ code will rotate your screen to the right. On the other hand, the ‘rotate left’ code will rotate your raspberry pi’s screen to the left. If you run the ‘rotate inverted’ code, your screen rotation will change to inverted. Once you are through with whatever you were doing or experimenting with, you can now run the xrandr rotate normal command to return your raspberry pi’s screen to normal.
What if You are Using a Raspberry Pi Touchscreen Display?
If you are using a raspberry pi touch screen display, the xrandr command will not work for you. You can use two methods to make this happen;
- Rotating screen by executing a command on the terminal.
- Rotating screen by editing the /boot/config.txt file.
1. Rotating screen by executing a command on the terminal.
The following are some of the commands you will need to execute to change the rotation of your raspberry pi touchscreen display;
- Rotate the screen to the left (90 degrees):
xinput set-prop ‘raspberrypi-ts’ ‘Coordinate Transformation Matrix’ 0 -1 1 1 0 0 0 0 1 - Rotate the screen to the right (90 degrees):
xinput set-prop ‘raspberrypi-ts’ ‘Coordinate Transformation Matrix’ 0 1 0 -1 0 1 0 0 1 - Invert the screen (180 degrees):
xinput set-prop ‘raspberrypi-ts’ ‘Coordinate Transformation Matrix’ -1 0 1 0 -1 1 0 0 1 - Rotate screen upright(normal):
xinput set-prop ‘raspberrypi-ts’ ‘Coordinate Transformation Matrix’ 1 0 0 0 1 0 0 0 1
2. Rotate the screen by editing the /boot/config.txt file.
To rotate the screen on a Raspberry Pi Touchscreen Display, you can follow these steps:
1. Open the terminal on your Raspberry Pi by clicking on the terminal icon in the taskbar or pressing Ctrl+Alt+T on your keyboard.
2. Type sudo nano /boot/config.txt and press Enter.
3. This will open the config.txt file in the nano text editor.
4. Scroll down to the bottom of the file and add one of the following lines depending on how you want to rotate the screen:
lcd_rotate=0" for no rotation
lcd_rotate=1" for a 270-degree rotation
lcd_rotate=2" for a 180-degree rotation
lcd_rotate=3" for a 90-degree rotation
5. Pressing Y will save changes, Enter will confirm the file name, and Ctrl+X will close the nano text editor.
6. Type sudo reboot in the terminal and press Enter. This will reboot your Raspberry Pi, and the changes you made to the config.txt file will take effect.
7. After the reboot, you should see your Raspberry Pi Touchscreen Display rotated according to the changes you made in the config.txt file.
8. Please note that the above steps require superuser privilege, and it’s recommended to have a backup of your config.txt file before making any changes.
Conclusion
Rotating the screen on a Raspberry Pi is a simple and easy process that can be accomplished in a few easy steps without much technical know-how, even by novice users. You can easily adjust a PIs screen orientation using the techniques covered above.
Whether using your Raspberry Pi as a desktop computer or as a part of a larger project, the ability to rotate the screen can significantly enhance the user experience. With the proper knowledge and tools, anyone can rotate the screen on their Raspberry Pi, making it even more versatile and powerful.
