
Whether you’re working on a complex project or just want to keep a copy of your system handy, cloning your Raspberry Pi SD card is the way to go. In this tutorial, we’ll learn how to clone a Raspberry Pi SD card, a crucial step for any maker or hobbyist looking to replicate their setup or create backups. With this guide, you’ll be able to clone your Raspberry Pi SD card quickly and easily, ensuring that your projects and data are safe and secure.
Let’s get started!
There are several reasons why someone might want to clone a Raspberry Pi SD card:
- Backup: Cloning the SD card allows you to back up your entire system, including the operating system, software, and files.
- Duplicating a setup: Cloning the SD card allows you to duplicate a particular setup on multiple Raspberry Pis quickly.
- Testing: Cloning the SD card allows you to test different configurations or software without affecting the current setup.
- Upgrading: Cloning the SD card allows you to upgrade to a larger SD card without losing your data or configuration.
- Distributing: Cloning the SD card allows you to spread your custom software/configurations to others without having them do the setup again.
Note: You can use different methods to connect to your Raspberry Pi. You can connect it to a monitor via the HDMI port and use it with a keyboard and mouse. You can access it via SSH or VNC. Please check out the posts below to learn more.
How to clone a Raspberry Pi SD card
This post will show several ways to clone a Raspberry Pi SD card. They include:
- Using the SD Card Copier application.
- Using the “dd” command.
- Using Win32imager application for Windows systems.
Method one: Using SD the Card Copier Application
To clone a Raspberry Pi SD card using an SD card copier, you will need the following:
- Raspberry Pi.
- The SD card you want to clone.
- A blank SD card or USB drive with at least the same capacity as the original.
Steps to clone the SD card:
- Connect the second USB drive or the SD card to your Raspberry.
- Next, launch the SD Card copier app by going to the main menu ->Accessories -> SD card copier.
- Open the Raspberry Pi Copier app and select the SD card you wish to clone.
- Choose the destination for the clone (e.g., a new SD card or USB drive).
- Click the “start” button to begin the cloning process.

SD card copier
The cloning process may take some time, depending on the size of the SD card and the speed of your computer processor. Please exercise patience. Once the cloning process is complete, properly eject the new SD card or USB drive, which you can insert into another Raspberry PI or store safely for future use if you need to restore data.
Tip: Always ensure you have a backup of your SD card data before proceeding with any cloning process, as there is always a risk of data loss. Additionally, make sure to use a good-quality SD Card reader to avoid errors while reading or writing on an SD card.
Method Two: Using the “dd” command.
Another effective and widely used method for cloning a storage drive is using a command line tool called “dd.” Popularly known as “Disk Dump” or “Disk Destroyer.” Here are the detailed directions for using this command line utility.
- Open a terminal window on your Raspberry Pi and execute the command below.
sudo fdisk -l
This command will list all devices present on your system. Including all the disks and partitions on your system. Unfortunately, this list can be long since this command will also list the loop devices. Therefore, scroll the list carefully to get the device you are looking for. For example, the default raspberry SD card uses the path
/dev/mmcblk0. - Look for the device name corresponding to the SD card (it will be something like “mmcblk0”). See the image below;
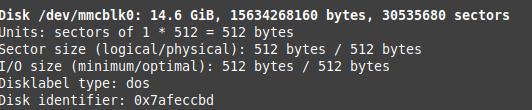
SD card
- Note that choosing the incorrect device name could result in data loss by overwriting the incorrect drive, so be careful when selecting it.
- Next, look for your destination- where you will be cloning your Raspberry Pi’s SD card. It could be a USB flash or another SD card. Usually, this is always named something like ‘
/dev/sdaor/dev/sdb‘. See the image below;
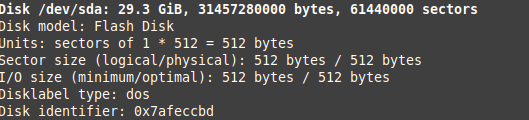
Destination-USB drive
- Next, Unmount the SD card by typing “
umount /dev/<device_name>” (device name of the SD card)in the terminal, replacing “<device_name>” (destination USB drive). In our case, it shall be/dev/mmcblk0‘ replacing it with ‘/dev/sda‘. - Type
sudo dd if=/dev/sda of=/dev/mmcblk0 status=progressin the terminal to execute theddcommand. - The purpose of
status=progressis to show you the progress of the entire cloning procedure - This command will also create an image of the whole SD card, including the partition table and all data, and save it in the current directory with the specified name.
- Wait for the
ddcommand to complete. Exercise a little patience because the procedure may take some time. Usually, the SD card size will determine how long this takes.
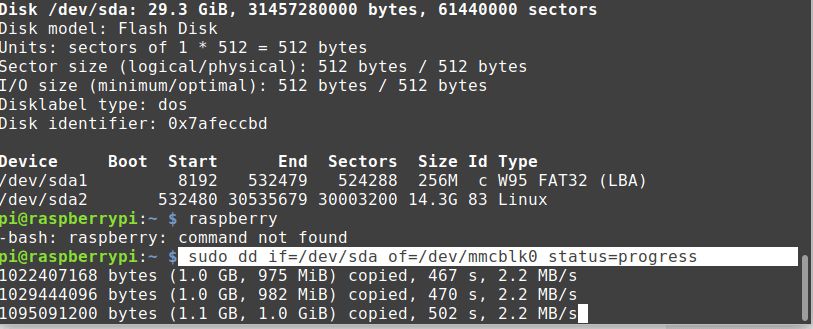
Cloning progress
- You can take the SD card out of your Raspberry Pi and boot it on another device after the “dd” command has finished.
Method Three: Win32imager Application (Windows Systems).
Cloning a Raspberry Pi SD card using Win32DiskImager on Windows is a simple process that can be done in a few easy steps. Here is how to do it:
- First, you must download and install Win32DiskImager on your Windows computer. The Win32imager official website has a link for downloading the software.
- Next, put the SD card you wish to clone into the SD card reader on your computer.
- Open Win32DiskImager, and choose the drive letter for the SD card from the drop-down menu.
- Click the folder icon to the right of the “Image File” field and select a location to save the image file.
- Give a name for the image file and add .img as the extension Click the “Read” button to start the cloning process.
- Depending on the size of your SD card, this could take a few minutes or several hours.
- Once complete, you should have an exact copy of your Raspberry Pi SD card saved as an image file on your computer.
- You can now use this image file to write to a new SD card using Win32DiskImager, to have an identical copy of your Raspberry Pi SD card.
Note: It’s essential to unmount the SD card and choose the right drive letter before writing. Otherwise, you may risk overwriting your hard drive.
Conclusion
As discussed above, you can agree that you can easily clone your Raspberry Pis SD card with enough expertise and knowledge. Using a tool such as Win32DiskImager or dd, you can easily create an exact copy of your Raspberry Pi’s SD card, including all its installed software and settings.
This can be especially useful when setting up multiple Raspberry Pis with the same configuration or upgrading your current Raspberry Pi to a newer model. Always back up your data before proceeding, and use a high-quality SD card with a fast write speed to ensure the best possible results. How do you clone your Raspberry Pi SD card?
3 comments
have you got if and of backways?
dd if=/dev/sda of=/dev/mmcblk0 status=progress
the given dd command doesn’t look right. if is the input file, of is the output. mmcblk0 is the source, and sda is the target. the explanation says to copy mmcblk0 to a sda so this sda can be used boot the raspberry
WARNING!!!
sudo dd if=/dev/sda of=/dev/mmcblk0 status=progress
Will actually copy your data from USB to your SD
If you want to backup your SD you should do the opposite
sudo dd if=/dev/mmcblk0 of=/dev/sda status=progress