
If you are reading this post, you have probably come across terms like Cryptocurrency, Bitcoin, Blockchain, Crypto mining, and many other jargons surrounding this new form of currency. You might have also heard of ways that you can profit from Crypto. Some of them include Crypto trading, hodling, and cryptocurrency mining. This post will focus on the latter – Crypto mining. However, before diving in much further, let’s do a short recap of some of these terms, as they will come quite often in this tutorial.
A recap on Cryptocurrency
Cryptocurrency is a digital asset like your dollars, except it runs fully digital. It doesn’t have a bank or any central entity that controls it hence why it’s referred to as decentralized. That is one of the main pros of cryptocurrency. FIAT currency (your usual dollars, euros, etc.) is controlled by Banks and governments. Without banks, it would not be easy to make payments, challenging to create credit, and challenging to create money.
As of writing this post, they are thousands of cryptocurrencies available on different exchange sites. Some of the most popular ones include Bitcoin, Ethereum, Tether, Binance Coin, Monero, Solana, etc. However, we will only focus on the most profitable ones to mine.
What’s Cryptocurrency Mining?
To understand mining, let’s look at how Bitcoin mining is done. You may ask yourself, “where do Bitcoins come from ?” Bitcoins aren’t printed out like traditional money; they are mined out of the system. A miner is just a person with a computer running a mining program.
Like real-world mining, you need to invest energy to extract these Bitcoins. These mining computers need to solve complex mathematical problems, and once it solves them, new Bitcoins are generated and awarded. But miners don’t just generate new Bitcoins. They also use their computers to verify transactions and prevent fraud. So more miners mean faster transaction verifications and less fraud. That’s why we want to compensate miners for their hard work. When verifying a transaction, the miner gets a small fee out of that transaction for his work.
So Miners get paid twice:
- Verifying the transactions
- When they successfully generate new Bitcoins.
Monero Coin (XMR)
Monero logo
Monero is considered the King of privacy in the Crypto world. Created in 2014, Monero is one of the easiest Cryptocurrencies that you can mine with your Raspberry Pi. Of course, you can mine other coins like Bitcoin, but there are many powerful miners currently that even mining Bitcoin with a standard PC might not yield any profits. What about the Pi? It would be much worse.
This post will guide you into mining Mobero with a Raspberry Pi.
Project requirements
- A Raspberry Pi board. We highly recommend using Raspberry Pi 4. The higher amount of memory (RAM), the better.
- A reliable internet connection. We recommend using Ethernet instead of a wireless connection (WIFI).
- Reliable power supply
- At least 8 GB Micro SD Card
- A cooling system. We highly recommend installing fans and heat sinks.
- Setup the Raspberry Pi
Unlike most other Pi projects that we have carried out, with this one, we will try to minimize the use of resource-intensive applications so that we can focus all the processing power on mining Monero. We will not use the official Raspberry Pi OS, which comes with a graphical desktop interface that uses more system resources. Instead, we will use Raspbian Pi Stretch. You can download the OS from the link below.
This distribution doesn’t come with a Desktop Environment installed. That saves us a lot of processing power that would have gone to render the graphics. We will access the Pi via command-line using SSH. To flash the OS on the SD card, we will use Balena Etcher.
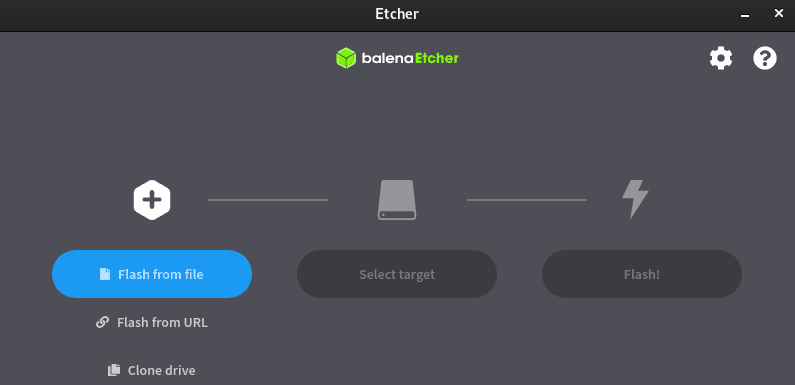
Balena Etcher
Follow the steps below to burn the Raspbian Stretch image on the SD card.
- Click “Flash from file” to select the downloaded image file.
- Click “Select target” and select the target SD card.
- Click “Flash!” to start writing the image to the SD card.
When done, don’t eject the SD card from your PC first; there is one more thing we need to do – enable SSH. To do so, create an empty file called “ssh” on the boot partition. We highly recommend looking at our post – “Connecting to Wi-Fi & Enabling SSH Without Monitor on Raspberry Pi.”
Create a Minergate account
Minergate is a multi-currency mining pool famous for mining coins like Ethereum, Monero, Zcash, and many other altcoins. Before diving further, let’s understand mining pools and how they work.
In plain English, mining pools can be envisioned as a team digging/ mining actual gold. The more people dig together, the more likely they will find gold. This gold is then shared among the miners based on every miner’s effort. On the contrary, solo mining would be just one individual digging, dramatically reducing their chances of finding gold. However, if that individual finds the gold, he will keep the entire amount to himself.
Using mining pools is one of the most recommended mining methods, especially for beginners who are still trying to get their hands on some of the most powerful crypto mining equipment. For this post, we will use Miner Gate. Head over to their official website and create an account.
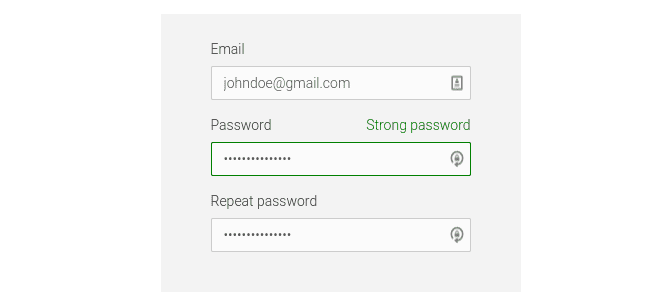
Minergate Account
Check your mail for the verification email and log in. Click on the “Mining Pools” dropdown menu at the top and select “Monero XMR,” which is the coin we will be mining. Scroll to the bottom of the page until you see a section similar to the image below.
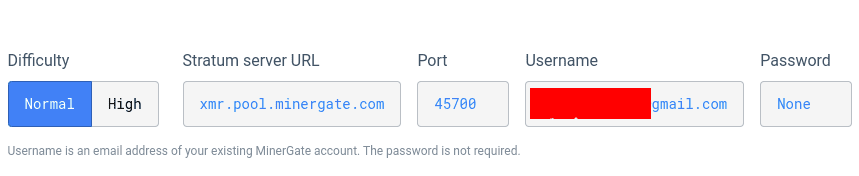
Mining Pool
Note this information as you will need it when setting up the miner on the Raspberry Pi.
Install the Monero Miner on the Raspberry Pi
As stated above, we will use Raspberry Pi Stretch for this project. It doesn’t come with a graphical interface, thus saving us a great deal of processing speed. We will access the Pi on our PC via SSH. First, update the system by executing the two commands below.
sudo apt update
sudo apt upgrade
The miner that we will use for this post is the “cpuminer-multi tool” from Tanguy Pruvot. You can check out the source code on their GitHub page.
Use the command below to install all the dependencies required to build and compile the miner on our system.
sudo apt install git automake autoconf libcurl4-openssl-dev libjansson-dev libssl-dev libgmp-dev
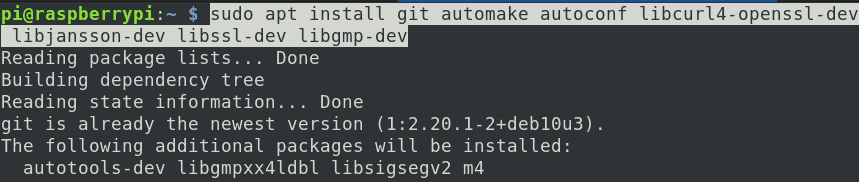
Install dependencies
If the process completes successfully, we can now proceed to clone the cpuminer repository on our system. Execute the command below.
sudo git clone https://github.com/tpruvot/cpuminer-multi

Clone cpuminer repository
When you run the ls command, you should see a new directory called “cpuminer-multi.” Navigate to this new directory and execute the commands below to install the Miner.
cd cpuminer-multi
sudo ./autogen.sh
sudo ./configure
sudo ./build.sh
This last command might take quite a while to execute. Please be patient.

Build Miner
If the process completes without any errors, the miner is successfully installed on your system. You can now proceed to the next step -Mining Monero XMR.
Get started with mining Monero
This miner comes with all the scripts to do your dirty work. We will use the command below to get started with the mining process.
./cpuminer -a cryptonight -o stratum+tcp://xmr.pool.minergate.com:45700 -u YOUR_EMAIL
Note: You should execute this command inside the folder that you cloned. Remember to replace “YOUR_EMAIL” with the email you used to create an account on Minergate.
After a while, you should start seeing figures similar to the image below.
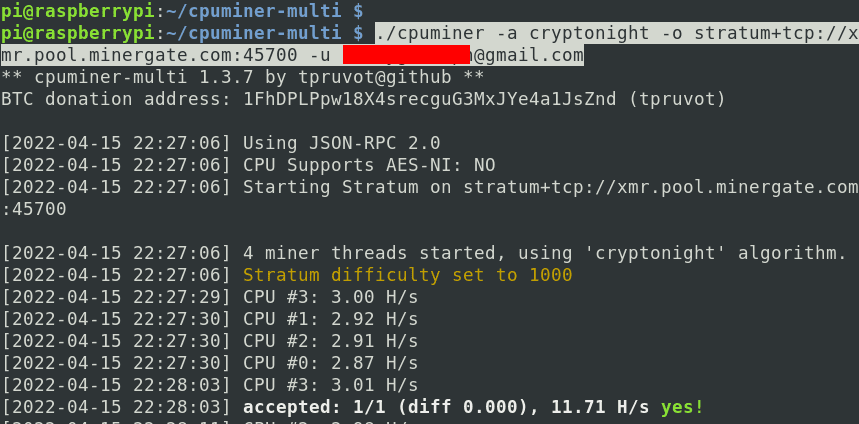
Mine Monero
The hash rate for the four processors is around 2.80 H/s. That is much lower than the high-end GPU miners that do up to 70,000 H/s. Luckily, the Raspberry Pi doesn’t consume much power like these powerful miners.
Head to the Minergate official website and select Dashboard from the main menu to monitor the mining process. Scroll down up to the coin which you are mining. In our case, it’s Monero XMR. You should see the status reading as “ONLINE.” You will also see the total amount of coins you have mined.
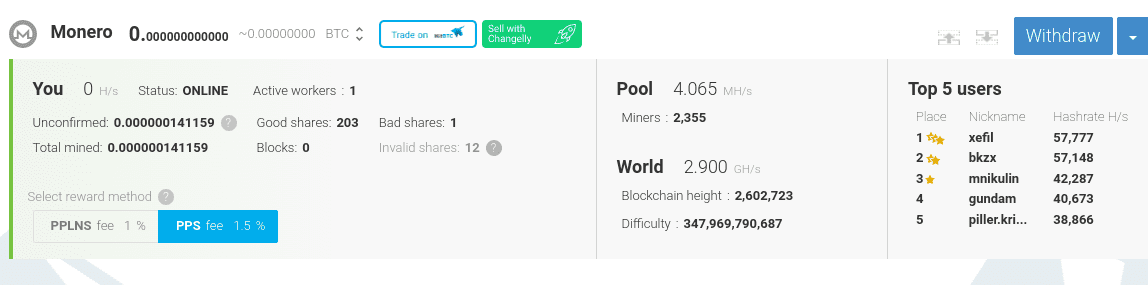
Monero Mining
Final thoughts on mining Crypto with the Raspberry Pi
Up to this point, I believe you are more than excited to watch the coins accumulating on your Minergate account. However, let’s pause that and go back to reality. Is it worth it? Does mining crypto with a Raspberry Pi yield profits? We will use a profit calculator that uses the hash power and power consumption to estimate the profits to answer that question.
Let’s assume the total Hash power of our Raspberry Pi is 3.02 H/s, the power consumption is 1.9w, and the pool fee is 1%. When we feed this information into the profit calculator, we see that we are making a loss.
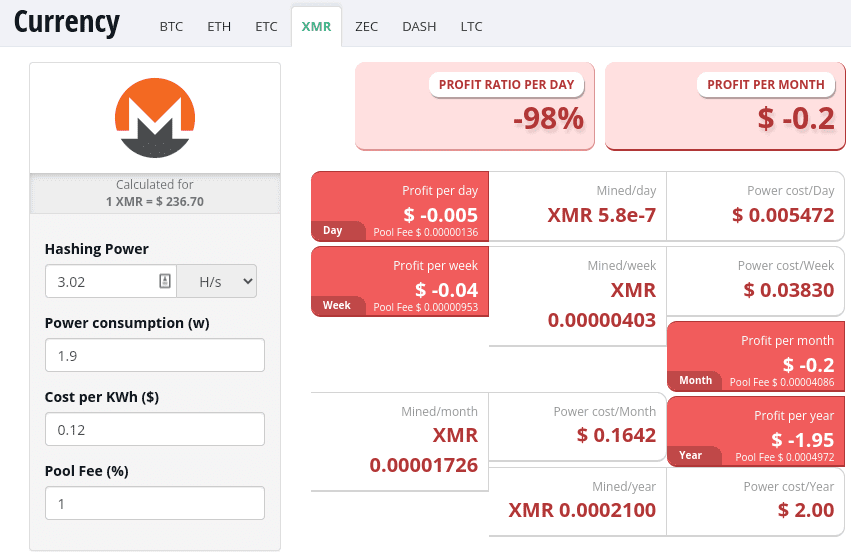
Profit Calculator
However, I believe you have had a fantastic experience with the whole cryptocurrency mining stuff, and you can now proceed safely to try out using much more powerful miners. You can also try mining other coins like Bitcoin, Dogecoin, etc., with your Pi and share your experience with our readers in the comments below.