
DietPi is a lightweight and optimized operating system designed for single-board computers. It offers a wide range of features and customization options, making it an ideal choice for hobbyists, developers, and enthusiasts. However, setting up and configuring a DietPi system can be challenging for beginners. That’s where the DietPi-Config tool comes in. This user-friendly tool simplifies the setup and customization process of a DietPi system, making it accessible to users of all skill levels.
In this comprehensive guide, we’ll walk you through how to get started with DietPi and the DietPi-Config tool. We’ll cover various aspects of the tool, including setting up WiFi and network connections, configuring the hardware and software, and optimizing the system’s performance. By the end of this article, you’ll be able to create a customized and efficient system that’s tailored to your specific needs and preferences.
This post will give you a comprehensive guide on getting started with DietPi on your Raspberry Pi and using the Dietpi-Config Tool.
Setup Diet-Pi on Raspberry Pi
Follow the steps below to install Diet-Pi on your Raspberry Pi 4.
1. Navigate to the official DietPi website (https://dietpi.com/) and download the Diet-Pi installation file.
Note: Diet-Pi is available for a range of Single Board Computers (SBCs), including Raspberry Pi, Odroid, PINE64, Radxa, Allo, ASUS, NanoPi, and Orange Pi. Carefully select the image for your exact Raspberry Pi Board.
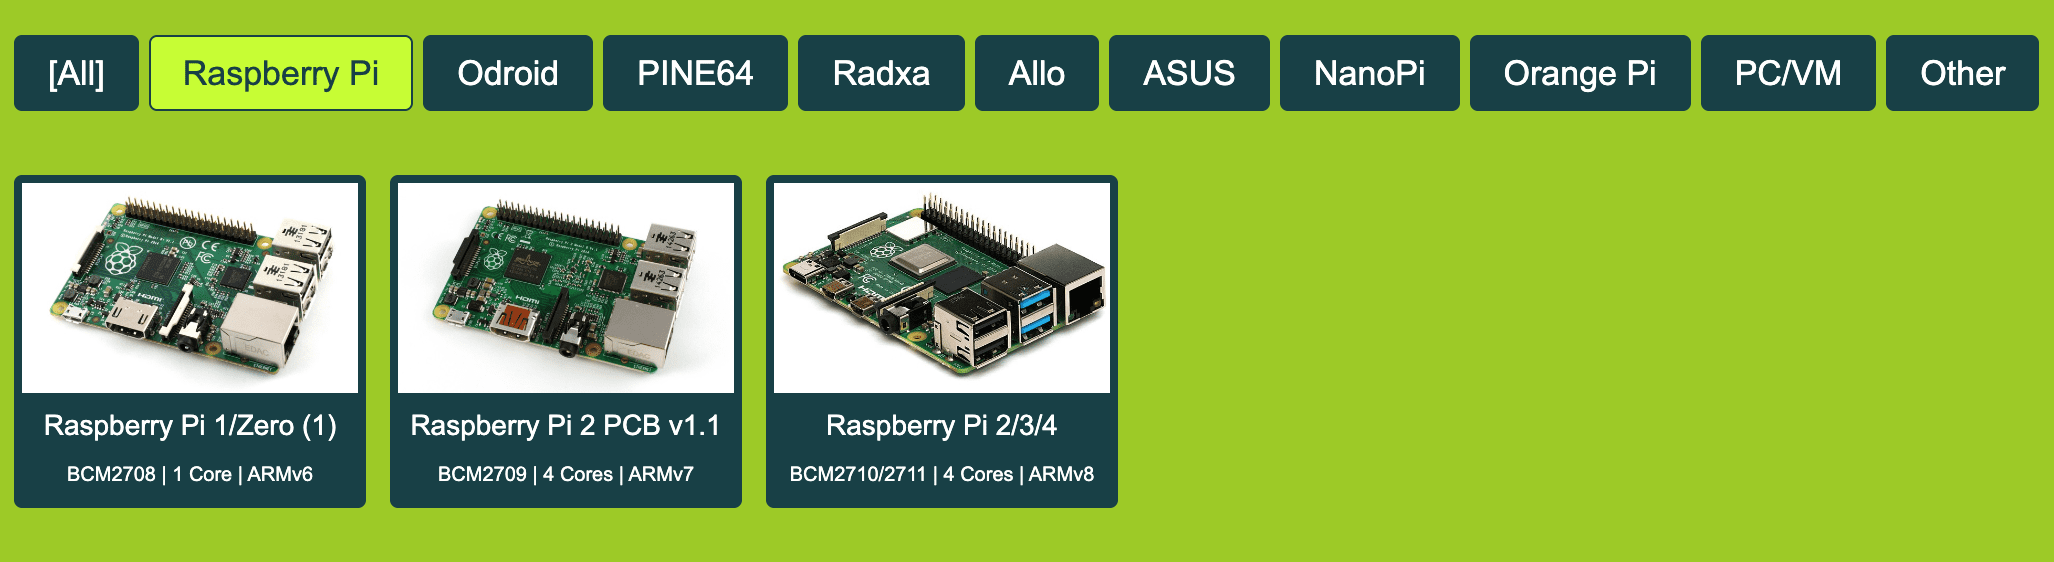
Download Diet-Pi
2. You need to write (flash) this image onto the SD Card. There are several tools that you can use to do that. They include Rufus, Balena Etcher, and PowerISO. This post recommends using Balena Etcher. You can download Balena Etcher from their official website (https://www.balena.io/etcher).
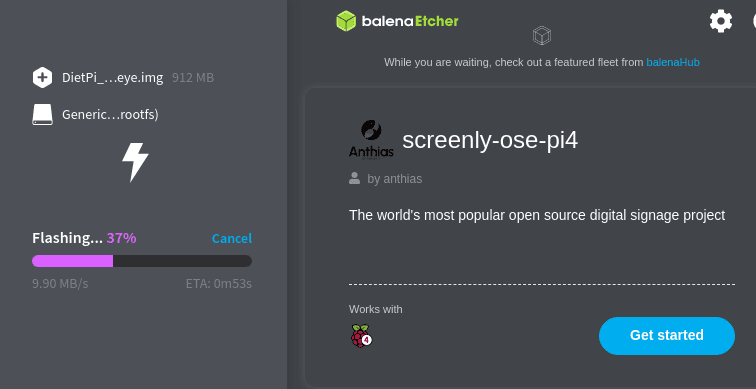
Flashing DietPi
3. Once the flashing process is complete, remove the SD card from the computer and insert it into the Raspberry Pi.
4. Connect your Raspberry Pi to a display, keyboard, power source, and any other necessary peripherals, and then power it on.
Install Diet-Pi on Raspberry Pi
You will see several screen prompts like enabling/ disabling the Serial/ UART console, changing the login password for “root” and “dietpi” users, changing the global software password for Diet-Pi software installs, etc. You can check out more information about this process in our post – How to set up Dietpi for the Raspberry Pi.
The last screen before installation is the “Dietpi-Software” screen which contains several options, including “Browser software,” “Dietpi-Config,” “Install,” and “Uninstall” options.

DietPi customization
This post is much more focused on the DietPi-Config option. However, you can still access the DietPi-Config after fully installing Diet-Pi on your system.
Using the DietPi-Config Utility
After successfully installing DietPi on the Raspberry, you will see the DietPi XFCE Desktop on your monitor or VNC, as shown in the image below.
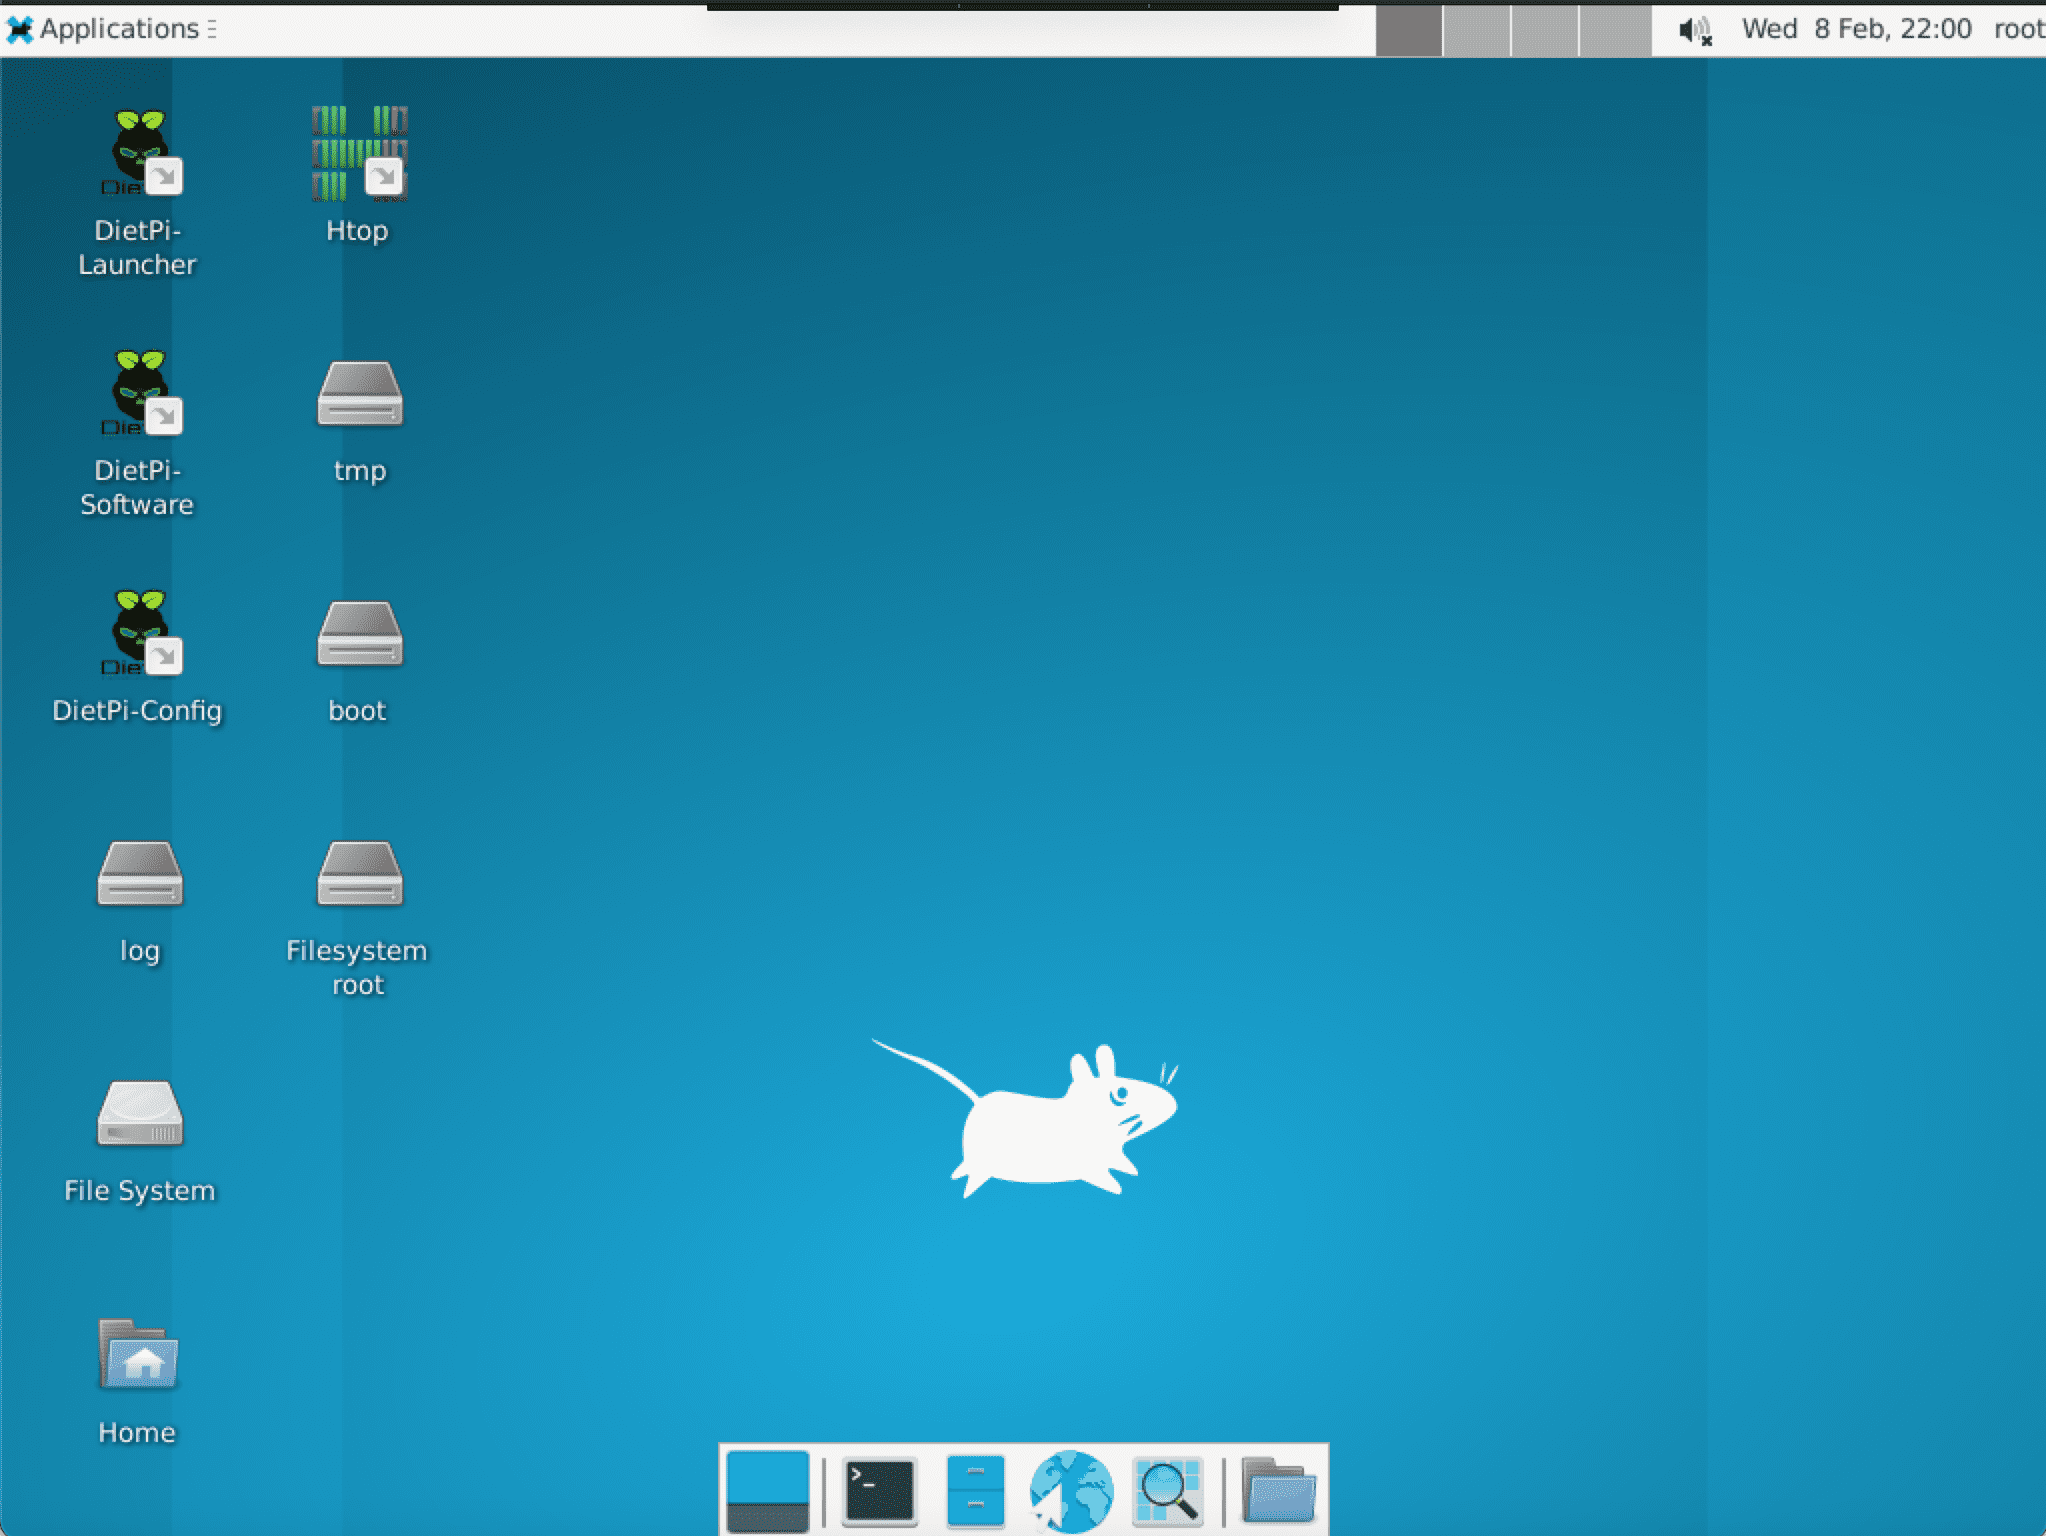
DietPi XFCE Desktop
You will see several Application shortcuts on the Desktop, including the “DietPi-Config” application.
DietPi-Config is a command-line utility that enables users to manage various system configurations on the DietPi system. Think of it like the Raspberry Pi configuration tool that you launch using the command – sudo raspi-config. The purpose of DietPi-Config is to allow users to easily and quickly configure their Raspberry Pi system to their specific needs and preferences without manually editing configuration files or using the command line.
To launch the DietPi-Config screen, double-click the “DietPi-Config” shortcut on the Desktop or launch the Terminal and execute the command below.
sudo dietpi-config
A terminal screen will open, similar to the image below.
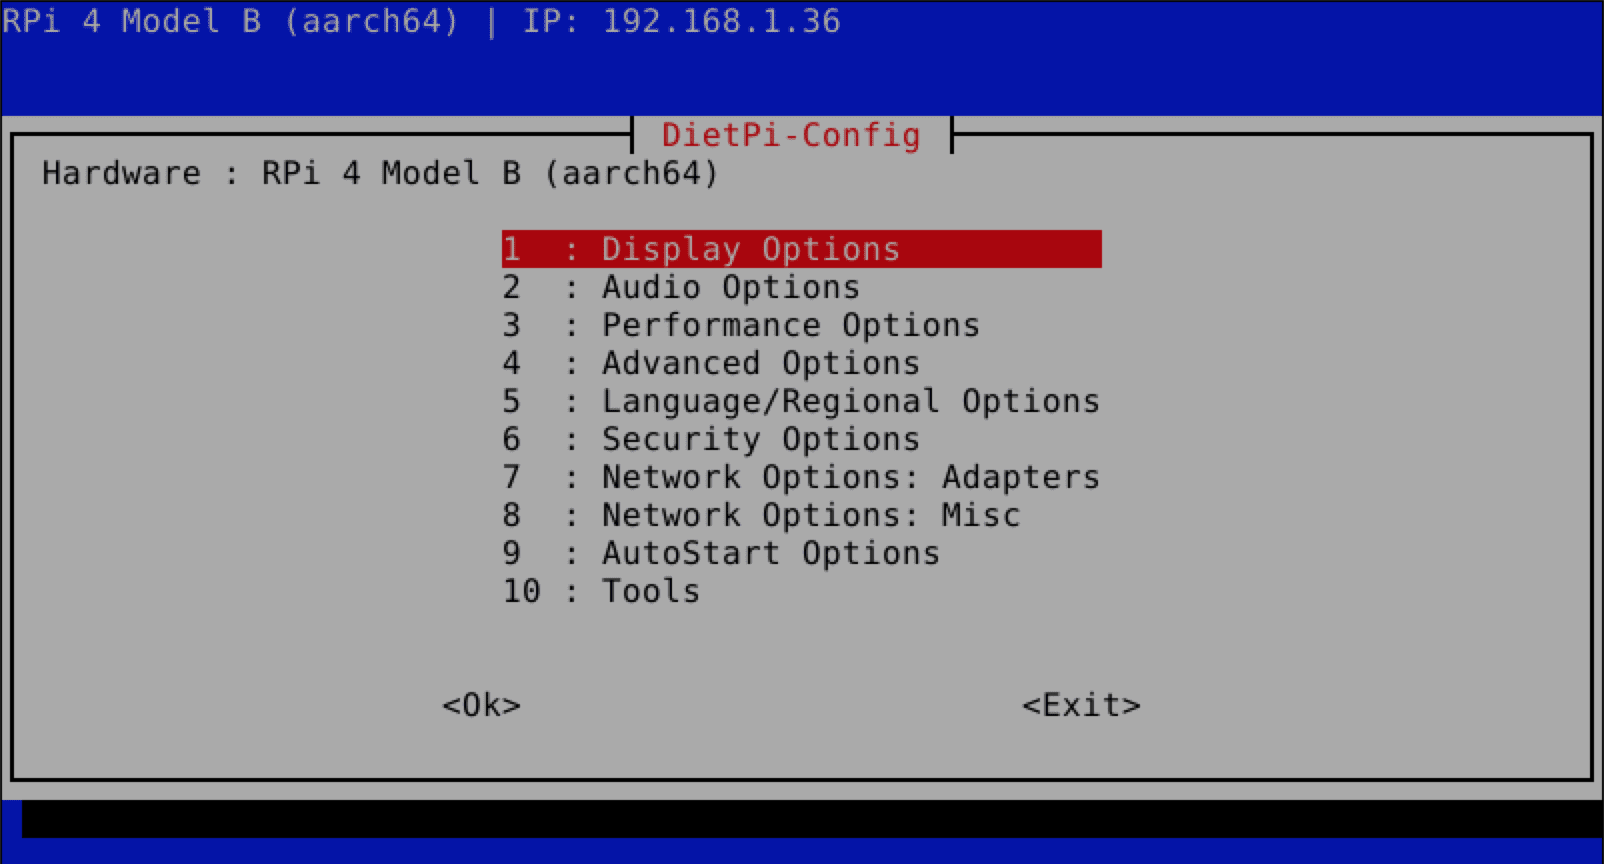
Dietpi-Config
Let’s look at every option listed in the DietPi-Config window.
1. Display Options
The first option on the DietPi-Config screen is the “Display options.” This option comes with various settings for configuring the display settings for your DietPi system.
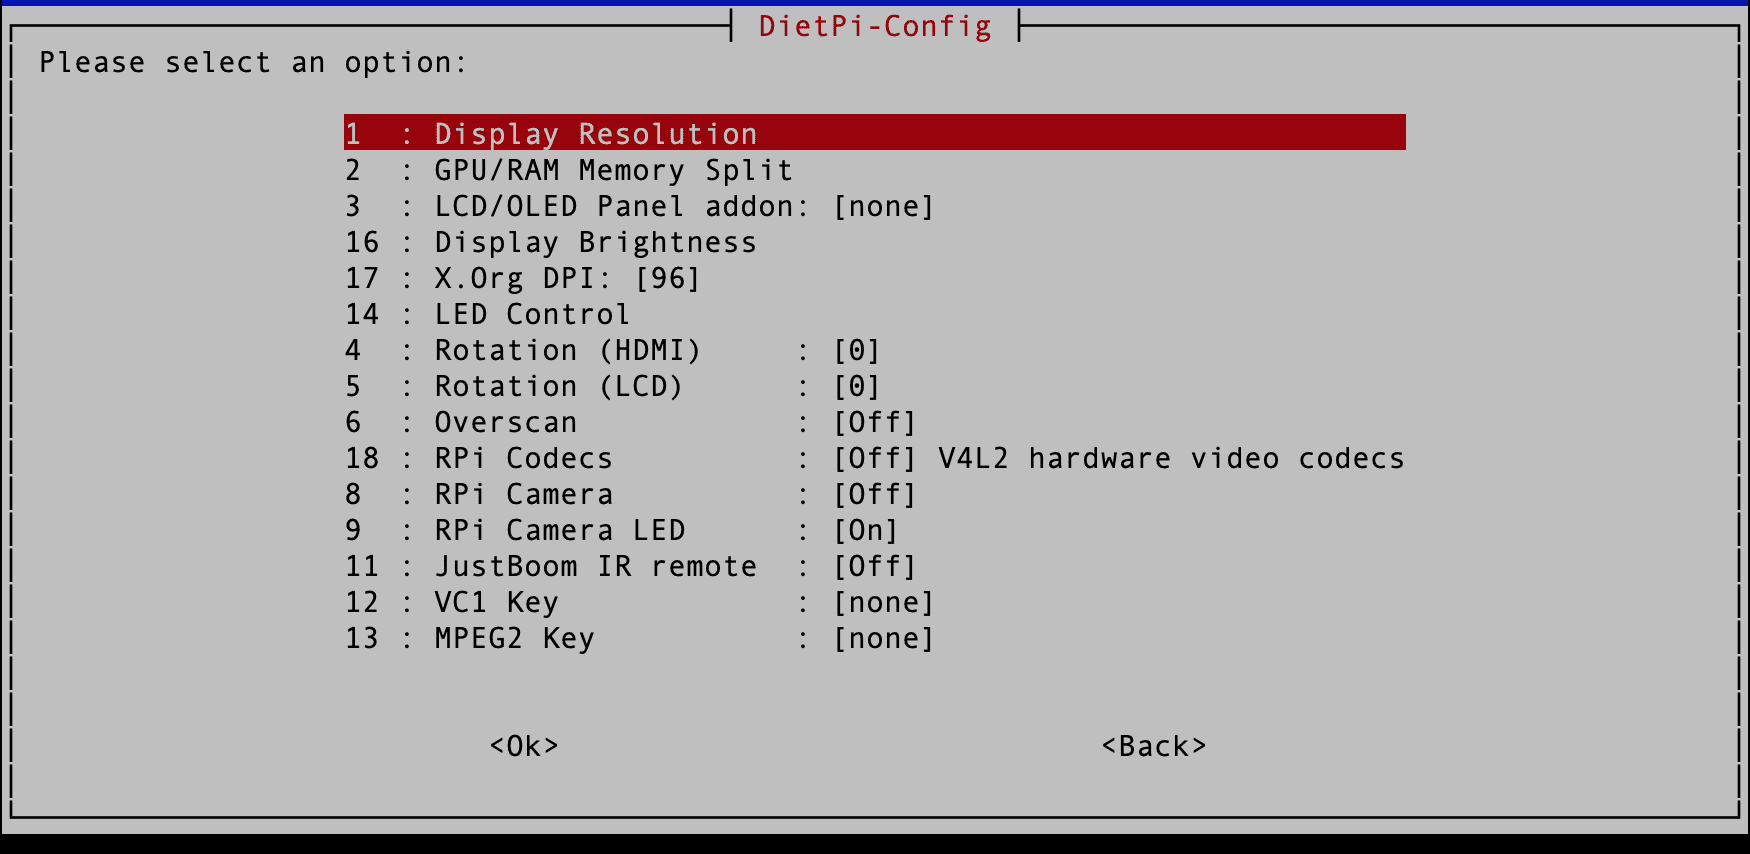
DietPi-Config Display Options
Let’s look at all the settings available under the “Display Options” and their functions on your system.
Display Resolution: As the name suggests, this option enables you those the display resolution for your Raspberry Pi Desktop display. Whether using an HDMI monitor, Rasberry Pi Touch screen display, or VNC viewer. You can choose various resolutions, including 720p, 1080p, and others. However, the screen resolution settings can vary from one Raspberry Pi board to another.
GPU/RAM Memory Split: This option allows you to specify the amount of memory or RAM assigned to the GPU and CPU. For example, if you wanted to handle a task that requires enhanced mathematical computation capability, you would give more memory to the GPU.
LCD/OLED Panel Addon: This option specifies an LCD or OLED panel connected to the Raspberry Pi.
Display Brightness: This option is used to adjust the brightness of your Desktop display. You don’t need to adjust the screen brightness if you access DIetPi from the command line (SSH).
X.Org DPI: This option is mainly used to fine-tune the text size and other elements by setting the DPI (dots per inch) for your Raspberry Pi’s display output.
LED Control: This option allows you to control the behavior of the LED lights on your Raspberry Pi.
Rotation (HDMI): This option allows users to rotate the display output from the Raspberry Pi to match the orientation of the display device. In this case, it is the HDMI display monitor. You can choose various rotation angles, including 90 degrees, 180 degrees, 270 degrees, vertical flip, and horizontal flip. By default, this option is set to disable.
Rotation (LCD): This option is similar to the Rotation (HDMI) option, but it is precisely for LCDs attached to the Raspberry Pi.
Overscan: Overscan is a feature on the Raspberry Pi that refers to the process of displaying a portion of the image that extends beyond the edges of the screen.
2. Audio Options
The “Audio Options” in DietPi-Config allows users to configure and manage the audio settings on their Raspberry Pi running DietPi. This section provides options for setting the audio output device, adjusting volume levels, enabling or disabling audio services, and more. Some of the key options that may be found under “Audio Options” include:
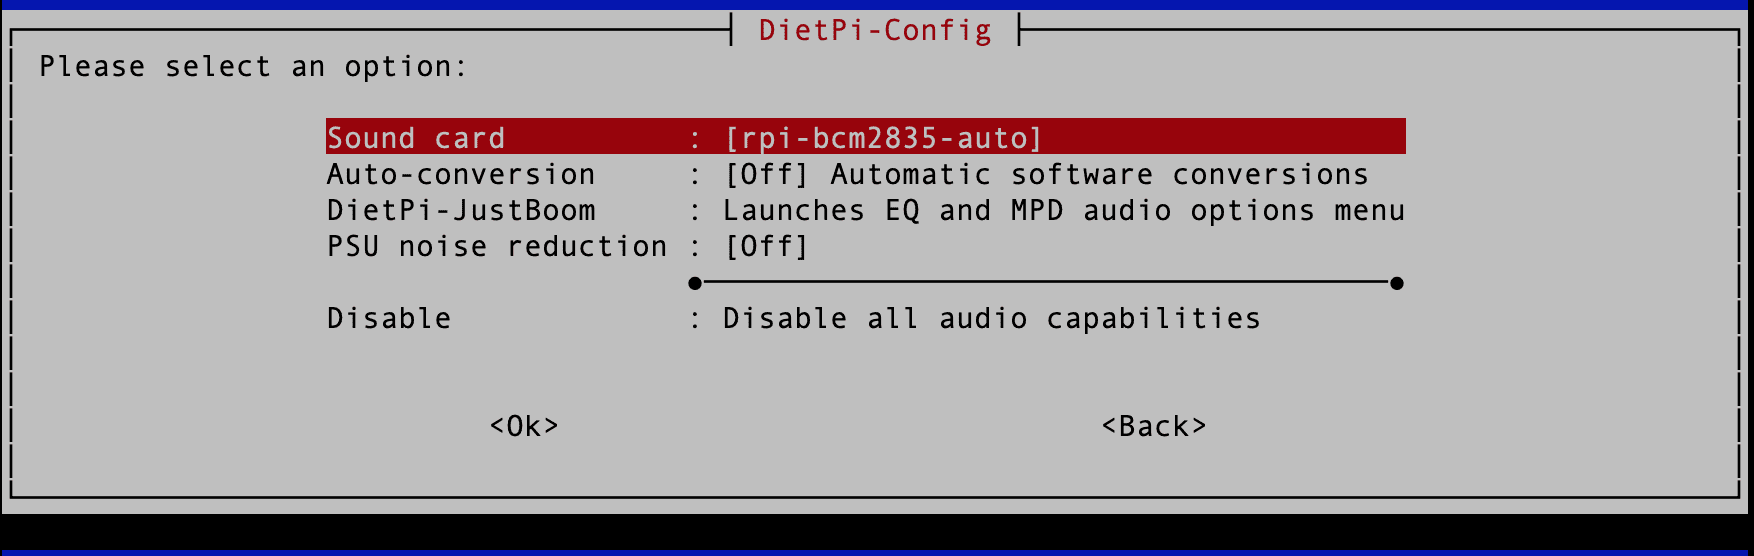
DietPi Audio Options
Sound card: This option allows the user to select the audio output device they want to use. For example, the default option is “rpi-bcm2835-auto”, which uses the built-in audio hardware of the Raspberry Pi.
Auto-conversion: This option allows the user to enable or disable automatic software conversions. This feature can be helpful to ensure that the audio output is compatible with the selected audio output device.
DietPi-JustBoom: This option opens up the audio options menu specifically for the JustBoom audio add-on board.
PSU noise reduction: This option allows the user to turn a power supply noise reduction feature on or off. This can be useful in reducing audio noise in certain situations.
Disable: This option allows the user to disable all audio capabilities altogether. This might be useful if the user does not require audio output or wants to conserve system resources.
3. Performance Options
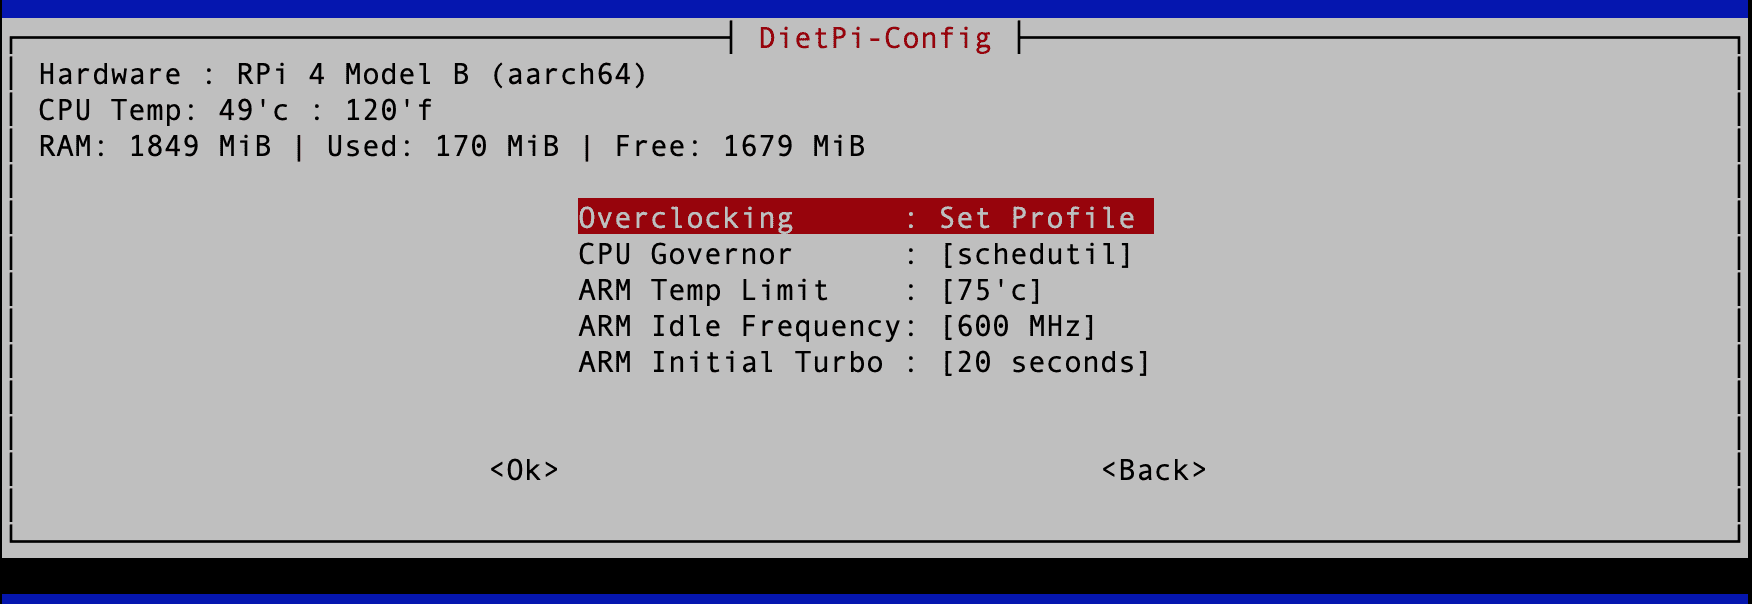
The “Performance Options” in DietPi-Config are a set of options that allow users to optimize the performance of their Raspberry Pi. These options can be used to configure various system settings to improve the device’s speed, responsiveness, and overall performance.
Performance Options
Some of the options that may be included in this section include:
Overclocking: This option allows you to set a specific overclocking profile for your Raspberry Pi, providing improved performance at the cost of increased power consumption and heat output.
CPU Governor: The CPU governor controls the frequency at which the CPU operates. The available options determine the behavior of the governor. For example, the “schedule” governor will dynamically adjust the frequency based on the current CPU utilization.
ARM Temp Limit: This option sets the maximum temperature at which the Raspberry Pi will operate before throttling to prevent overheating.
ARM Idle Frequency: This option sets the frequency at which the CPU operates when idle.
ARM Initial Turbo: This option sets the duration for which the Raspberry Pi will operate at the maximum frequency after booting.
4. Advanced Options
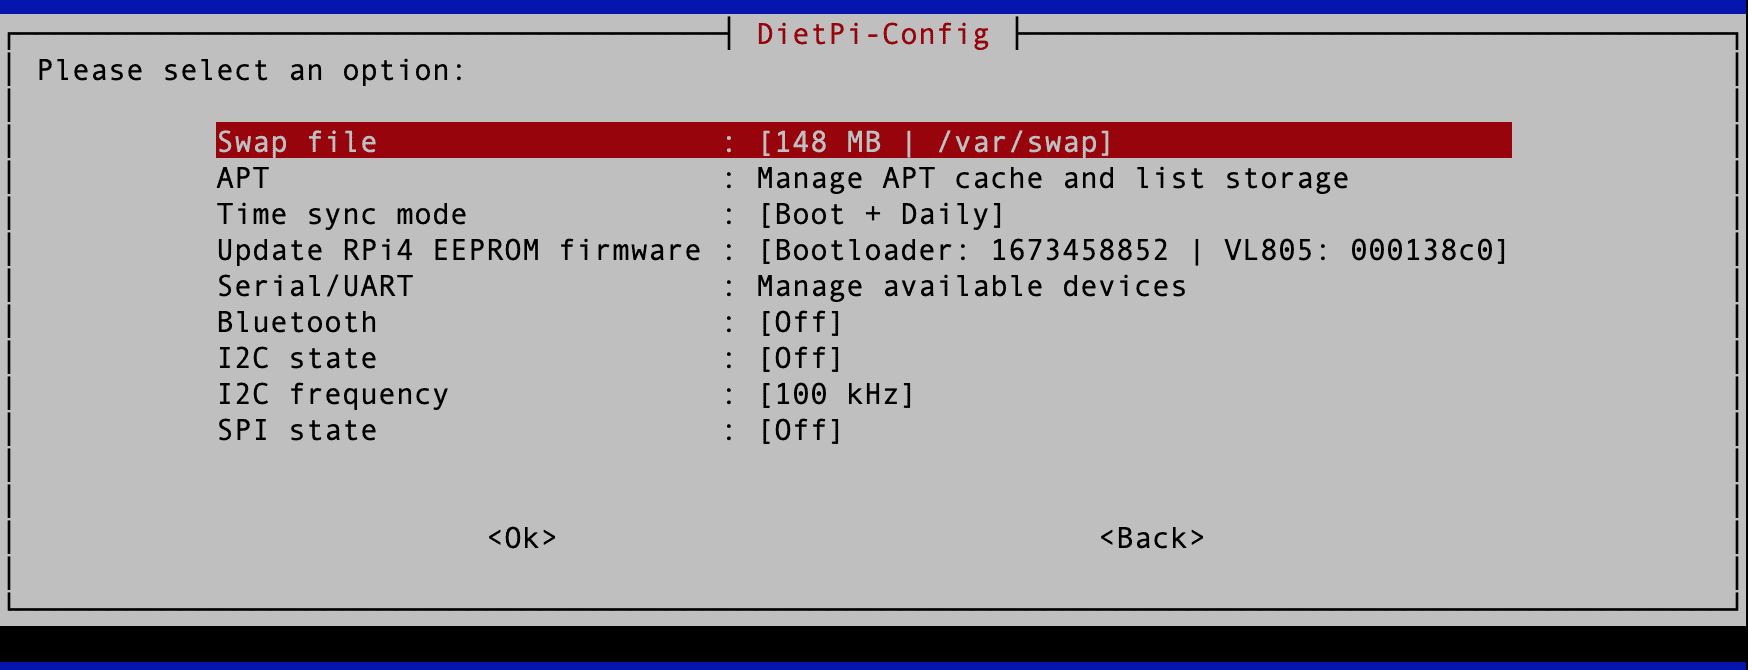
The “Advanced Options” in DietPi-Config allows users to access and configure more advanced settings and features in DietPi. This option includes a variety of settings that can be used to fine-tune the system, such as:
Advanced Options
Swap file: This option allows you to manage the swap file on your Raspberry Pi. When the RAM is full, a swap file is used as virtual memory, which helps prevent your system from crashing. You can change the size of the swap file or turn it off entirely.
APT: This option lets you manage the Advanced Packaging Tool (APT) cache and list storage. The APT cache stores downloaded packages, which can take up a lot of disk space. You can choose to clean up the cache or manage the amount of disk space used for the cache.
Time sync mode lets you manage the time synchronization on your Raspberry Pi. You can choose to synchronize the time at boot-up and daily or disable time synchronization.
Update RPi4 EEPROM firmware: This option allows you to update the firmware of the EEPROM chip on the Raspberry Pi 4. The EEPROM chip controls the boot process and other low-level functions.
Serial/UART: This option allows you to manage the serial and UART devices on your Raspberry Pi. You can enable or disable these devices, depending on your needs.
Bluetooth: This option allows you to enable or disable the Bluetooth capability on your Raspberry Pi.
I2C state: This option allows you to enable or disable the Inter-Integrated Circuit (I2C) bus on your Raspberry Pi.
I2C frequency: This option allows you to set the frequency of the I2C bus on your Raspberry Pi.
SPI state: This option allows you to enable or disable the Serial Peripheral Interface (SPI) bus on your Raspberry Pi.
5. Language/Regional Options
The “Language/Regional Options” in DietPi-Config is a set of settings that allows you to configure the language and regional settings of your Raspberry Pi. This option lets you choose your preferred language, keyboard layout, time zone, and locale settings.
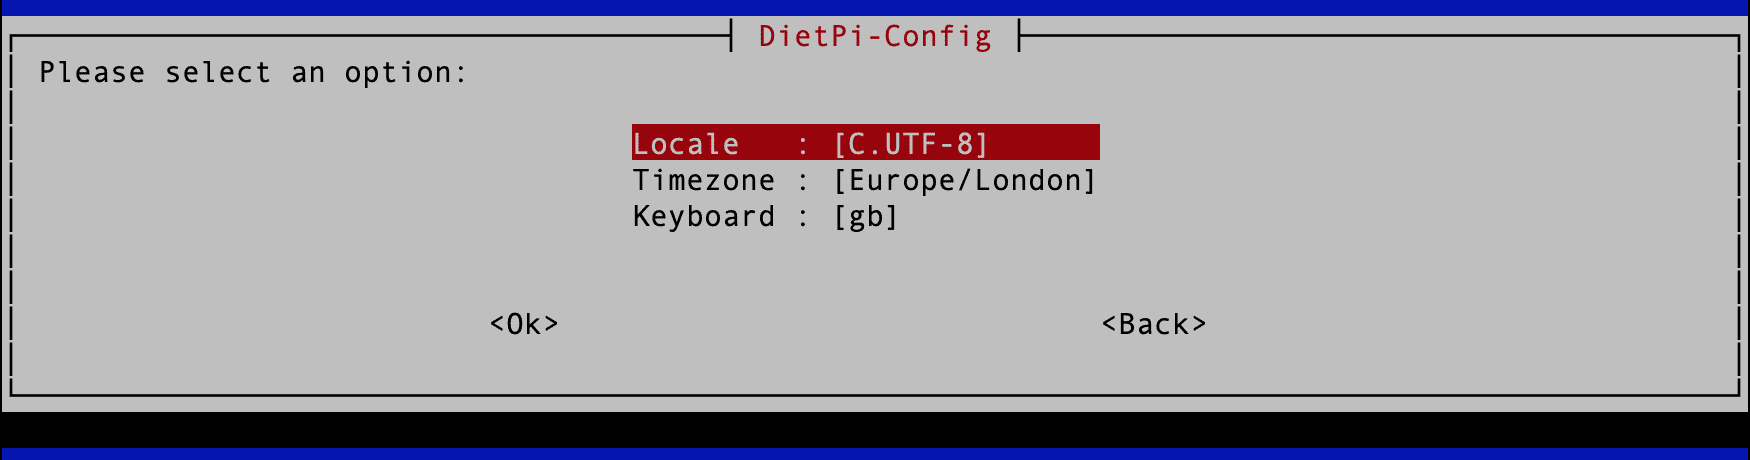
Language – Regional Options
By setting the language and regional options, you can ensure that the system display and user interface elements, such as the date and time formats, are consistent with your expectations. This can make it easier for you to use your Raspberry Pi and its applications, especially if you are unfamiliar with the default settings.
6. Security Options
The “Security Options” in DietPi-Config is a set of settings that can be used to enhance the security of your Raspberry Pi system.
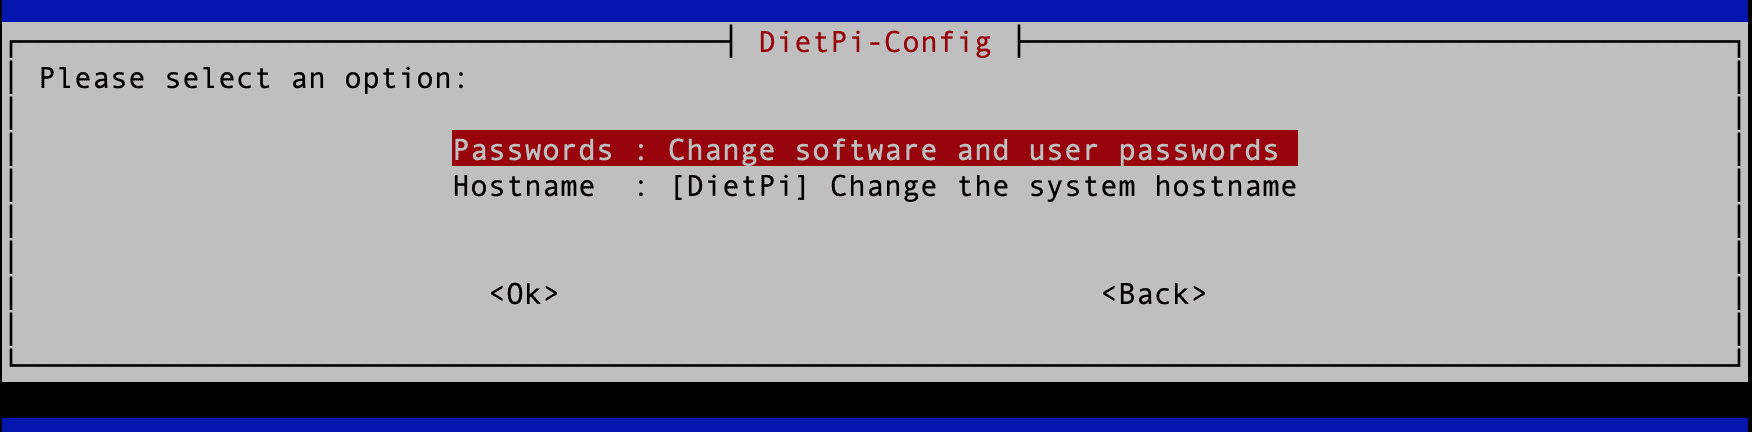
Security Options
- Passwords: This option allows you to change the passwords for both the software and the user on the Raspberry Pi. It is a security measure that ensures that only authorized users can access the system.
- Hostname: This option allows you to change the system hostname. The hostname is the name assigned to a device on a network and is used to identify the device on the network. By default, the hostname is set to “DietPi.” Changing the hostname can be helpful in a network with multiple devices to help identify the specific device you want to access.
7. Network Options: Adapters
The “Network Options: Adapters” option in DietPi-Config manages network adapters and connections on a Raspberry Pi. This option allows you to configure the settings for Ethernet and Wi-Fi adapters and choose the adapter you want to use for connecting to the internet.
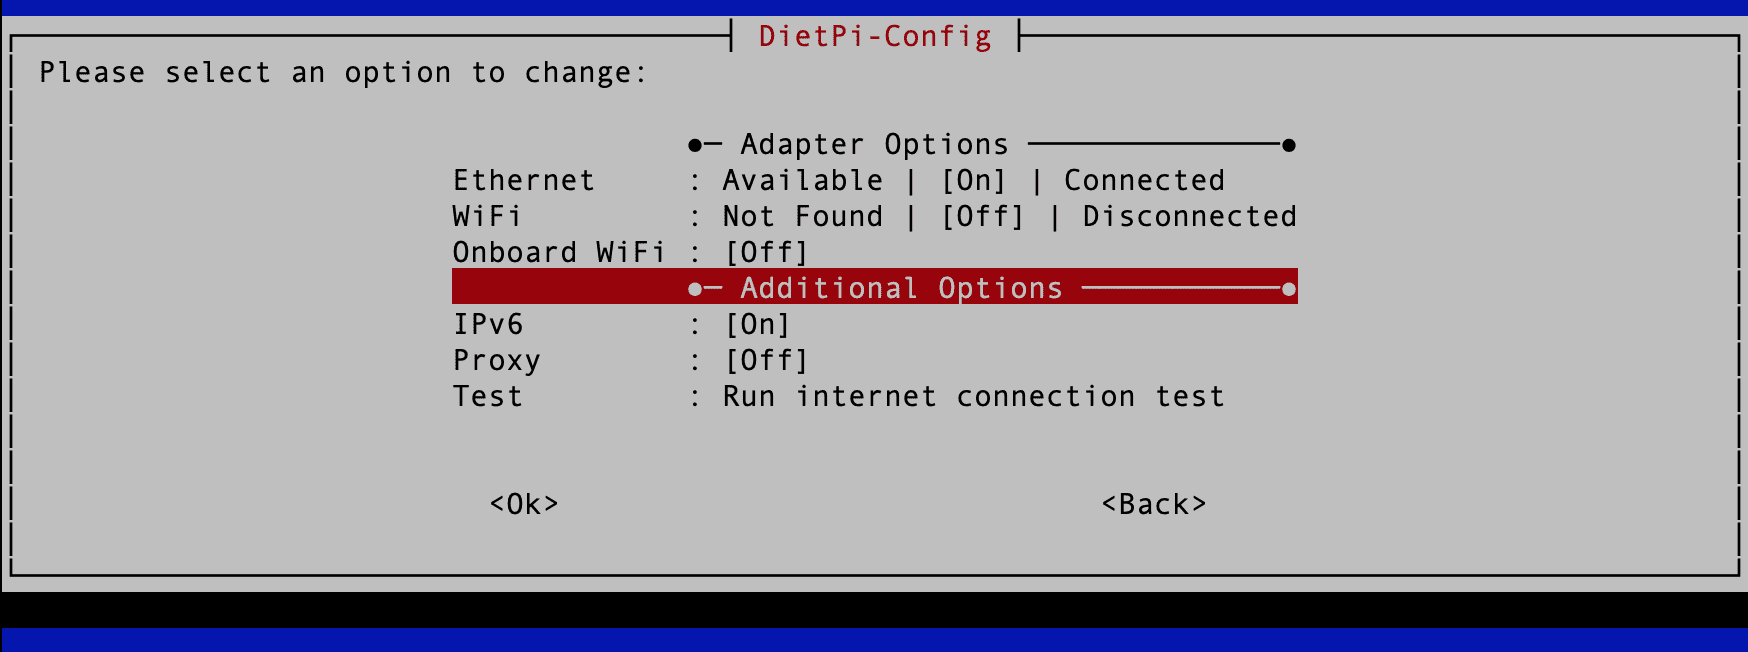
Network Options
You can use this option to enable or disable adapters, set the IP address and other network settings for each adapter, and configure settings for DHCP or static IP addresses. Additionally, you can manage the settings for Wi-Fi networks, including selecting the network you want to connect to, setting the password, and configuring advanced settings like the encryption type and network mode.
8. AutoStart Options
The “AutoStart Options” in DietPi-Config allow you to set up software applications and services to start when the Raspberry Pi boots automatically. With this feature, you can ensure that specific applications or services are automatically started when the Raspberry Pi starts, eliminating the need to start them each time manually. You can also control the order in which applications and services are started, which can help ensure dependencies are started first.
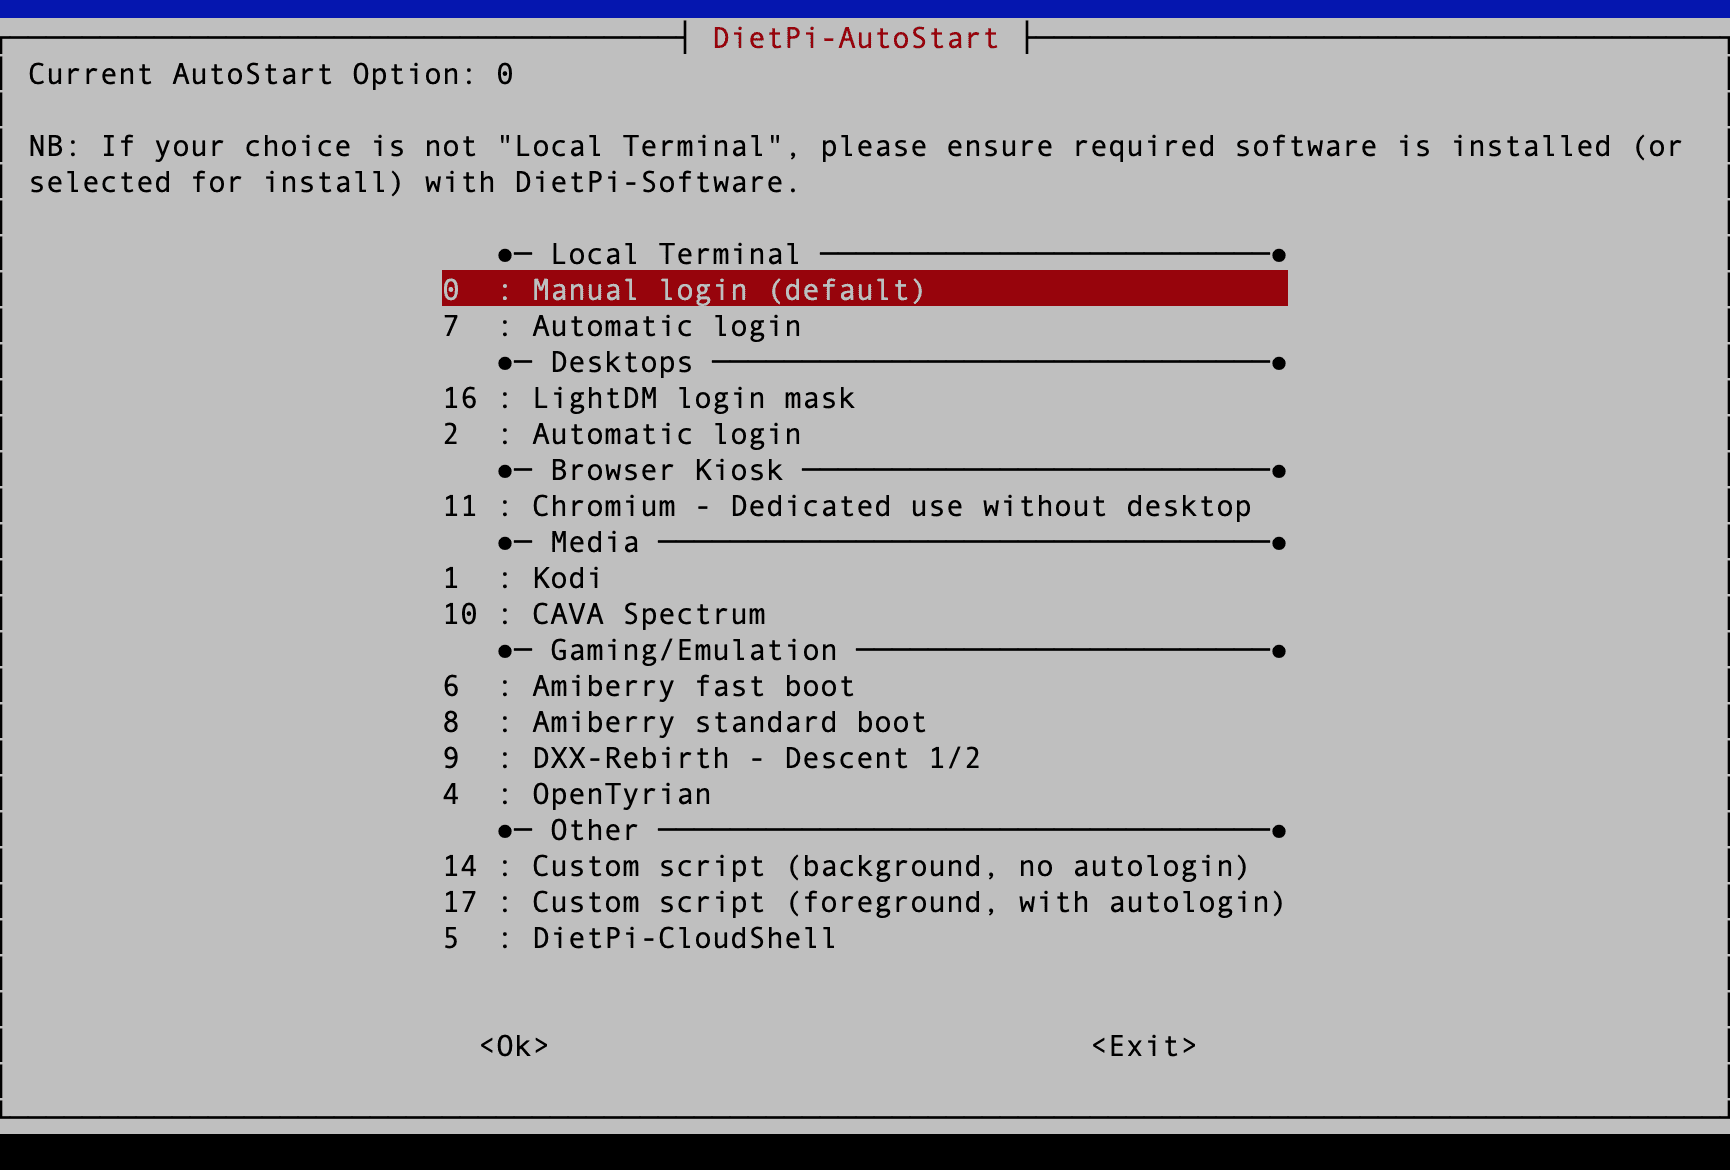
AutoStart Options
Wrapping Up
DietPi is a powerful and efficient operating system that offers a wide range of features and customization options for single-board computers. With the DietPi-Config tool, setting up and configuring a DietPi system is made easy and user-friendly, even for beginners.
In this article, we have provided a comprehensive guide on how to get started with DietPi and the DietPi-Config tool, including installation, configuration, and system customization. We covered various aspects of the DietPi-Config tool, from setting up WiFi and network connections to configuring the hardware, software, and services.