
The Raspberry Pi, despite its small size, has proven to be a reliable device with a multitude of uses, such as acting as a media center, network-attached storage, and even for 3D printing. In this post, we will be discussing how to use the Raspberry Pi camera to live stream.
Over the years, the Raspberry Pi Camera has evolved. The first version was the Raspberry Pi Camera Module V1, which had a 5MP resolution. The next version was an upgrade of the first – the Raspberry Pi Camera Module V2, with an 8MP resolution. The latest version is the Raspberry Pi High-Quality Camera, which doesn’t come with a fixed lens and supports a wide range of interchangeable lenses, offering different resolutions and image quality.
Raspberry Pi Camera Live View: How to Set Up and Stream Video
Hardware and Software Requirements
Below are some of the hardware requirements we will need for this project.
- Raspberry Pi: You can use any Raspberry Pi model you want. However, we highly recommend Raspberry Pi 3B, 4B, or the latest release, Raspberry Pi 5, for better performance.
- SD card: You will need at least an 8GB SD card to install the latest Raspberry Pi OS. However, if you plan to live stream for many hours and record the videos, you might need an even bigger SD card.
- Camera module: There are various Raspberry Pi camera modules you can use. This post will use the latest Raspberry Pi High-Quality Camera with a 12 MP camera lens. That should take clearer images and videos.
- OS: We will use the official Raspberry Pi OS for this post. You can also use the Lite version, which lacks many packages.
Setting up a Raspberry Pi Camera
If you are familiar with this step, skip to the next section. However, if it is your first time, please follow along.
The first step is to shut down your Raspberry Pi and disconnect the power cable. Locate the camera port, which is just next to the headphone jack. Lift the top cover and insert the camera module using the ribbon cable. Ensure the blue part of the ribbon connector faces the USB and ethernet ports, as you will see in the image below. Once done, press down the port cover to hold the ribbon cable in place.
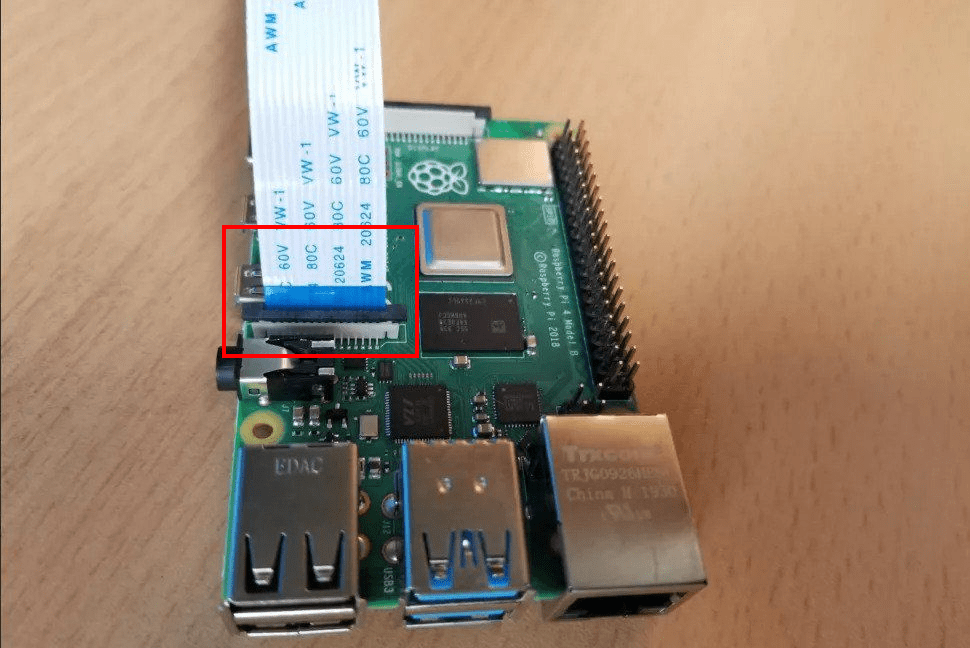
Raspberry Pi camera
After successfully setting up the camera, connect all your peripherals and power on your Raspberry Pi.
Enable the camera from the Raspberry Pi desktop
If you have a display monitor connected or are accessing your Raspberry Pi desktop over VNC, click the Raspberry Pi menu => Preferences => Raspberry Pi Configuration.
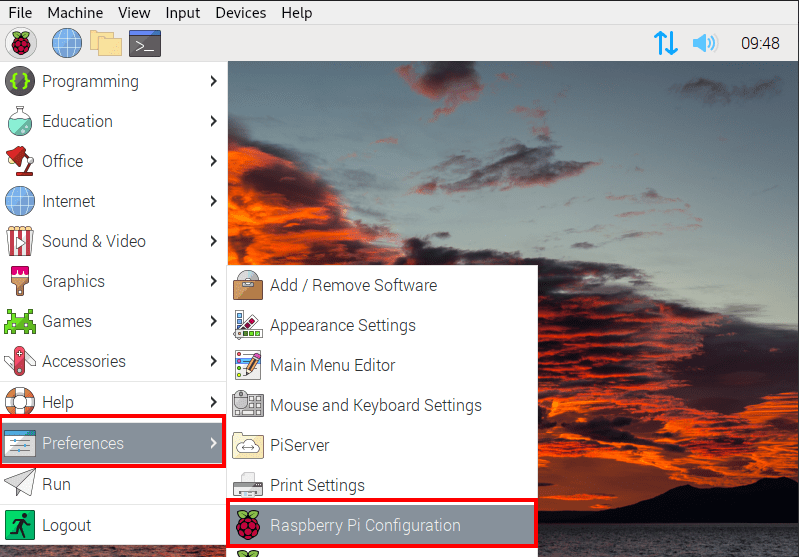
Raspberry Pi configuration utility
That will open the Raspberry Pi configuration window. Select the “Interfaces” tab. Tick the “Enable” radio button next to the camera option, as shown below.
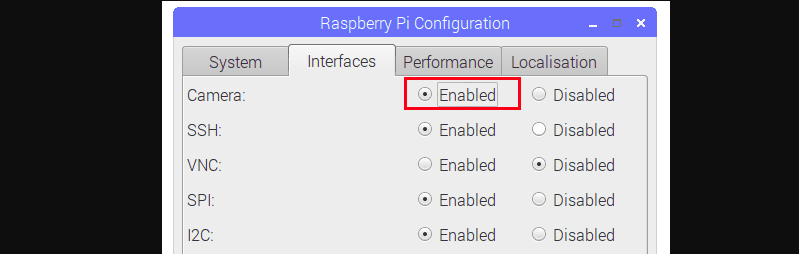
Enable camera
Once done, click OK at the bottom of the window and reboot the Raspberry Pi to apply the new configurations.
To test whether the camera is working, execute the command below.
raspistill -o test.jpg
The Raspberry Pi will take an image and save it in the Picture directory. Use the file manager to check the picture is okay before proceeding further.
Enable the camera from the Raspberry Pi terminal
If you are accessing your Raspberry Pi over SSH, execute the command below to open the Raspberry Pi configuration utility.
sudo raspi-config
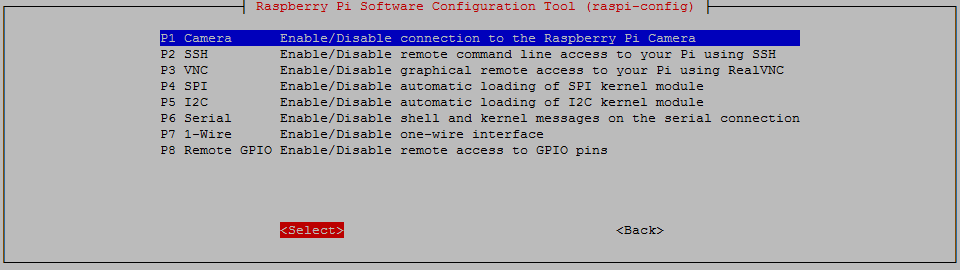
That command will open the configuration screen, as shown below. Select “Interfacing Options” and hit Enter.
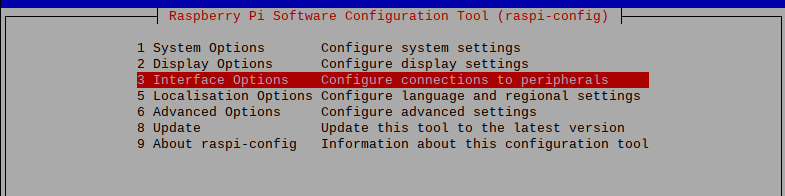
Interfacing options
On the screen that appears, select “Pi Camera” and hit “Enter to enable. Once done, reboot the Raspberry Pi to apply the new configuration.
Enable camera
To test whether the camera is working, execute the command below.
raspistill -o test.jpg
The Raspberry Pi will take an image and save it in the Picture directory. Use the file manager to check if the picture is okay before proceeding further.
How to live stream using the Raspberry Pi camera
Now, there are two methods that you can use to live stream using the Raspberry Pi camera:
- RTSP (Real Time Streaming Protocol)
- Streaming Video into a Webpage with Python
We will look at both methods in this post.
Method 1: RTSP (Real Time Streaming Protocol)
RTSP (Real-Time Streaming Protocol) is a network control protocol for controlling streaming media servers. It enables delivering multimedia content, such as audio and video, over a network in real-time. The best part of this method is that you only need to execute one command in the Terminal. You don’t have to write any piece of code.
Install VLC
To get started, you will need to install VLC. You have probably come across this application. It comes with a command line package, CVLC, that we will use to read the streamed data and display it on the VLC player. Execute the command below.
sudo apt install vlc
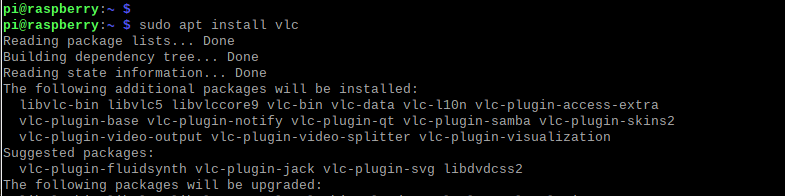
Install VLC
Find out the Raspberry IP address
Next, you need to know the IP address of your Raspberry Pi, as you will be streaming over the local network. This will enable you to access the live stream from other devices connected to the same network as the Raspberry Pi. Use the command below.
ifconfig

Or,

ip a s
Start the live stream
Next, launch the terminal and execute the command below.
rpicam-vid -t 2 --inline -o - | cvlc stream:///dev/stdin --sout '#rtp{sdp=rtsp://:8000/}' :demux=h264
Let’s look at what every parameter in this command does.
-
rpicam-vid: This is the name of the program used to capture video from the Raspberry Pi camera.
-
-t 2: This parameter sets the recording time to 2 seconds. You can adjust this value to control the duration of your live stream.
-
–inline: This option tells rpicam-vid to send the video data directly to the standard output (-) instead of saving it to a file.
-
-o –: This specifies that the output should be sent to the standard output (-).
-
| cvlc stream:///dev/stdin: This pipes the video data from rpicam-vid to the cvlc program, which is used to stream the video. stream:///dev/stdin tells cvlc to read the video data from the standard input.
-
–sout ‘#rtp{sdp=rtsp://:8000/}’ :demux=h264: This option configures cvlc to stream the video using the Real-time Transport Protocol (RTP) over the Real-time Streaming Protocol (RTSP). Here’s a breakdown of the sub-options:
-
#rtp{sdp=rtsp://:8000/}: This sets the streaming protocol to RTSP and specifies the port number (8000) to use.
-
:demux=h264: This tells cvlc to use the H.264 video codec for encoding the video stream.
Running the first test stream
After executing the command above, launch the VLC program on your Raspberry Pi or any other device connected to the same network as the Raspberry Pi. Go to Media => Open Network Stream.
<IMAGE>
That will open a window where you must enter the RTSP network URL. Use the syntax below.
rtsp://[raspberrypi-ip address]:8080/
e.g.,
rtsp://192.168.100.24:8080/
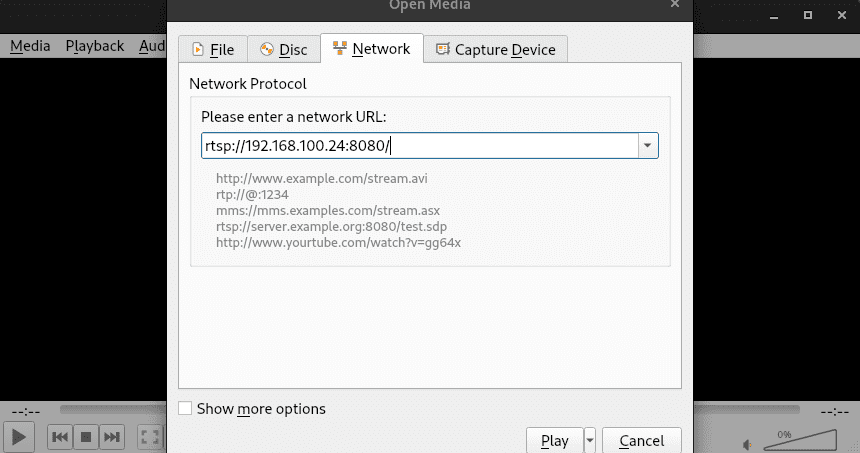
VLC stream
Once done, click the “Play” button at the bottom of the window.
After a few seconds (like 5 seconds), you will start seeing the live stream on your VLC player. And that’s it; you have successfully created your first live stream using the Raspberry Pi camera.
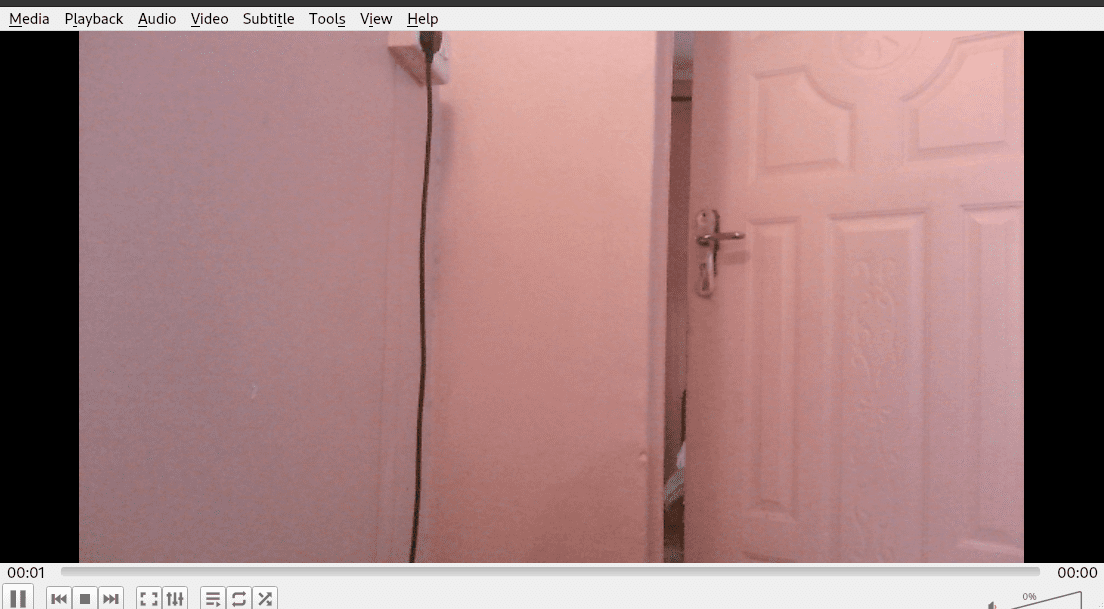
VLC live stream
If you want to record the stream, go to click on Playback >> Record. You will see a prompt to specify the file name. Enter any name of your choice, like “first-stream-ever.” The recording will stop when you click the stop button.
Method 2: Streaming video into a webpage with Python
In the previous method, you needed to install the VLC application to view the live stream. What if you don’t want to be limited to an application? Maybe you want to view the live stream from a browser on your laptop or phone. Well, this is the perfect method for you. Follow the steps below.
Write the Python script
The Python code in this tutorial is available in the Raspberry Pi documentation. If you are working from the command line, create a new Python file using the command below.
nano rpi_camera_livestream.py
If you are using a Raspberry Pi desktop, you can use any text editor. Just remember to save the file with a “.py” extension.
Paste the Python script below.
import io
import logging
import socketserver
from http import server
from threading import Condition

from picamera2 import Picamera2
from picamera2.encoders import JpegEncoder
from picamera2.outputs import FileOutput

# HTML page for the MJPEG streaming demo
PAGE = """\</pre>
<h1>Single Board Bytes Demo RPI-Stream</h1>
<pre>
<img src="stream.mjpg" width="640" height="480" />
"""

# Class to handle streaming output
class StreamingOutput(io.BufferedIOBase):
    def __init__(self):
        self.frame = None
        self.condition = Condition()

    def write(self, buf):
        with self.condition:
            self.frame = buf
            self.condition.notify_all()

# Class to handle HTTP requests
class StreamingHandler(server.BaseHTTPRequestHandler):
    def do_GET(self):
        if self.path == '/':
            # Redirect root path to index.html
            self.send_response(301)
            self.send_header('Location', '/index.html')
            self.end_headers()
        elif self.path == '/index.html':
            # Serve the HTML page
            content = PAGE.encode('utf-8')
            self.send_response(200)
            self.send_header('Content-Type', 'text/html')
            self.send_header('Content-Length', len(content))
            self.end_headers()
            self.wfile.write(content)
        elif self.path == '/stream.mjpg':
            # Set up MJPEG streaming
            self.send_response(200)
            self.send_header('Age', 0)
            self.send_header('Cache-Control', 'no-cache, private')
            self.send_header('Pragma', 'no-cache')
            self.send_header('Content-Type', 'multipart/x-mixed-replace; boundary=FRAME')
            self.end_headers()
            try:
                while True:
                    with output.condition:
                        output.condition.wait()
                        frame = output.frame
                    self.wfile.write(b'--FRAME\r\n')
                    self.send_header('Content-Type', 'image/jpeg')
                    self.send_header('Content-Length', len(frame))
                    self.end_headers()
                    self.wfile.write(frame)
                    self.wfile.write(b'\r\n')
            except Exception as e:
                logging.warning(
                    'Removed streaming client %s: %s',
                    self.client_address, str(e))
        else:
            # Handle 404 Not Found
            self.send_error(404)
            self.end_headers()

# Class to handle streaming server
class StreamingServer(socketserver.ThreadingMixIn, server.HTTPServer):
    allow_reuse_address = True
    daemon_threads = True

# Create Picamera2 instance and configure it
picam2 = Picamera2()
picam2.configure(picam2.create_video_configuration(main={"size": (640, 480)}))
output = StreamingOutput()
picam2.start_recording(JpegEncoder(), FileOutput(output))

try:
    # Set up and start the streaming server
    address = ('', 8000)
    server = StreamingServer(address, StreamingHandler)
    server.serve_forever()
finally:
    # Stop recording when the script is interrupted
    picam2.stop_recording()
Once done, save the file (Ctrl + S) and exit (Ctrl + X).
Initially, this code might seem tricky, but if we break it into smaller parts, it becomes easier to understand:
- The variable PAGE holds the HTML for our basic webpage.
- The StreamingOutput Class handles the video stream from the Pi camera.
- The StreamingHandler Class manages HTTP requests to our webpage, letting us view the stream.
- Lastly, the StreamingServer class provides a basic server for hosting the webpage and streaming video.
The other part of the code does the following:
- Sets up the Pi Camera with a specific resolution.
- Creates a StreamingOutput instance.
- Starts recording with the Pi Camera.
- Sets up and creates a StreamingServer instance.
- It keeps the stream running until stopped.
Running the first test stream
After saving the code into a file, launch the Terminal and execute the command below to run your first live stream.
python3 your_code_filename.py
e.g.,
python3 rpi_camera_livestream.py
Once the script is up and running, launch the browser on your Raspberry Pi or any other device connected to the same network as the Pi and type the URL address below.
http://<your-pi-address>:8000/
e.g
http://192.168.100.24:8000/
Keep in mind that in this approach, the streaming delay is unnoticeable. It offers a practically real-time feed of whatever your camera sees, unlike the RTSP method. Moreover, employing a tool like Python provides you with many options and greater flexibility.
Wrapping up
In case you’re looking for ways to live stream on your Raspberry Pi using the default Raspberry Pi camera, we have explored three methods that you can use. If you’re interested in this topic, you can dig deeper into each technique and discover other capabilities that you can add to your project. We encourage you to share any insights, tips, and tricks that you come across with our readers in the comments section below.