
The advertisement arena has taken a new turn. Many e-commerce stores, hotels, banks, etc., no longer use traditional posters to display their services or adverts to customers. Instead, they use big display screens. Of course, these digital signage solutions have been there for a while, but most are expensive or too complicated to set up. In this tutorial, you will learn how to set up digital signage for free using a Raspberry Pi and Anthias.
Anthias is free digital signage software developed by Screenly and explicitly designed for the Raspberry Pi platform. It can be effortlessly installed as a standalone operating system (custom image) or as an integrated package within your existing Raspberry Pi OS setup.
Here are the top three reasons to use Raspberry Pi for digital signage:
- Cost-effectiveness: Raspberry Pi hardware is affordable compared to traditional PCs or media players, making it a budget-friendly option for deploying multiple signage displays.
- Energy efficiency: Raspberry Pi consumes significantly less power than standard PCs, lowering energy costs and reducing environmental impact.
- Compact size: The compact form factor of Raspberry Pi makes it easy to integrate into small spaces or mount behind displays, offering flexibility in installation options.
Setting up Anthias by Screenly on Raspberry Pi
Pre-requisites
Here are some of the things you will need for this project.
- A Raspberry Pi: Anthias supports various Raspberry Pi models. However, we highly recommend standard models like Raspberry Pi Zero, Raspberry Pi 3 Model B, and Raspberry Pi 4 Model B.
- Raspberry Pi OS Lite (Bulls Eye) (Optional): If you decide to install the Anthias package instead of the custom image, you must use Raspberry Pi OS Lite.
- Internet connection: We highly recommend using an ethernet cable to connect your Raspberry Pi to the network.
- Display monitor (optional): Anthias runs on the browser. You can decide to connect your Raspberry Pi to a display monitor or use another PC connected to the same network as your Pi.
Understanding Screenly and Anthias
Screenly allows anyone to quickly transform a monitor or TV into a digital sign. It has an online dashboard where users can manage all their screens remotely. Users can easily upload assets they want to display, such as images, videos, or websites. You can manage what each screen displays, at what time, the type of asset, and the frequency of change (if you are rotating between multiple assets).
To better understand what we are talking about, consider the screens you see in your favorite restaurant (KFC, Mc McDonald’s, etc.) displaying the offers available. Or, if you have visited a video game parlor – there are those screens that display game demos.

McDonald’s Plant-based Burger (Source: McDonald’s)
The only drawback now is that Screenly is a commercial solution primarily tailored for businesses to manage everything from the cloud. However, if you want free digital signage software that you can set up on your Raspberry Pi, Screenly has your back.
Anthias is a free and opensourceversion of Screenly. You can use it in your business or company without paying a dime forever. However, there are a few differences.
- The paid version (Screenly) comes with all deployment and management tools for all your screens. However, with Anthias, you will need to manage the screens individually.
- Screenly comes with a monitoring solution for your screen, but with Anthias, you must build it yourself.
Method 1: Install Anthias using the Anthias custom image
If you are not using the Raspberry Pi to run anything else, you can decide to install the Anthias custom image and get started with digital signage. Follow the steps below.
Install Raspberry Pi Imager
The Raspberry PI Imager helps write OS images to your RaspberryPI SD card. It is far better than other tools because it enables you to perform various OS pre-configurations, such as adding WiFi credentials, enabling SSH, and setting up hostnames.
If you have not installed or used this utility before, please read our article – How to write Raspbian to an SD card using Imager.
Launch the utility from the applications menu after successfully installing the Raspberry Pi Imager. You will see a window similar to the image below.

Raspberry Pi Imager
Flash Anthias image to the SD card
Now, we need to write the Anthias image to the SD card. Click the “CHOOSE DEVICE” option and select the Raspberry Pi model you are using. In our case, we are using a Raspberry Pi 4B.
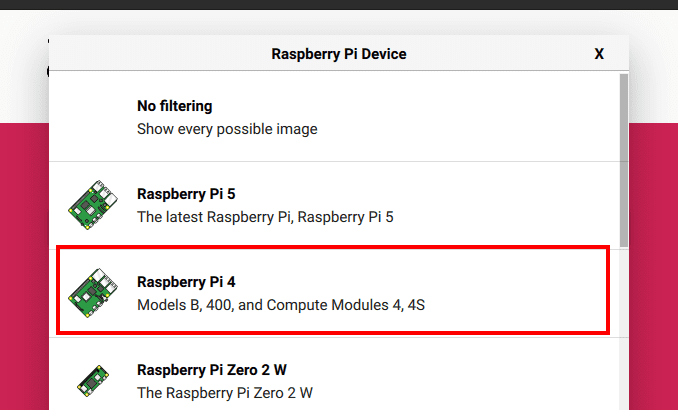
Select the Raspberry Pi model
Next, you need to select the operating system you want to flash. Click “CHOOSE OS.” On the window that appears, select “Other specific-purpose OS” => “Anthias.” You will see a list of available Anthias images for specific Pi models. We will choose Anthias (Pi4) since we use a Rasberry Pi 4B for this project.
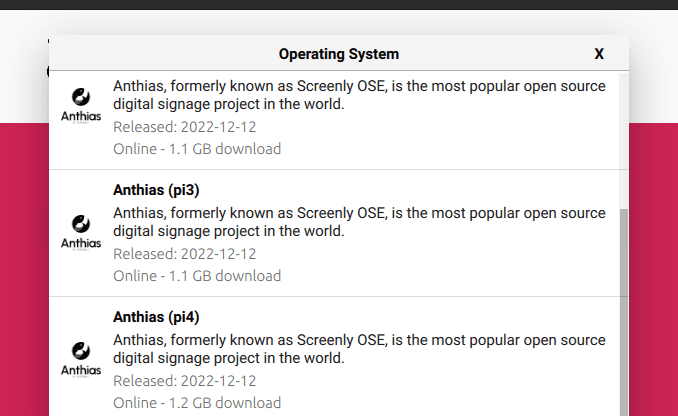
Select Anthias version
Next, click “CHOOSE STORAGE” and select the SD card you want to flash. Please note that all the data on the SD card will be overwritten. Therefore, you need to choose the right storage, or you might lose a lot of data. Once done, click “NEXT” to download and flash the image to the SD card.

Download and write the image to an SD card
After successfully flashing the SD card, please remove it from your PC and insert it into the Raspberry Pi. Connect the ethernet, display monitor, and power cable, and turn on the Raspberry Pi.
From this point, there is nothing more to do. Just wait for the Pi to do the necessary configurations. After a while, you should see an IP address that you will use to access your screen, as shown in the image below.
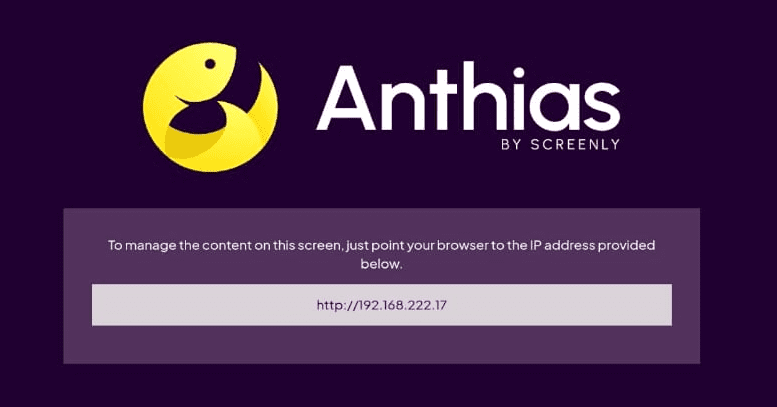
Anthias IP
If you don’t have an ethernet connection and are only limited to Wi-Fi, don’t worry! Anthias has your back. It’ll create a hotspot to set up your Wi-Fi connection easily using its web interface. Follow the simple steps to connect through your computer or smartphone and input your regular Wi-Fi network settings.
Once you’ve completed this, skip to the “Getting Started with Anthias” section. You’re all set!
Tip: If you don’t have a monitor connected, check your router and see which IP address is assigned to the Raspberry Pi.
Method 2: Install Anthias on Raspberry Pi OS Lite
If you don’t want to use the custom Anthias image, you can install Anthias on your Raspberry Pi OS. The recommended OS is Raspberry Pi OS Lite. Unfortunately, the latest version is unsupported, and we had to use Raspberry Pi Bullseye on a Raspberry Pi 4.
Follow the steps below to get started.
Install Raspberry Pi OS
As stated above, we used Raspberry Pi Bullseye for this tutorial. You can check out our comprehensive guide on installing the Raspberry Pi OS on your Pi.
Install Anthias
Once your operating system is up and running, you can install Anthias. Launch the Terminal and execute the command below.
bash <(curl -sL https://install-anthias.srly.io)
Immediately you run this script, you will see a prompt similar to the image below.
[iNSTALL ANTHIAS]You will see several prompts that you will need to use your keyboard to reply. You can either choose yes (Y) or no (N). Some of the prompts include:
- Do you still want to continue? (Y/N): Press Y.
- Do you want Anthias to manage your network? (Y/N): If you are connected via WiFi and accessing the system over SSH, select (N). That’s because ANthias will update the network manager, and you will lose connection; however, if you use ethernet, type Y.
- Would you like to perform a full system upgrade as well? (Y/N): This is optional. Depending on your internet connection, you can choose to type Y or N.
After you complete the prompts, the installation process will start. Depending on your Raspberry Pi model, this might take 15 minutes to hours.
After a successful installation, your Raspberry Pi will reboot, and you will see the Anthias dashboard on your monitor showing the IP address.
Anthias IP
Tip: If you don’t have a monitor connected, check your router and see which IP address is assigned to the Raspberry Pi.
Setup Anthias
Up to this point, I believe you have successfully installed Anthias on your Raspberry Pi. Now, open a browser on another PC connected to the same network as the Pi and type the IP address that you got after installing Anthias. That will open the Anthias dashboard on your browser.
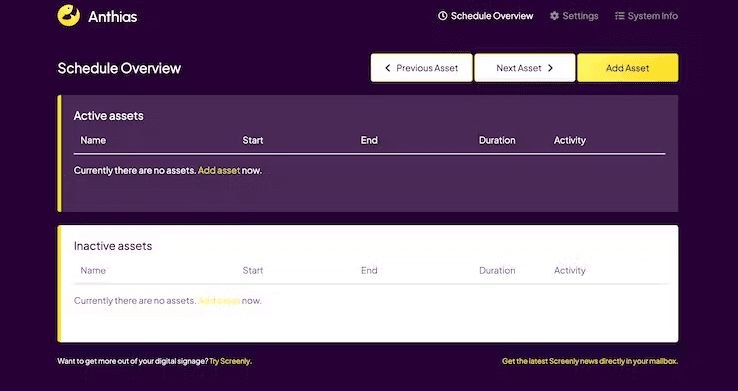
Anthias dashboard
Now. this is where you manage all the assets you want to display on your screens. You can upload, schedule, and prioritize assets. Some of the supported assets include:
- Images: Anthias supports various image formats, including JPG, PNG, and GIFs.
- Videos: All videos need to be encoded with H264 MPEG4.
- Video feeds: Anthias supports stream videos (camera feeds).
- URL: Anthias also supports websites. You only need to add the URL.
Conclusion
This post has given you a comprehensive guide on installing and getting started with Anthias on the Raspberry Pi. If you are operating on a budget, you don’t need a commercial digital signage solution when you can build one for free using the Raspberry Pi and Anthias from Screenly. Did you encounter any issues? If yes, please don’t hesitate to let us know in the comments below.