
Debian, a name recognized by all those who participated in GNU/Linux, is a free operating system. In fact, it is the largest group of free software providers in the world. Apart from being free, Debian’s biggest claim to fame is stability and security, which makes it one of the most popular Linux distributions in existence.
Some of the most popular Debian-based distributions include:
- Raspbian (the Official Raspberry Pi OS)
- Ubuntu
- Zorin OS
- Kali Linux
- Pop! OS
- Deepin Linux and many more.
Luckily, if you have a Raspberry Pi 4 around your home, you can install Debian and use it efficiently, just like the official Raspberry OS. That’s what we will look at in this post. “How to install Debian on Raspberry Pi 4.” Let’s dive in and get started.
Installing Debian on Raspberry Pi 4
Project requirements
- A RaspberryPi 4 board. Preferably 4 GB RAM.
- At least 8 GB Micro SD Card
- A keyboard and a mouse
- A Display monitor
- An active internet connection
- Reliable power supply
Once you have all these requirements in place, follow the steps below to install Debian on Raspberry Pi 4.
Step 1. Download Debian for Raspberry Pi
The Raspberry Pi uses an ARM-based processor. Therefore, you cannot install the standard Debian ISO for x86_64 processors. Navigate to the Debian for Pi official download page to download the Debian image for Raspberry Pi 4. Please select an image that’s compatible with your Raspberry Pi board. Some of the supported boards include:
- Raspberry Pi 4
- Raspberry Pi 3B+
- Raspberry Pi Zero
- Raspberry Pi 2B
- Raspberry Pi 1
For this post, we will download Debian Image for Raspberry Pi 4.
Step 2. Flash the Debian image on the micro SD Card
You can use different applications to create a bootable Micro SD Card. Some of these are dependent on the platform you are using. For example, you can use Rufus, Power ISO, or Balena Etcher if you are on Windows. For this post, we highly recommend Etcher, which is available for Windows, macOS, and Linux. You can download Etcher from their official website. Before starting the flashing process, ensure you have formatted the SD card with a compatible format like EXT4, NTFS, FAT, or FAT32. One of the best disk management utilities that you can use to format the SD is Gparted.
When you first launch Etcher, you will see a window similar to the image below.
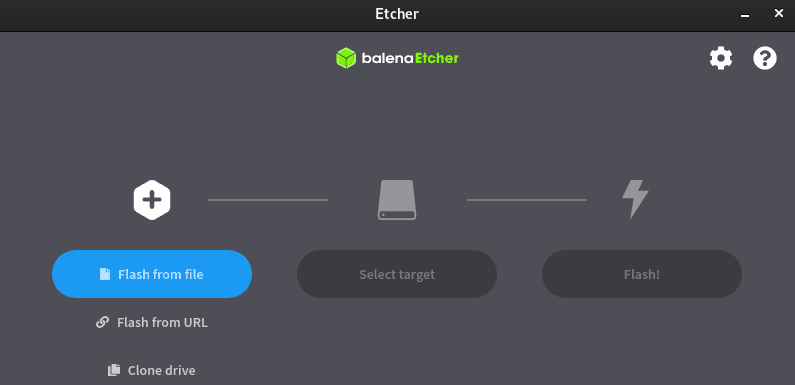
Balena Etcher
Use the options below to flash the image file onto the SD card with Etcher.
- Flash from file: Use this option to select the Debian image you downloaded to your system.
- Select target: Click this button to select the target SD card where you want to burn the image file.
- Flash: Use this button to start the flashing process.
Insert the SD card into the Raspberry Pi and power it on when done.
Step 3. Debian for Raspberry Pi first boot
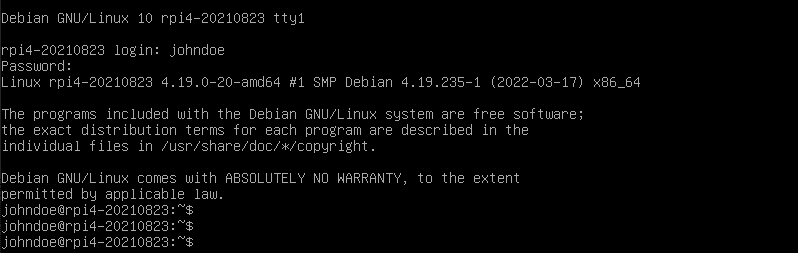
If you have installed other operating systems on your Raspberry Pi, you will immediately realize that Debian is a little different. It DOES NOT come with a graphical user interface. After a successful boot, the only thing you will see on your monitor is a login prompt like the one shown below.
Debian GNU/Linux 10 rpi4-20210823 tty1
Rpi4-20200823 login:

Login Prompt
Of course, the number Rpi4-20200823 might be different to mine depending on your Raspberry Pi board, but that doesn’t matter. Before proceeding, one more thing to note is that the default user is the root user, and this user doesn’t have a password set. Therefore, to get started with Debian on your Raspberry Pi, type root on the login prompt and press Enter. You will see some information regarding your Linux distribution before opening a shell.
Note: The root user has overall privileges over the entire system. Therefore, please be careful with any command you execute as you can quickly delete any important configurations files.
Step 4. Advanced configuration
Up to this point, you already have a working Debian system. If you are well-versed with Linux and only need access to the command line and a few tools, this might be all you need. However, proceed with this tutorial if you want a full-featured Debian system running on your Raspberry Pi. We will look at other features like:
- Enable WIFI
- Configure Keyboard
- Add another user
- Setup
sudocommand - Connect via SSH
- Add a Desktop Environment (Graphical User Interface)
(i) Enable WiFi
Tip: If you are connected to ethernet and are okay with that, you can skip this step.
Connecting to a WIFI network has never been a hustle if you have a Graphical Desktop Environment. But with only access to a console, you might wonder, “How do you even list the available WIFI networks?” But it’s much easier than you might think. To get started, execute the command below to edit the wlan0 file with the nano editor.
nano /etc/network/interfaces.d/wlan0
On the file that opens, uncomment the lines below:
allow-hotplug wlan0
iface waln0 inet dhcp
Now, you need to add the credentials of your WIFI network, as shown below.
wpa-ssid MyHomeWIFI
wpa-psk 123456789
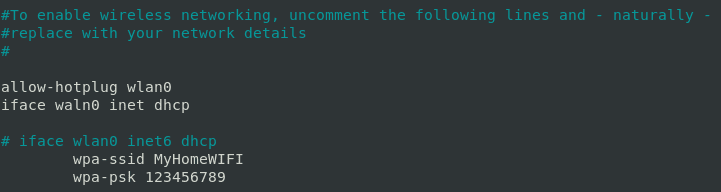
Enable WIFI
Please remember to replace the name:
MyHomeWIFI: Replace with your WIFI network name
123456789: Replace with your WIFI password
When done, reboot the system to apply the changes.
sudo reboot now
Your Raspberry Pi should connect to the WIFI network if the information entered was correct.
(ii) Set keyboard layout
By default, the set keyboard layout is the US. If you want to switch to another layout, execute the command.
dpkg-reconfigure keyboard-configuration

Set Keyboard Layout
You will see a prompt to select the keyboard and the language. To apply these new configurations, execute the command below.
setupcon
Alternatively, you can also reboot the Pi.
reboot now
(iii) Add a new user
We can easily do so from the Terminal using the useradd command to add a new user on any Linux system. To get started, execute the command below.
useradd -m [username]
e.g
useradd -s /bin/bash -m johndoe
Let’s look at the two parameters that we have thrown in the command above.
-s /bin/bash: Here, we are specifying the login shell of the new user.
-m: This parameter allows us to create a home directory for the new user.
To confirm if the new user was added successfully, check the contents of the /etc/passwd using the command below.
less /etc/passwd

New user
(iv) Set a new user password
After successfully adding a new user, we need to enforce security by setting a strong password for this user. We will use the passwd command as shown below.
passwd [username}
e.g
passwd johndoe

Set Password
At this point, you can reboot the Pi and log in with your new username and password. Additionally, you will notice that when you try to log in with the root user, you will now be prompted for a password, unlike before. Log in with the password you created for the new user.
Login With a new user
(v) Setup sudo command
You will notice that you can’t use the command if you are logged in as root or the new user we just created. If you try executing a command like:
sudo apt update
You will get the error – “bash – sudo command not found.”
Log out and log in with the root users to solve this error. To log out, you can type the exit command on the console. When done, execute the command below to install sudo in your system.
apt install sudo
After a successful installation, we need to do one more thing so that we can use sudo with the new user we just created. If at this point, you try executing the command below with the new user account, you will get the error below. [username] is not in the sudoers file. This incident will be reported. To solve this issue, edit the sudoers file in the /etc directory and add the line below.
[username] ALL=(ALL:ALL) ALL
e.g
johndoe ALL=(ALL:ALL) ALL
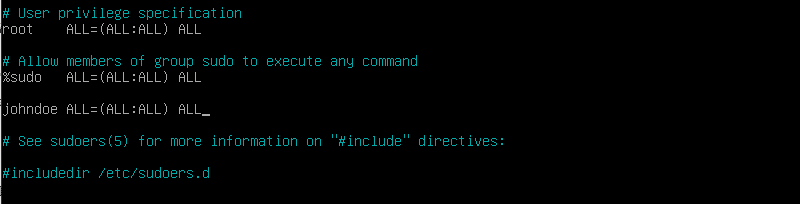
Add user in the sudoers file
Save the file (Ctrl + S) and Exit (Ctrl + X). You can now proceed to execute commands with sudo privileges without any errors.
sudo apt update
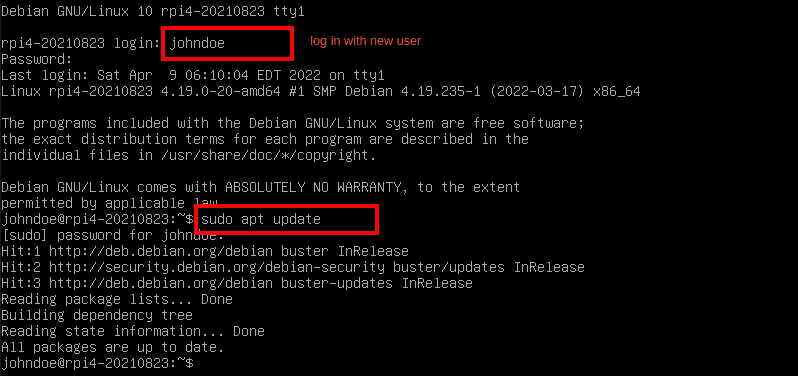
update system
(vi) Connect to Raspberry Pi via SSH
If you wish to configure your Raspberry Pi from your laptop, we can proceed to create an SSH connection. By default, Debian for Raspberry comes pre-installed with an SSH server. Use the syntax below to create an SSH connection from your system.
ssh [[username]@[Raspberry-IP-Address]
e.g
ssh johndoe@192.168.1.49
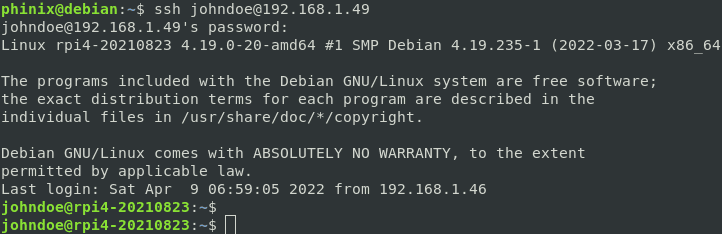
Connect via SSH
(vii) Install a desktop environment
Up to this point, we have successfully done all the necessary configurations needed to get you started with the Debian system on the console. However, it would be much better if we could install a Graphical User Interface. To get started, execute the command below.
sudo tasksel
A screen will pop up, and you will see several Desktop Environments (DE) you can install. Since the Raspberry Pi has quite limited resources to the standard PC, we will install a more lightweight DE like the XFCE or KDE. For this post, we will install XFCE. Use the arrow keys to scroll between the options and use the spacebar to select your desired option.
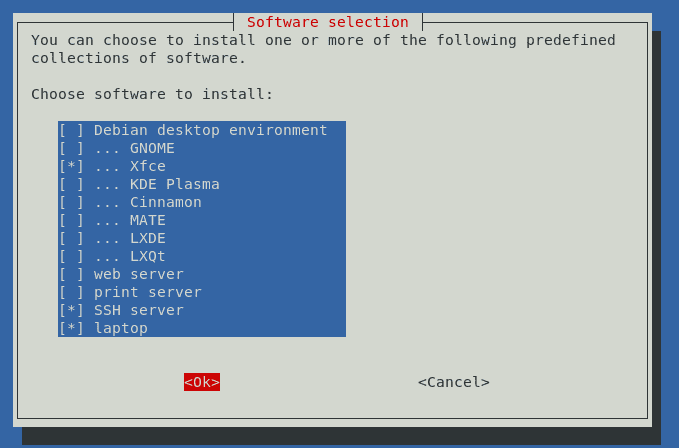
Install DE
Select OK (use the Tab key to navigate) and press Enter. That will start the installation process, and it might take some time. Please be patient.

Install DE
When done, reboot your system. You will be presented with a graphical login interface, as shown below.

XFCE Desktop
Wrapping up
That’s it! I hope this article has given you a step-by-step guide to installing and setting up Debian on your Raspberry Pi. If you only want to use some command-line tools, you don’t need to install a graphical user interface. However, if you’re going to have a full-featured operating system with all the necessary graphical tools, you need to install a DE. Please let us know in the comments below if you encounter any issues or have any queries.
3 comments
Just a quick question: Raspberry Pi OS comes with software for the 40 pins IO. Is there a quick way to obtain and install that software on the Debian installation?
Sorry, nothing in the mentioned paces worked. 5 hours!
Pace 1 Download Debian for Raspberry Pi and
pace 2 Flash the Debian image yes,
but the rest not.
Debian goes to the litter.