
If you have lots of media files, documents, and such, there is a high probability they are just lying somewhere on a hard drive. To make these files accessible and secure at all times, you will require to dig deep and get yourself a good Network-Attached Storage (NAS) solution. There are many NAS solutions available, but these devices can be quite costly. Luckily, if you have a Raspberry Pi lying around, you can easily turn it into a reliable NAS.
What’s a NAS – Is NAS for you?
A NAS (network-attached storage) is basically a good setup headless device (no monitor or keyboard) which grants access to a large amount of data over a network. For example, you can store your media files like music videos, movies, etc., and use a payer like Kodi to stream them from your NAS. Other services that a NAS can offer include;
- Act as a backup for your PC files.
- Use it to host a torrent app that seeds your files 24/7.
- Ensure data security RAID (redundant array of inexpensive disks).
You might be asking yourself – Can’t I do all these from my main PC? Sure, you can. However, a NAS is designed to run 24/7 without shutting down, and it consumes much less power. That feature makes our Raspberry Pi an excellent choice.
A Raspberry PI is quite a versatile SBC (Single Board Computer) that can serve as a cheap NAS. We can’t really compare it to commercial NAS solutions out there, which are more powerful, can handle a huge amount of data and users, and support RAID, but it can still give you a good start to working with NAS solutions. Once you are well versed, you can now think of upgrading to solutions like Synology and QNAP.
Requirements
A fully setup Raspberry Pi: If you are just getting started, you should check out some of our website’s posts. For this tutorial, we will use the official Raspbian OS; you can, therefore, check our post on How to Install Raspbian on Raspberry Pi.
Hard drives: Unless you are only sharing a couple of files, the Micro SD card present on your Pi might not be enough. Therefore, I would recommend using one or two hard drives to store your data. If they are many, you might consider using a powered USB hub since Pi’s power might not be enough. Alternatively, there a drives designed specifically for use in NAS solutions. Those, too, can be useful.
In my case, I am using a Raspberry Pi 4 (which I would highly recommend for your NAS solution).
Setting your Raspberry Pi as a NAS solution
There are operating systems like Openmediavault which easily turn your Raspberry Pi into a powerful NAS. However, for this tutorial, we will use the official Raspbian OS. You can check our post on How to Install Raspbian on Raspberry Pi. It is quite easy to use and has many solutions available online if you run into an issue.
I recommend connecting your Pi via Ethernet rather than WIFI for faster data transfers. WIFI will still work but not very efficient as you would want. Proceed to power and start your Pi. You don’t require to access the Raspberry’s GUI as everything we will do will take place on the command-line; therefore, you can access it from another device if you have ssh setup.
Now, attach your external drives. Note: All the data on these drives will be erased. Therefore, ensure you back up any files before transferring them to your Pi-NAS.
Execute the command below to list all your connected drives.
sudo fdisk -l
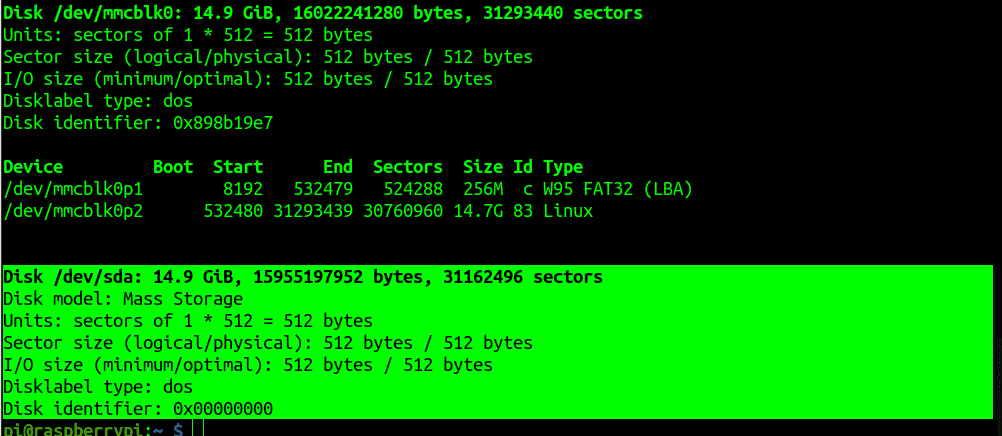
List drives
You should get an output as shown in the image above. In your case, however, your drives might have a different size. If you see a drive like /dev/mmcblk0, that’s probably your SD card. Scroll below and locate your external drive. In my case, it /dev/sda. It is a 16 GB USB drive. Ensure you note the path of your drive (e.g./dev/sda).
To format your drive, execute the commands below. Please remember to replace the bolded text accordingly. Replace /dev/sda with your drive path and my_Drive_One with the label you want to use for your drive.
umount /dev/sda
sudo mkfs -t ext4 /dev/sda
sudo e2label /dev/sda my_Drive_One
The formatting process might take some time, depending on the drive’s size. Please be patient.
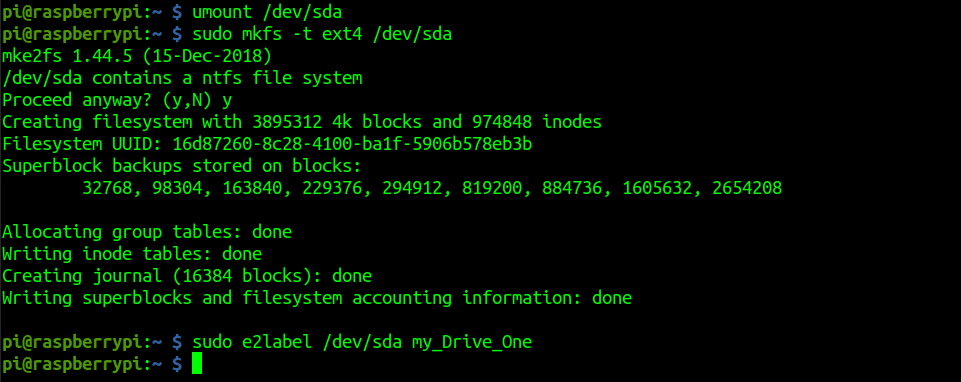
Format drive
Once done, reboot your Pi. If you have access to the Pi’s GUI, you should see the drive appear on the file manager with the label you assigned it.
Now we need to make our drive accessible over a network. To do so, we will use SAMBA. It’s ab open-source implementation of SMB/CIFS Windows protocol. It allows the simple sharing of files between Linux and Windows systems. By default, SAMBA is not installed on Raspbian; proceed to install it with the commands below:
sudo apt update
sudo apt upgrade
sudo apt install samba samba-common
You will get a prompt on whether ‘you want to modify smb.conf to use WINS settings from DHCP,’ select YES and hit Enter.
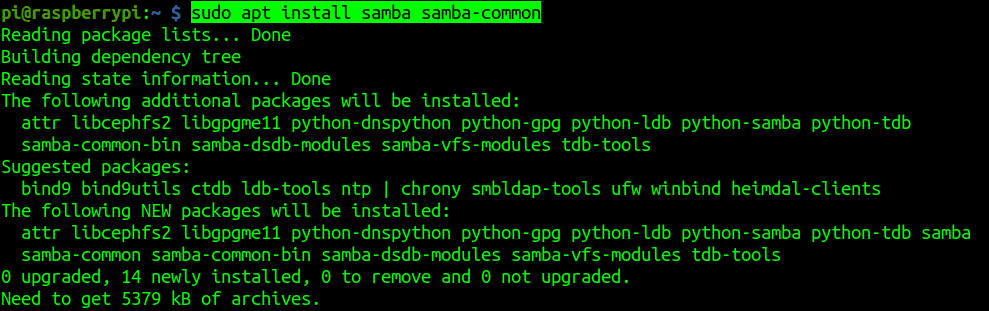
Install Samba
We need to edit the samba configuration file to share our drive over a network.
Open the smb.conf file using the command below.
sudo nano /etc/samba/smb.conf
Using the Arrow Keys or Page-Down key, scroll to the bottom of the file and paste the contents below. Remember to make the bolded text changes as explained below.
[My_Files_To_Share]
path = /media/pi/my_Drive_One
writeable = yes
create mask = 0775
directory mask = 0775
public=no
Replace My_Files_To_Share with the name of what you want to share (e.g., My_Media) and /media/pi/my_Drive_One with the path of your drive. You might need to navigate to your /media directory to get the full path.
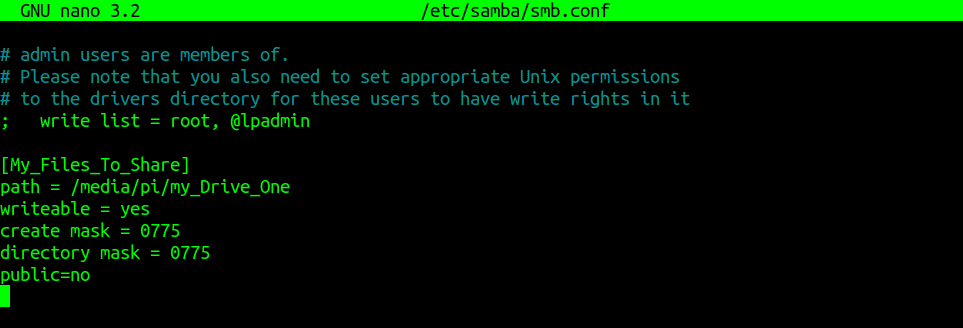
Samba configuration file
Save the file (Ctrl + O then Enter) and Exit (Ctrl + X).
Now, we need t set up a password for SAMBA. To add a password for the current user, execute the command below:
sudo smbpasswd -a pi
You will be prompted to type your new password. Note: It doesn’t have to be the same as your login password, but it can be.

Setup SAMBA password
If you have another user or want to add a new user, use the adduser command and set up a password for them, as shown below.
sudo adduser John_Doe
sudo smbpasswd -a jeff
Once done, restart the samba service with the command below:
sudo systemctl restart smbd

Restart samba
That’s it. We have fully configured our Raspberry Pi as a NAS solution. Now proceed to your client PC to access the files. In my case, I am on Ubuntu 20.04. Open the file manager and click on Other Locations. You should see Raspberry listed under the network option on the window that opens.
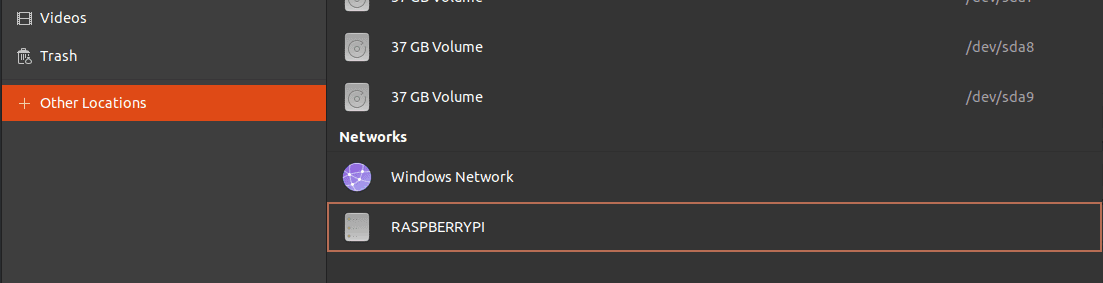
Raspberry
Click on the Raspberry directory, and a window will pop-up. On the “Connect as:” option, select ‘Registered user.’ On the ‘Username’ field, enter the current registered user on your Pi and use the Password we set up for samba to create a samba session. Leave the Domain field as it is. Click Connect. You should now see a folder with the name you set for your share. In my case, it was My_Files_To_Share.
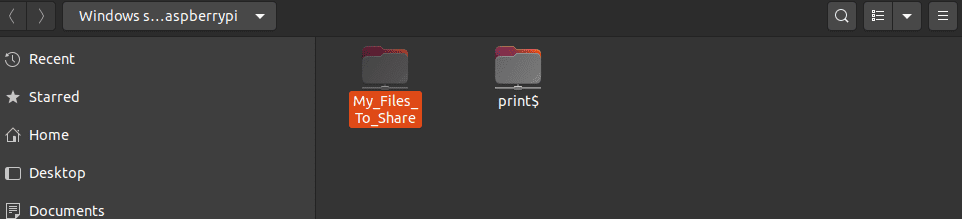
My Shared files
Wrapping Up
I believe this post has given you a clear guide on how to turn your Raspberry Pi into a NAS solution. With time as your data grows in size and users increase, you will need to get more drives and even set up a RAID to prevent data losses. But when you get to that point, you might need to get a powerful NAS solution such as Synology or QNAP. In case you across any issue or want to share more info on this with our readers, feel free to hit the comments below.