
Since its first release in 2012, the Raspberry Pi has never shipped with a power button. Of course, that is due to cost matters and the idea of making the Pi flexible to handle an array of projects ranging from anything like embedded IoT projects, Media Center, Network Attached Storage (NAS) to using it as a regular Desktop. However, you should never Shutdown your Raspberry by simply “pulling the plug.” Instead, you need to power it off just like you would on a regular PC. Otherwise, you risk losing data or corrupting your SD Card.
Why You Need a Power Button for Your Raspberry Pi
When working with the Raspberry Pi, several problems might arise. Maybe you cannot successfully connect via SSH or VNC, an issue displaying to a screen, or freezing issues. One of the quick solutions most people settle for is plugging out the power cable the putting it back to boot up the Pi again.
However, there is a catch.
If you were writing data to the Pi, there is a probability that data on the SD Cards will be corrupted. In certain cases, the Raspberrry might not even boot, and you will be required to burn a new image on the card. If you have been using the Pi for a long time, you wouldn’t want to lose the data you have stored for all that period of time. Personally, I corrupted an SD card to the extent I could not even burn an image successfully because of continuously plugging out the power cable in case of an issue. A reliable and efficient solution to all these hurdles would be to add a power button. There are Raspberry power cables that come with a switch. However, that works similar to plugging out the power cable.

Raspberry Pi Cable
By safely powering down your Pi, the operating system will have a chance to halt all the running write processes. That will prevent any data loss or corruption of the SD card.
The Wake Functionality On Raspberry Pi
The Raspberry Pi board of choice that we will use in this tutorial is Raspberry Pi 4 B. When you power off the Pi using a command like;
sudo shutdown now
You are simply putting the Pi in a Halt state. To wake up the Pi, just short GPIO pins 5 (GND) and 6 (GPIO3) momentarily, and your Pi will boot as usual. Therefore, we won’t require any coding(software) for waking the Pi from a halt state.
Mount a Power Button on the GPIO
As discussed above, you can easily wake (boot) the Pi from a halt state by shorting pins 5 and 6. This section will give you a step-by-step procedure for mounting a button on the GPIO pins 5 and 6. You don’t require a very complicated button. If you can’t access the pre-made ones, use a switch from any electronic device lying around your house. The first power button I used on my PI was from a Cathode Ray Tube (CRT) television. Despite it being a little large and buggy, it worked perfectly.
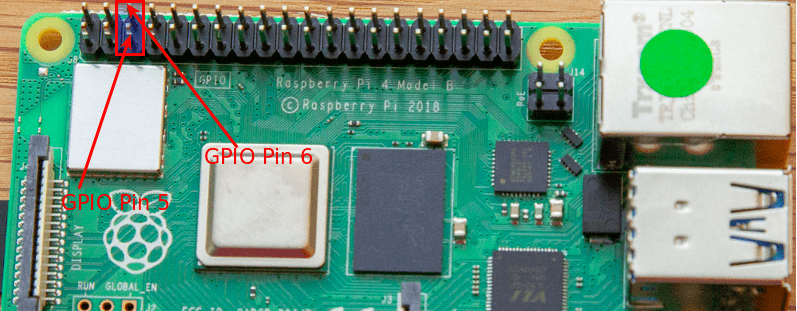
GPIO Pins 5 and 6
To mount the button, you can use two female cables and strip them on one end. Then, solder the two naked wires on the button and connect the end of the cables to GPIO pins 5 and 6. It would be best if you had a setup similar to the one below.
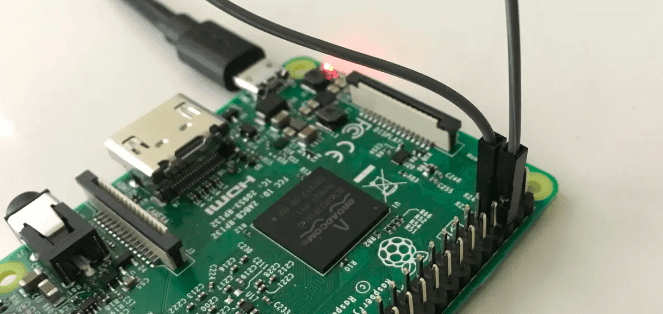
Mount Button
To test whether your button is working correctly, shut down the Pi from the graphical screen or execute the command below if you are connected via SSH.
sudo shutdown now
When the PI is fully halted, press the button. The Pi should wake (boot) as normal.
Understanding The Sleep Functionality
Up to this point, you will notice that even though you can use the button to wake the Pi, you can’t use it to shut down the Pi. For this, we will need a software solution. First, we will write a Python script that listens for any button presses on pins 5 and 6 and halt the Pi.
There are several ways you can achieve this. First, we can write an infinite loop that listens to any state change on GPIO pins 5 and 6. The code would look something similar to this:
while True :
    if GPIO3 is pressed:
        shutdown the pi
This could work and not impact Pi’s performance (feel free to try it out and share the experience in the comments). However, there is even a better method.
We will write a script that listens for any interrupt coming from pins 5 and 6. An interrupt (edge detection) is a change of state from LOW to HIGH or HIGH to LOW. Luckily RPi.GPIO library provides a method called wait_for_edge. We will use this method to listen to any interrupt (FALLING edge) from pins 5 and 6 and then execute our shutdown script.
Create the Shutdown Python Script
Execute the command below to create a python file called pi_Shutdown.py
sudo nano pi_Shutdown.py
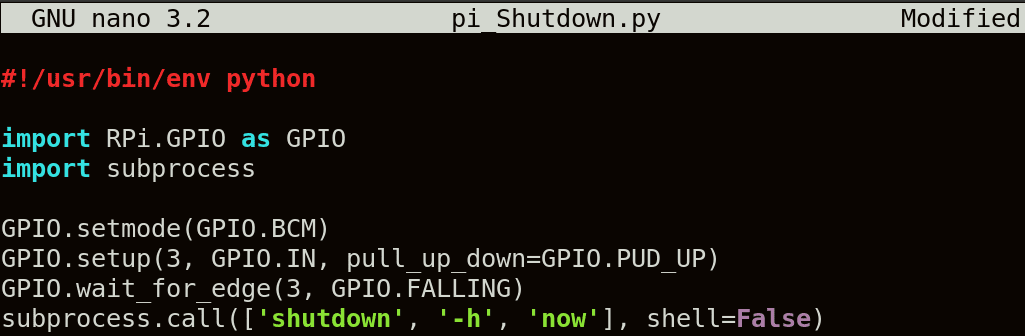
Paste the code below and save the file (Ctrl + S). Use Ctrl + X to exit
#!/usr/bin/env python

import RPi.GPIO as GPIO
import subprocess

GPIO.setmode(GPIO.BCM)
GPIO.setup(3, GPIO.IN, pull_up_down=GPIO.PUD_UP)
GPIO.wait_for_edge(3, GPIO.FALLING)

subprocess.call(['shutdown', '-h', 'now'], shell=False)
Shutdown script
To enable this script on boot, we need to add it to the /usr/local/bin directory. Execute the command below.
sudo mv pi_Shutdown.py /usr/local/bin/
Make the file executable with the chmod command.
sudo chmod +x /usr/local/bin/pi_Shutdown.py

Shutdown Script
Up to this point, we have successfully created a script to shut down our Pi. First, however, we need a bash script to start and stop the service.
Create the Bash Script
To create the script, execute the command below.
sudo nano pi_Shutdown.sh
Paste the code below into the file.
#! /bin/sh

case "$1" in
start)
echo "Starting pi_Shutdown.py"
/usr/local/bin/pi_Shutdown.py &
;;
stop)
echo "Stopping pi_Shutdown.py"
pkill -f /usr/local/bin/pi_Shutdown.py
;;
*)
echo "Usage: /etc/init.d/pi_Shutdown.sh {start|stop}"
exit 1
;;
esac
Bash Script
Add the script in the /etc/init.d directory and make it executable.
sudo mv pi_Shutdown.sh /etc/init.d/
sudo chmod +x /etc/init.d/pi_Shutdown.sh
To make the script start on boot, use the command below.
sudo update-rc.d pi_Shutdown.sh defaults
Now, start the script with the command below.
sudo /etc/init.d/pi_Shutdown.sh start

Bash script
That’s it! We now have a working power button, and you can proceed to test it.
Conclusion
I believe you now have a working wake/shutdown button on your Raspberry Pi. If you are a well-versed developer with Python and bash scripting, you can add more interesting lines in the code. Even though the Raspberry Pi ships without several components, it gives you a platform to test your skills and develop the necessary tools and addons you need.
1 comment
Great write up! Thank you! I have a RPI4 with latest Bullseye updates, using python3.
I was caught up with a problem after following the instructions to a “T”. After starting the script using
“sudo /etc/init.d/pi_Shutdown.sh start” I received the following error “ImportError: No module named RPi.GPIO
“.
I found the answer here: https://stackoverflow.com/questions/70697888/rpi-gpio-modulenotfounderror-no-module-named-rpi-gpio.
If you also come to see this problem & the py script doesn’t start properly for you, add “sudo python3” to your .sh bash script file.
For example,
#! /bin/sh
case “$1” in
start)
echo “Starting pi_Shutdown.py”
sudo python3 /usr/local/bin/pi_Shutdown.py &
;;
stop)
echo “Stopping pi_Shutdown.py”
pkill -f /usr/local/bin/pi_Shutdown.py
;;
*)
echo “Usage: /etc/init.d/pi_Shutdown.sh {start|stop}”
exit 1
;;
esac