
With every new release, the Raspberry Pi becomes more and more powerful, allowing us to run even more heavy tasks than we could have imagined. It has become one of the ideal devices for retro gaming. One pretty unique game that I associate with retro gaming is Quake 3. And in this post, we will give you a step-by-step guide to installing and running Quake 3 on the Raspberry Pi.
What is Quake 3?
Quake III Arena is a first-person shooter game released in 1999 and developed by id Software. Its release had a massive impact on the market since it helped define the multiplayer arena and introduced bots controlled by Artificial Intelligence for single players. This new technology made the game quite fascinating as it brought a wholly unique experience to gamers.
The game’s plot is simple: “in the Arena Eternal, the greatest fighters of all time fight for the entertainment of a race known as the Vadrigar.” It takes place in a sci-fi world with up to 16 players per map. At the start of the game, every player needs to select a character and have the same kind of weapons; however, they can collect more weapons during the gameplay.
The game was supported by various platforms, including Microsoft Windows, Linux, Mac OS, Mac OS X, Dreamcast, PlayStation 2, Xbox 360, and iOS. However, when the developers released the games’ source code, other developers modified this code and ported the game to run on different devices, including the Raspberry Pi.
Installing Quake 3 on Raspberry Pi
This post will show three methods that you can use to install Quake III Arena on your Raspberry Pi. Of the three, I highly recommend using the first two, as the third method still shows some errors when trying to launch the game (as of writing this post). These methods include:
- Install Quake 3 from the Raspberry Desktop
- Install Quake 3 from the Raspberry repositories.
- Compiling the Q3Lite port
Requirements
For this project, you will need:
- A newer Raspberry Pi board for better performance. (We highly recommend using a Raspberry Pi 4 board)
- An Active internet connection
- A Micro SD Card. Even though you might have configured your Pi to boot from a USB drive, an SD card would be better for faster read/ write speeds.
- Display Monitor
Even though you can still use VNC to access the graphical interface of your Pi, we don’t recommend it when gaming because it will increase the game’s lag.
When you have all the requirements in place, follow the steps below.
Setup the Raspberry Pi
First, install an Operating System on your SD Card. If you are doing this for the first time, you can check out our post on Installing the Official Raspberry Pi OS on the Pi. Additionally, you can enable SSH or VNC, which will allow you to have easy access to the Raspberry Pi. You can check out our posts “How to Set up VNC Server on Raspberry Pi” and “How to SSH into Raspberry Pi.“
For this post, we will access the graphical desktop interface of the Pi via VNC and SSH. First, update your system to ensure running the latest packages and repositories as a rule of thumb.
sudo apt update
sudo apt upgrade
Method 1: Install Quake 3 from the Raspberry Pi desktop
That is one of the easiest ways which you can use to install Quake 3 on the Raspberry. You don’t need to execute multiple commands like we would with other methods. Follow the steps below.
1. On the Raspberry Pi desktop, open the main menu and select Preferences -> Add/ Remove Software.
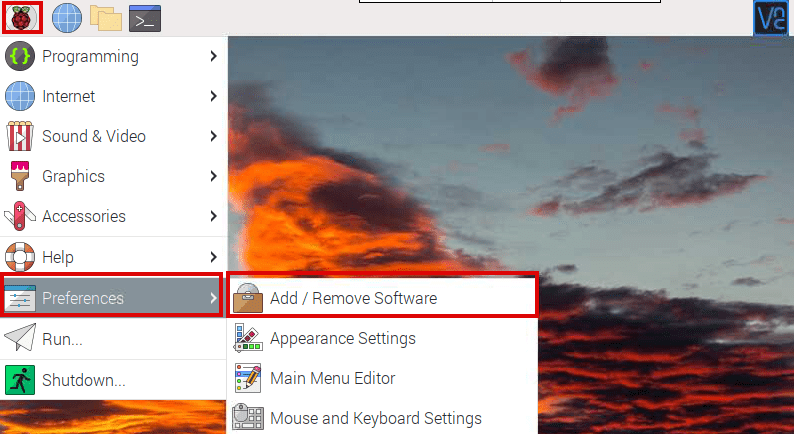
Add Software
2. Type “quake3” in the search box on the window that appears and hit “Enter.” You will see a long list of Quake 3 packages. Select the option “Quake III Arena menu entry and launcher scripts.“
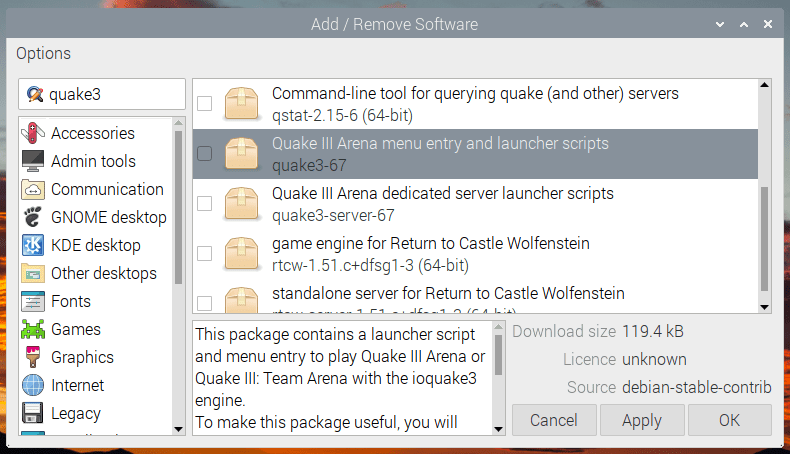
Install Quake 3
3. Tick the check box next to this option and click OK at the bottom to install Quake3 on your system. You will see a prompt to enter the user password.
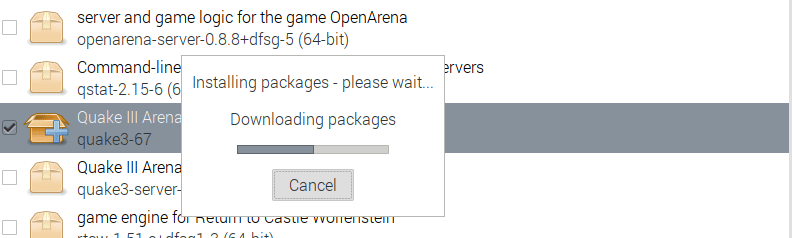
Install Quake3
4. Once the installation completes, launch the menu. You should now see a menu option called “Games,” Inside here, you will see Quake 3.
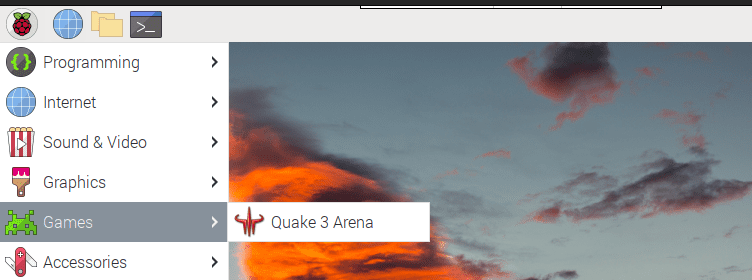
Games Menu
5. However, when you try to launch the game, you will see the error “Required data files are missing. Please use game-data-packager to build and install the data packages for Quake 3 Arena.”

Required Data files missing.
6. To solve this error, we need to download the game data using the game-data-packager utility. Launch the Terminal and execute the command below.
game-data-packager quake3 -i
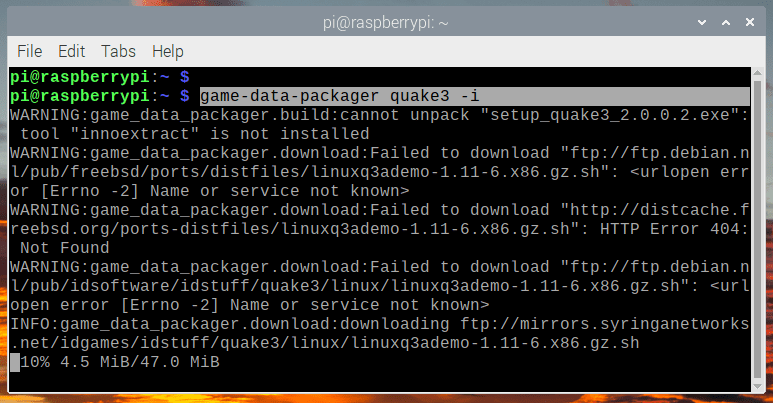
Download and Install Game data
7. When done, return to the games menu and relaunch Quake 3. This time, the game should launch without any errors.
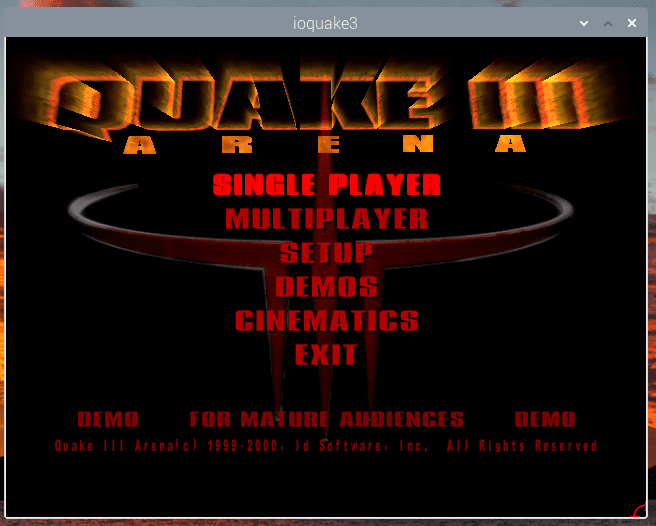
Run Quake 3 on Raspberry Pi
That’s it! You have successfully installed Quake 3 on your Pi from the graphical user interface.
Method 2. Install Quake 3 from the Raspberry Repository
If you are a Terminal person, this method is the best option. To get started, ensure you run the latest packages on your system by executing the command below.
sudo apt update
sudo apt upgrade
When done, install the Quake 3 package by executing the command below.
sudo apt install quake 3
When done, you will see a new “Games” menu added. However, when you try launching the game at this point, you will see the error “Required data files are missing. Please use game-data-packager to build and install the data packages for Quake 3 Arena.” To solve this issue, execute the command below.
game-data-packager quake3 -i
When done, you can proceed to launch Quake 3 from the Games menu or execute the command below.
quake3
Method 3. Compile Q3Lite on your Raspberry Pi
Q3lite is a Linux-based version of the id Tech 3 gaming engine. The project’s goal was to design a lightweight gaming engine for use with low-end CPUs found in Single Board Computers, tablets, development boards, smartphones, and other devices. Q3lite has a bespoke OpenGL ES renderer, the industry standard for embedded 3D graphics acceleration. The Q3Lite project aims to keep up with the latest Quake III Arena engine while introducing new capabilities that benefit both players and server admins.
Note: At the time of writing this post, Q3Lite doesn’t include the support for Raspberry Pi 4. However, the developers are working on it, and we will update this post once they release a version for Raspberry Pi 4.
Q3Lite supports several Raspberry Pi boards, including:
- Raspberry Pi Zero, Zero W
- Raspberry Pi 1 Model A+, B, B+ w/512 MB Memory
- Raspberry Pi 2
- Raspberry Pi 3
Follow the steps below to compile and install Q3Lite on your system.
1. Install all the required Raspberry Pi OS updates using the command below. If you are running outdated packages, you might encounter errors.
sudo apt-get update && sudo apt-get upgrade && sudo apt-get dist-upgrade
2. When done, update the Raspberry Pi firmware with the rpi-update command below. Don’t turn off the Raspberry Pi when doing a firmware update. When done, reboot the Pi.
sudo rpi-update
sudo reboot now
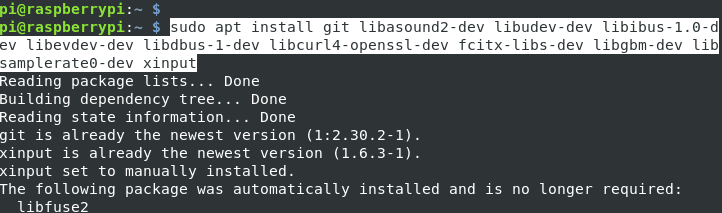
3. When done, install the following packages necessary to compile and install Q3Lite on the Raspberry Pi.
sudo apt install git libasound2-dev libudev-dev libibus-1.0-dev libevdev-dev libdbus-1-dev libcurl4-openssl-dev fcitx-libs-dev libgbm-dev libsamplerate0-dev xinput
Install Packages
When done, reboot your Raspberry Pi.
sudo reboot now
4. We need to clone the Q3Lite repository on our system. You can clone the repo in any directory you wish, but we will clone it on the home directory for this post.
git clone https://github.com/cdev-tux/q3lite.git

Clone Q3Lite Repo
When done, change your directory to the newly created q3lite directory.
cd q3lite
5. At this point, we need to run the make-raspberrypi.sh script, which will do all the dirty work for us – compiling Q3Lite and downloading the necessary packages required to run the game on the Raspberry Pi. This process might take a while; please be patient.
sudo ./make-raspberrypi.sh
If you encounter the error “Unable to determine platform type from /proc/cpuinfo”, you are probably running Raspberry Pi 4, which is not yet supported.
Execute the command below to install Q3Lite on your Raspberry when the process completes successfully.
sudo ./make-raspberrypi.sh install
You will see a prompt to download the updated Quake3 files during the installation. Type Y and press Enter as we will need these files to run Quake 3 on our system. You will also see a prompt to Agree to the is Software End User License Agreement (EULA). When done, head over to the Games menu and launch the game by clicking on the Q3Lite option.
Wrapping Up!
At this point, you should now have Quake III Arena running on your Raspberry Pi. If you come across any issues during the installation, please don’t hesitate to leave a comment below.