
Despite its physically small size, the Raspberry Pi has proven to be a worthwhile device. With more recent models becoming more powerful with increased RAM and performance, you can do anything with the Raspberry Pi, like your standard PC, including gaming.
However, there is one problem: not all games can run smoothly on the Raspberry Pi without a reliable gaming emulator. Many gaming emulators are available for the Raspberry Pi, including RetroPie, which we have looked at in our article – How to install Retropie on Raspberry Pi. Even though RetroPie is a good option, Lakka seems to stand out from the crowd.
What is Lakka?
Lakka is an open-source Linux distribution that transforms small computers like the Raspberry Pi into retro gaming consoles. It is built on the LibreELEC operating system and utilizes the RetroArch gaming platform to provide a user-friendly interface for running various retro game emulators.
With Lakka, users can emulate various gaming consoles and systems, including classic systems like the NES, SNES, Sega Genesis, PlayStation, etc. It supports an extensive library of games from these systems, allowing users to enjoy nostalgic gaming experiences on their Raspberry Pi.
Lakka provides a simple setup process and offers features like customizable themes, gamepad support, save states, and more. It’s a popular choice for retro gaming enthusiasts who want to build their own emulation consoles using affordable and accessible hardware like the Raspberry Pi.
Lakka vs Retropie
Lakka and RetroPie are two popular options for creating retro gaming consoles on the Raspberry Pi, but they differ significantly in their approach and technology stack.
- Lakka utilizes the RetroArch framework on top of LibreELEC OS, while RetroPie relies on the EmulationStation frontend with Raspberry Pi OS.
- Lakka offers a user-friendly system ready for immediate gaming out of the box, while RetroPie boasts a larger and more active community for quick troubleshooting and support.
- Lakka is lightweight and optimized for smooth performance on Raspberry Pi models. In contrast, RetroPie features a customizable frontend interface with advanced options and supports additional software like Kodi for expanded functionality.
Pre-requisites
Here are some of the software and hardware we will need for this project.
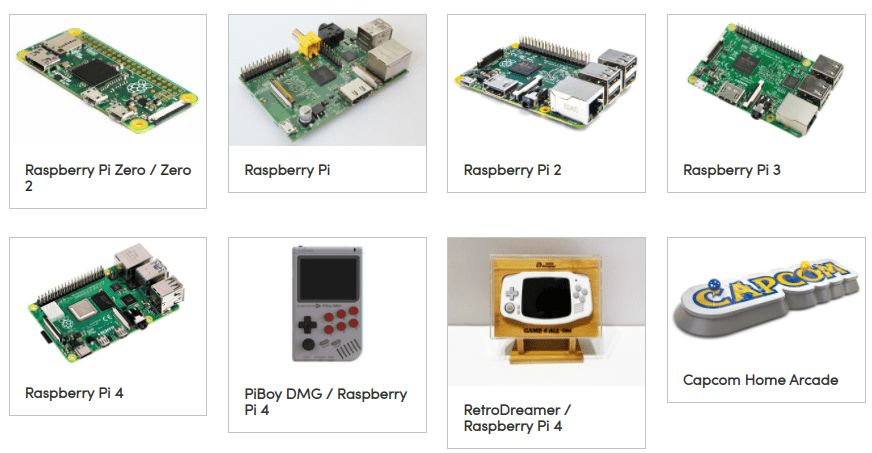
- Raspberry Pi board: Lakka supports all Raspberry Pi models. But of course, if you want excellent performance, you should consider using the latest version like Raspberry Pi 3B, 4B, or even the newest release, Raspberry Pi 5.
- Micro SD card: We recommend having an 8GB SD card for a smooth experience. If you have enabled your Pi to boot from a USB drive, you can also use a flash drive that is at least 8 GB.
- An internet connection: You will need an internet connection to download the Lakka OS image file and the games you will test on your Raspberry Pi. For the Raspberry, we highly recommend using an ethernet connection.
- Display monitor: Connect any display (computer monitor or TV) to the Raspberry Pi using the HDMI ports available.
- USB keyboard and mouse: You will need these two items to navigate the Lakka interface and play some games.
Some other optional requirements that might come in handy include:
- Retro USB Controllers or Joysticks: Retro USB controllers or joysticks can enhance the gaming experience by providing a more authentic feel when playing retro games on Lakka.
- Xbox Controller: If you prefer modern gaming controllers, an Xbox controller can be used with Lakka to play games wirelessly or via a USB connection.
- PlayStation Controller: Similarly, a PlayStation controller can be used with Lakka to play games wirelessly or via a USB connection, offering an alternative control option for gaming.
Install Lakka on Raspberry Pi
Now that you understand Lakka well, how different it is from RetroPie, and the requirements you need for this project, let’s dive in and get started with installing it. Follow the steps below.
Step 1: Download and Install the Raspberry Pi Imager
The Raspberry Pi Imager is a utility developed by the Raspberry Pi team for writing OS images to the SD card. Of course, there are other options like Balena Etcher, but the Raspberry Pi Imager has additional features that simplify installing an OS with the Raspberry Pi SD card.
One of those features is the ability to do some pre-configuration to the OS before installation. For example, you add your WiFi credentials, set your hostname, enable SSH, and more. Additionally, you don’t have to download an OS image online; it can download as it flashes the image to the SD card.
Step 2: Download the Lakka image file (Optional)
You can download the Lakka image file from their official website or let the Raspberry Pi Imager do that hard work for you. But we always have one recommendation: if you think you might need to install Lakka again in the future or need to install it on another Raspberry Pi board, download the image file and have it stored on your PC. When you download an image file using the Raspberry Pi IMager, it will not be stored on your PC, and you will need to download it every time you want to install Lakka.
Launch your browser and navigate to the official Lakka website. First, you must select your hardware (Raspberry Pi model). In our case, we are using the Raspberry Pi model 4B.
Step 3: Flash the Lakka image to the SD card
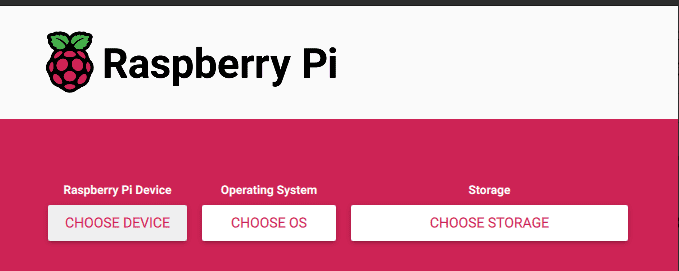
Launch the Raspberry Pi Imager from the applications menu. You will see a window similar to the image below with three giant buttons – “CHOOSE DEVICE,” “CHOOSE OS,” and “CHOOSE STORAGE.”
Raspberry Pi Imager
Click “CHOOSE DEVICE” and select your Raspberry Pi Model. In our case, it’s the Raspberry Pi 4B. Next, click “CHOOSE OS.” Now, here you have two options:
- If you downloaded the Lakka OS image from their official website, scroll download and select the “Use Custom” option. That will open the file manager, and you will choose the Lakka image you downloaded.

Use custom OS image
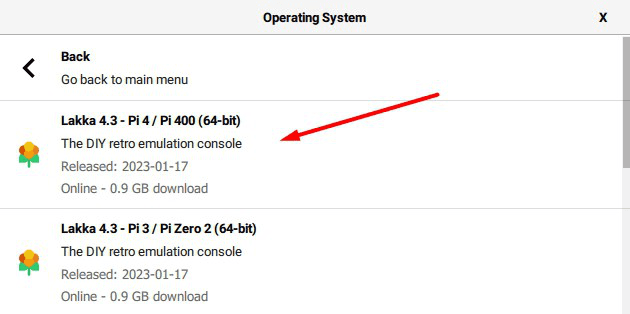
- If you want to download Lakka from the Raspberry Pi Imager, select “Emulation and game OS” => “Lakka.” You will see a list of available Lakka images. Select the image that is compatible with your Raspberry Pi model.
Lakka image versions

Once done, click “CHOOSE STORAGE.” Here, you will need to select your Raspberry Pi SD card. Once done, click “Next” to start writing the image to the SD card.
Booting up Lakka
After successfully writing the Lakka image to the SD card, remove the SD card from your PC and insert it into the Raspberry Pi. Connect all the required peripherals and power up your Raspberry Pi.
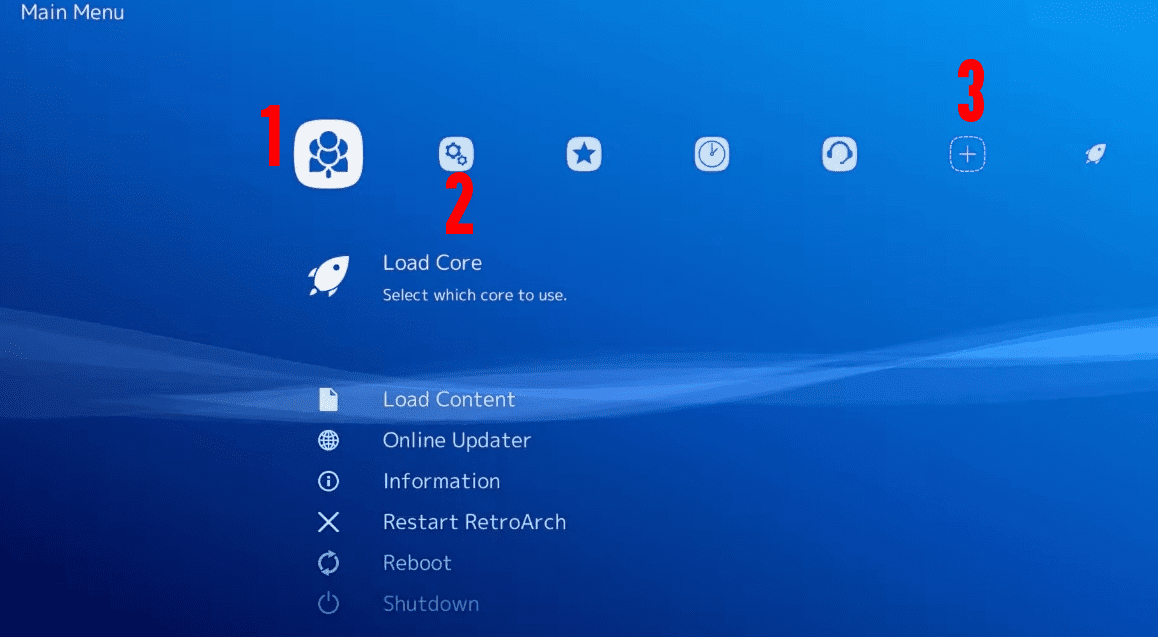
After a few minutes of booting, you will be greeted by the Lakka “Main Menu,” which should look similar to the image below. As you can see, we have marked some of the options you will use most with numbers, which we will explain below.
Lakka desktop
- This is the “Main Menu.” We will mainly use it to find the IP addresses assigned to the Raspberry Pi, which will help connect to shared folders in Lakka. Shared folders will be helpful when you need to copy downloaded ROMs in your PC over to your Lakka setup.
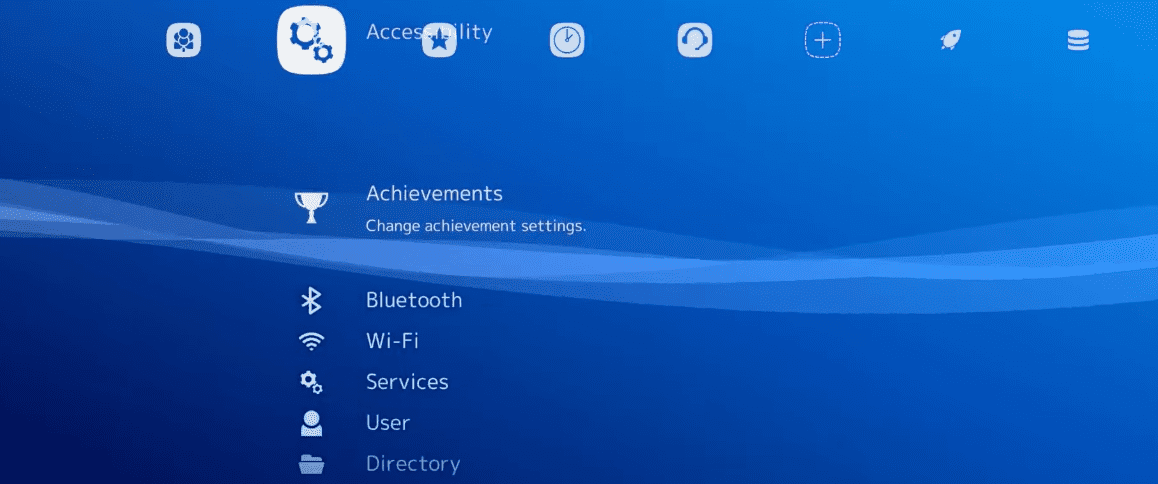
- This is the “Settings Menu.” It comes with several configurations for audio, input, interface, WiFi, services, etc. This post will mainly use it to connect to WiFi and set up file sharing.
- This is the “Import Content” menu: We will use this option mainly for scanning for ROMs available on the Lakka setup.
Create a WiFi connection on Lakka
If you don’t have an ethernet connection, you can use WiFi. Click the “Setting Menu” and select “WiFi,” as shown in the image below.
WiFi
You will see a list of all the available WiFi networks near you. Select the WiFi you want to connect to. If it is password-protected, you will be prompted to enter the passphrase. Lakka will display a virtual keyboard you can navigate using your game controller to make the process more user-friendly.
After entering the passphrase, you will be taken back to the WiFi menu. If the connection was successful, you will see an “Online” status displayed next to the WiFi network you are connected to.

Lakka WiFi connection
Retrieve the IP address on Lakka
Up to now, we believe your network is up and running – connected via ethernet or WiFi. As mentioned above, you must work with “Shared Folders” in this project. You must know the IP address assigned to the Raspberry Pi.
Click the “Main Menu” as shown in the image below. Select the “Information” option.
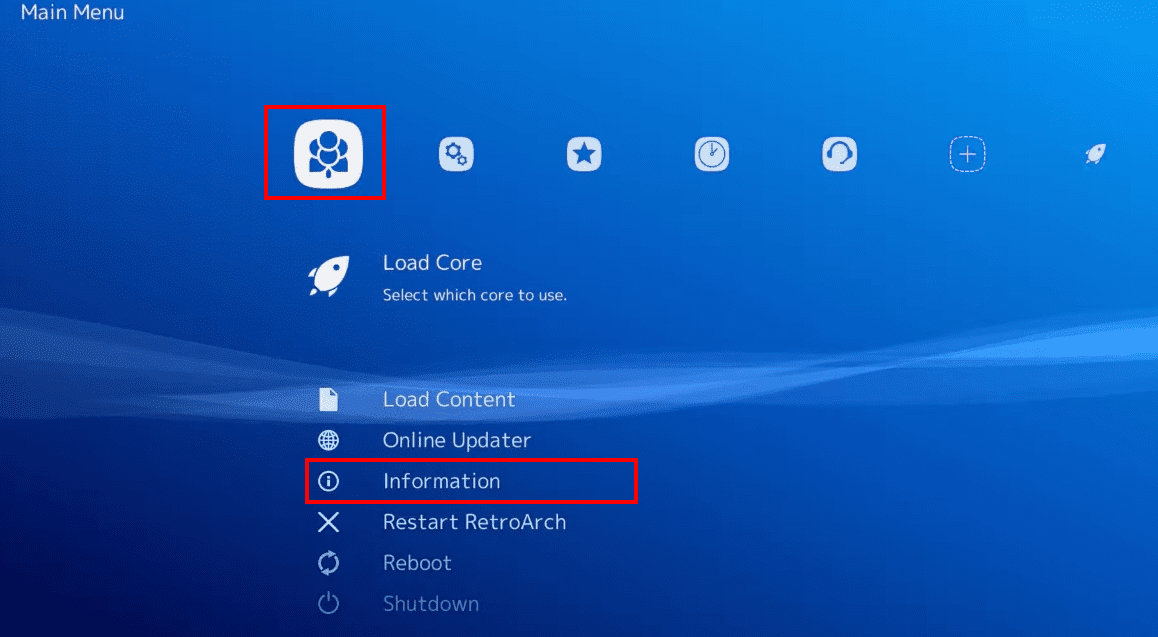
Lakka system information
That will open a new screen with various system options. Click “Network Information.”

Lakka network information
You will see a new screen displaying all the IP addresses assigned to the Raspberry Pi. In most cases, you will see two addresses. The loopback address is always 127.0.0.1, and the router assigns the dynamic IP address to your Raspberry PI.
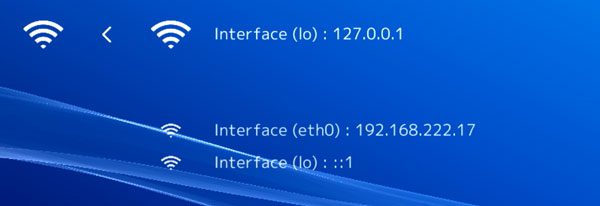
Lakka IP addresses
In our case, the dynamic IP assigned by the router is 192.168.222.17. That is the address that we need. The Raspberry Pi uses the loopback address 127.0.0.1 to communicate with itself.
Activating SSH and Folder Sharing within Lakka
The following section demonstrates how to activate SSH within the Lakka interface and enable its folder-sharing feature.
Enabling Lakka’s built-in support for Samba folder sharing will streamline transferring files such as ROMs to the Raspberry Pi.
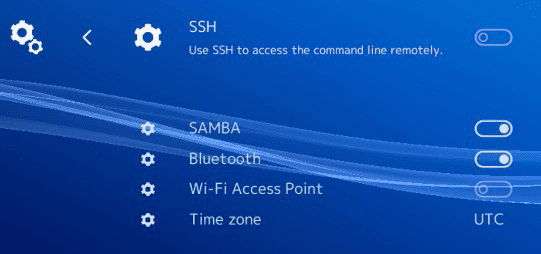
Navigate to the “Settings menu” and locate the “Services submenu” as indicated below.
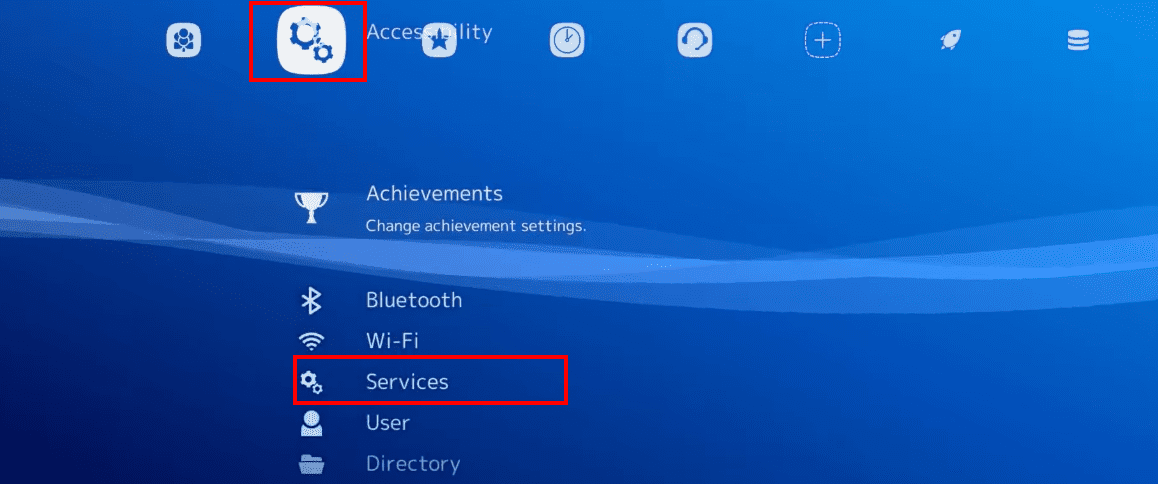
Lakka services
In this menu, you can enable or disable SSH and SAMBA services. For most users, it’s generally safer to keep SSH disabled unless you specifically plan to use it.
SAMBA, on the other hand, is highly beneficial for most users. The service enables Lakka to share its folders over a network.
Enabling SAMBA will simplify transferring your ROMs from your computer to the Raspberry Pi effortlessly.
Lakka samba service
Copying ROMs over to Lakka
This section will guide you through transferring ROMs from your PC to your Raspberry Pi’s Lakka installation. The reason we are doing that is that Lakka doesn’t come with a web browser that you can use to download ROMs for your favorite games. Therefore, you must download the games on your PC and transfer them to Lakka.
If you’ve activated Samba in the previous section, you can proceed to open the “File Explorer”. Navigate to the address bar (1.) and type “smb://Lakka/” then press enter. This should establish a connection to your Raspberry Pi, allowing access to the shared folders.
If the connection fails, you can use the IP address you retrieved earlier instead of “Lakka.” So, in the address bar, enter something like “smb://192.168.222.17/” instead.
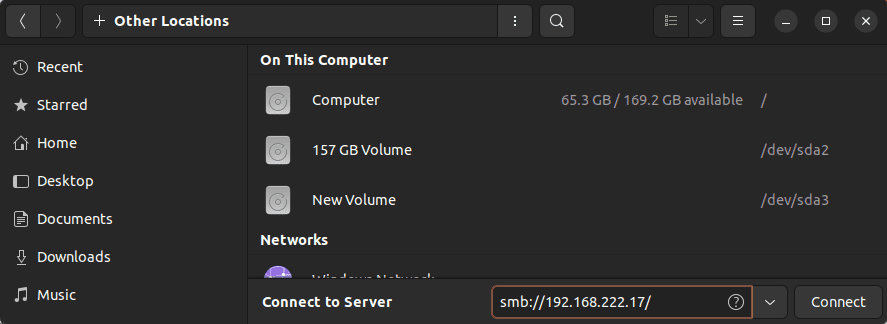
Connect to shared folders.
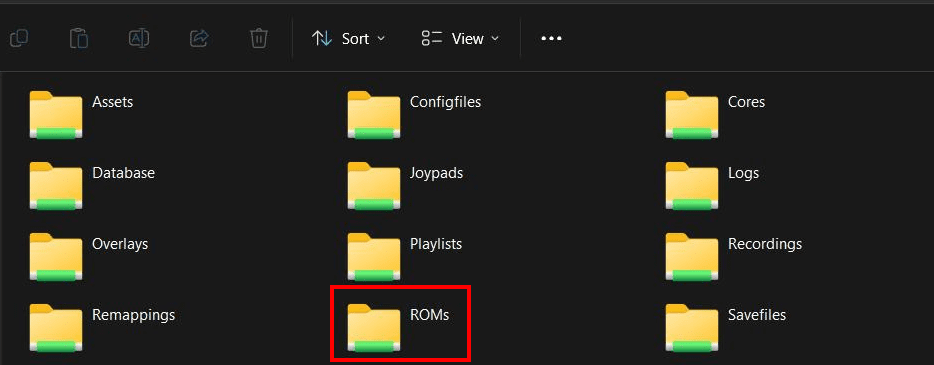
Once connected to your Raspberry Pi’s Lakka installation, you will see the folders/ directories available on your Lakka setup.
The folder we’re most interested in is labeled “ROMs.” Navigate into this folder. You can copy all your ROMs from your PC to the Raspberry Pi.
Lakka samba access
Organizing the ROMs into folders based on the console they belong to is advisable. For instance, the game “Doom 64” for the Nintendo 64 would be placed in a “Nintendo 64” folder.
Tip: Although Lakka’s Retroarch scanner diligently attempts to identify the console a game belongs to, it’s not flawless and may encounter difficulties occasionally detecting games. In the following section, we’ll explore how to import ROMs using the Lakka interface. This process is straightforward and doesn’t require a significant amount of time.
Importing ROMs using Lakka’s interface
Up to this point, you have done much of the hard work required to have your Lakka setup up and running. Now, you only have one task: importing the ROMs you copied inside the folder.
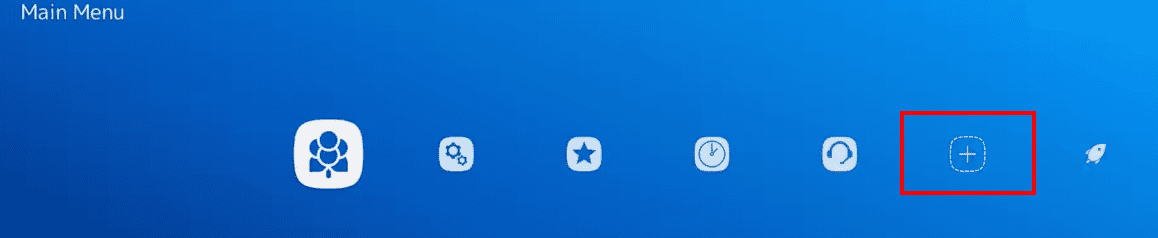
To begin, navigate to the “Import Content” menu. As discussed earlier, this menu can be identified by the symbol [+] and is located at the end of the menu row. Once you’re in the “Import Content” menu, access the “Scan Directory tool.”
Import content
Within the “Scan Directory tool,” click the “Scan this Directory” option. Lakka will promptly start scanning the directory and adding the ROMs to its library. This process may take some time, especially with an extensive collection.
After the import process is complete, you can run your ROMs. To find them, return to the main menu screen and look for icons on the far right representing each console you have ROMs for. For instance, the SNES is depicted by an SNES controller icon.
Once you’ve reached this stage, you can use your Raspberry Pi to play these games.
Conclusion
This post has given you a comprehensive guide on installing and starting with Lakka on the Raspberry Pi. We tested several games on Lakka, and the performance was excellent. Did you come across any issues? If yes, don’t hesitate to let us know in the comments below.