
Whether a front-end or back-end web developer, you might require NodeJS when building various applications and projects. In plain English, the developers of NodeJS took Javascript, which is usually confined to a browser (has access to only the webpage), and enabled it to run on your computer. That was made possible using Google Chrome’s v8 engine.
That allows you to perform tasks like accessing the computer file system, monitoring network traffic, listening to HTTP requests, accessing Databases, etc., using Javascript. In simple terms, anything you can do with a language like PHP or Python is now possible with Javascript.
NodeJS is ideal for building highly scalable, data-intensive, and real-time backend services that power our client applications. You might wonder, but there are many other languages and frameworks that you can use to build backed apps; what’s the unique feature with NodeJS? There are several reasons.
- It’s great for prototyping and agile development. Noe is used in production by many famous companies, including PayPal, Uber, Walmart, Netflix, etc.
- NodeJS is super fast and highly scalable.
- NodeJS is Javascript with just different syntax and modules. Therefore, if you are a front-end developer, you can comfortably build backend services with NodeJS without learning a new language or framework.
This post will guide you on installing NodeJS on the Raspberry Pi 4. The Raspberry Pi 4 is the most powerful board, featuring more processing power and memory (RAM). Therefore, you can run any resource-intensive tasks on it and still get the utmost performance.
Set up the Raspberry Pi
We will use the official Raspberry Pi OS for this post. Please look at our master guide, which gives you a step-by-step guide for installing Raspbian on the Raspberry Pi. ‘How to install Raspbian on Raspberry Pi.’ If you wish to access your Pi via SSH or VNC, the posts below will be of excellent help.
- Connecting to Wi-Fi & Enabling SSH Without Monitor on Raspberry Pi
- How to Set up VNC Server on Raspberry Pi
When done, update your Raspberry Pi by executing the commands below on the Terminal.
sudo apt update
sudo apt upgrade
Determine the Raspberry ARM architecture
As you know, the Pi runs on the ARM architecture, and as of writing this post, the releases available for ARM are ARMv7 and ARMv8. To check out your ARM architecture, execute the command below on the Terminal.
uname -m

ARM version
From the image above, we are running the ARMv7l architecture. Therefore, we need to download the equivalent NodeJS library.
Download and install NodeJS
After successfully updating your system and checking the ARM architecture, we can now proceed to download and install NodeJS on our Raspberry Pi. We will look at three main methods that you can use to download and install NodeJS and NPM on your Pi.
- Download the NodeJS package for ARM (Recommended)
- Install Node.js from the NodeSource Repository
- Install NodeJS from the Raspbian repository
Method 1. Download the NodeJS package for ARM (Recommended)
Tip: I highly recommend using the Terminal to carry out all the steps discussed in this method. Follow the steps below.
Step 1. Download the NodeJS ARM package
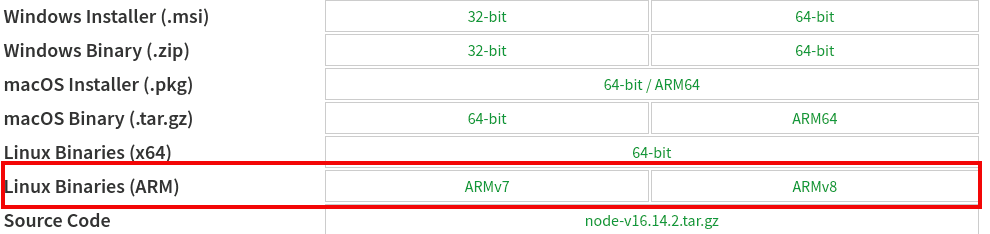
To get started, open the official NodeJS download page. Here, you will see a list of all available NodeJS setup packages for various platforms, including Windows, macOS, and Linux. Find the Linux Binaries (ARM) section.
Download the package supported by your Raspberry Pi. In our case, it’s the ARMv8.
Download NodeJS
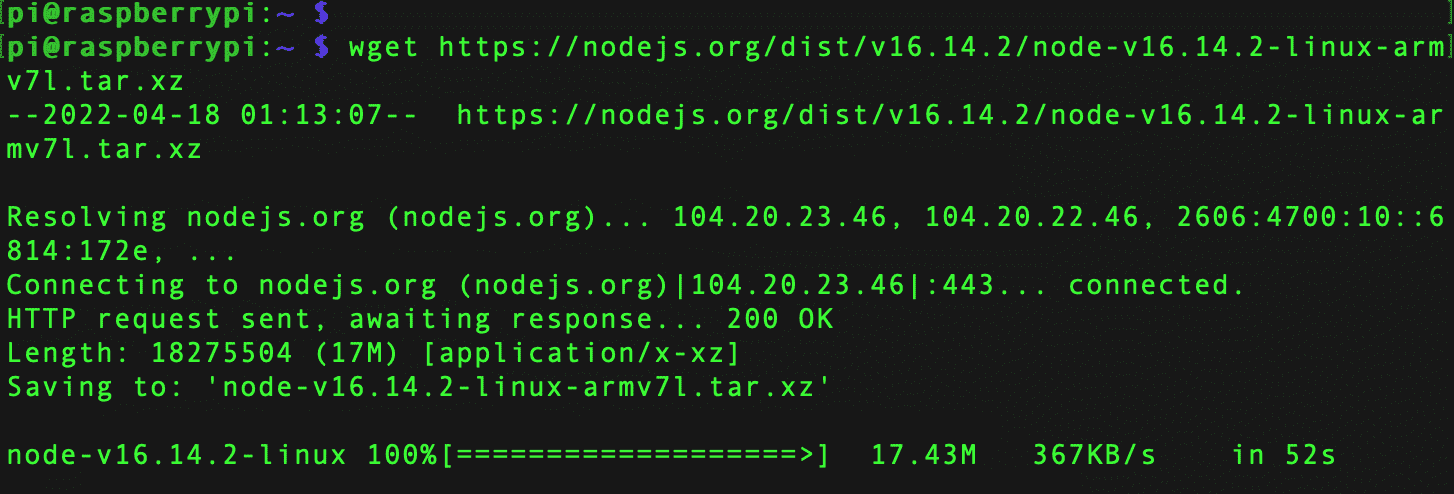
Alternatively, you can right-click on the option you wish to download and copy the link. You can then use this link to download NodeJS via the terminal using the command wget below.
sudo wget [link-address]
e.g
sudo wget https://nodejs.org/dist/v16.14.2/node-v16.14.2-linux-armv7l.tar.xz
Download NodeJS
Step 2. Extract the file
If the downloaded successfully, you will notice that the downloaded file is compressed in a tar.xz format. To extract the contents, use the syntax below.
tar -xf [file-name.tar.xz]
e.g
tar -xf node-v16.14.2-linux-armv7l.tar.xz

Extract files
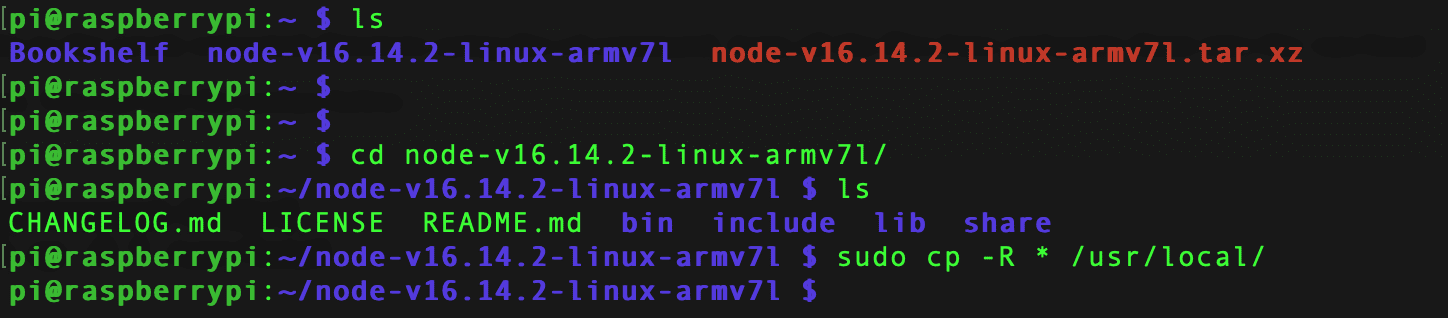
Step 3. Copy the files to the /usr/local Directory
Navigate to the newly extracted directory using the cd command. Copy all the files here and paste them into the /usr/local directory. You can use the syntax below.
cd [extracted-folder]
sudo cp -R * /usr/local
The -R parameter allows us to copy the directories recursively, and the * parameter specifies that we want to copy everything in that folder.
Copy files
That’s it! You have successfully installed NodeJS and NPM on your system. To verify that, use the –version commands as shown below.
node --version
npm --version

Check NodeJS version
Additionally, you will notice that we are running the latest stable NodeJS release. That is very important because the other methods we will look at might not install the newest NodeJS release.
Method 2. Install Node.js from the NodeSource Repository
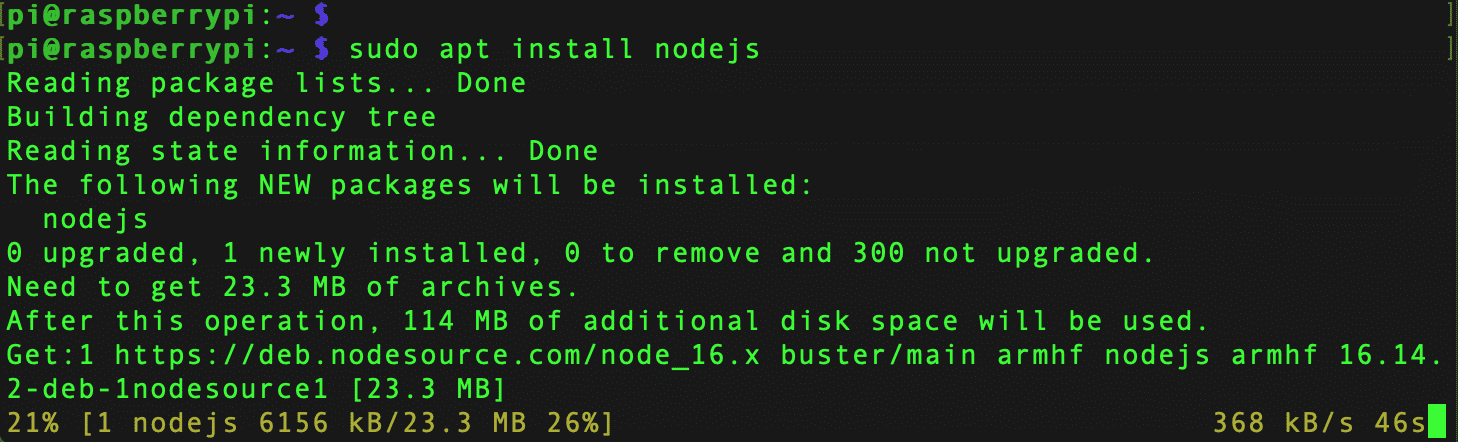
NodeSource is a company that focuses on providing the latest and most stable NodeJS releases for various platforms. To get started, add the NodeSource repository to your system using the command below.
sudo curl -fsSL https://deb.nodesource.com/setup_16.x | sudo bash -
You will notice setup_16.x section in the command above. That specifies that we want to install NodeJS 16 on our system. If we wanted to install NodeJS 14, we would change that to setup_14.x. Check out their official GitHub page to see all the available repositories.
When done, execute the command below to install NodeJS.
sudo apt install nodejs
Install NodeJS
When done, confirm by checking the version of NodeJS and NPM as shown below.
node --version
npm --version
Check NodeJS version
To uninstall NodeJS installed using this method, execute the commands below.
sudo apt remove nodejs
sudo apt purge nodejs
sudo rm /etc/apt/sources.list.d/nodesource.list
The last command removes the NodeSource repository from our system.
Method 3. Install Node from the Raspbian repository
This method is one of the most straightforward. However, it has one major flaw. It will install an earlier version of NodeJS and NPM on your system. Use the commands below.
sudo apt update
sudo apt upgrade
sudo apt install node

NodeJS version
The image above shows that the installed version of NodeJS is 10.24.0, while the latest stable release is version 16. Additionally, this method does not automatically install NPM. You will have to install NPM separately using the command below.
sudo apt install npm
And you will also notice it this method installs a much earlier version of NPM. In our case, the installed version was 5.8.0, while the latest NPM release is 8.5.0

NPM version
Conclusion
This post has given you a step-by-step guide to installing NodeJS and NPM on the Raspberry Pi 4. We have looked at three main methods. However, I highly recommend using method 1, “Download the NodeJS package for ARM,” which automatically installs the latest version of Node and NPM on your system. Did you encounter any problems? Please don’t hesitate to let us know in the comments below.