
Python has recently reached the pinnacle of popularity as a programming language. Its main attraction point is the straightforward learning curve, but it is also compelling. It has an amazing community, and there are many external modules, making our lives easier by not having to reinvent the wheel. All these features make it the obvious choice for not only hobbyists but also professionals.
We know that Raspberry Pi is used extensively for creative projects and also for education. Both of these scenarios add up to Python having a major role on a Raspberry Pi. We will use the Raspberry Pi OS, which features several tools for learning and executing Python. In this article, we will explore how we can use Python on a Raspberry Pi.
Writing Python Code on Raspberry Pi
Before creating actual scripts, we ought to know how actually to code in Python. We are going to teach you some basic Python. Just basics, mind you, because these concepts and codes can go very deep indeed, and for that, you will have to do your own research.
Using Python Interactive Interpreter
The Python Interactive Interpreter, in simplest terms, is like a command line for Python. You can execute one-line code one after another and see the results instantaneously. This is a great aid for learning Python because you can observe, correct, and run the next code very quickly, not externally executing a script repeatedly. We will learn some basics of Python using this mode. First of all, to start the Python interpreter, start up the command line by pressing Ctrl+Alt+T. Now type in:
python3
This will start with the Python interpreter. The first and traditional code line to execute for you:
print("Hello World!")
Print Function
As you can probably see from the prior command, the print function displays what you have written inside the parentheses (brackets). It probably seems silly now, but you will see the significance. The print function in Python is used to display text for the user to see. There is a multitude of ways in which you can manipulate text to be displayed by the print function. We already have seen the most basic usage. Anything inside double quotations will be printed as it is.
print("I am learning to use Python on a Raspberry Pi.")
You can do the math:
print("Addition of 5 and 3:", 5 + 3)
print("Subtraction of 5 and 3:", 5 - 3)
print("Multiplication of 5 and 3:", 5 * 3)
print("Division of 5 and 3:", 5 / 3)
print("Division of 5 and 3 to the floor value:", 5 // 3)
print("Raising 5 to the 3rd power:", 5 ** 3)

Simple Printing and Math
Also, notice how a comma is used as a separator. Wherever a comma is used, space will replace it. Also, notice that when doing math with just numbers, there is no usage of double quotations. If you use double quotations, Python assumes it is a string (we will touch on this later), and you cannot perform math on strings. If you are using alphabetical characters with/without numeric characters, you will need to use double quotations only then. For example:
print(55)
print("55")
An individual number can be printed both with and without double quotations.
print(5 + 3)
print("5" + 3)
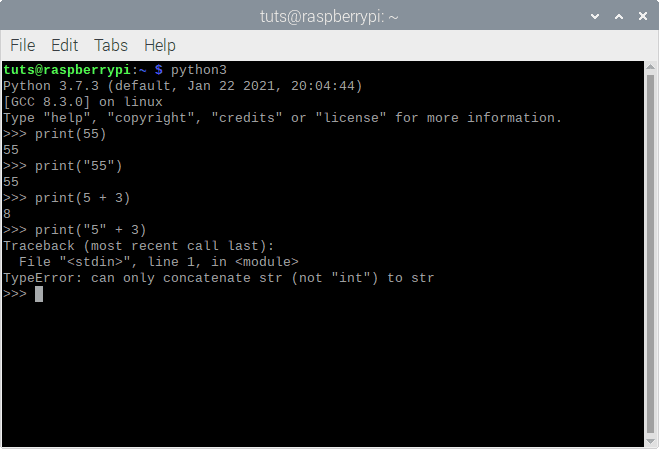
Printing str and int
Without double quotations, numbers get added. When you put double quotations around a number, it is now a string. In most basic terms, a string is any combination of characters. As you already know, if you put double quotations around any sequence of characters, it becomes a string. You cannot add numbers inside strings without converting them to integers. For Python, as soon as it sees the double quotations, there could be anything inside. Instead of “5”, it might be “bacon.” And obviously, you can’t add “bacon” to 3. There is a workaround, though:
print(int("5") + 3)
print(int("bacon") + 3)
Using the int() function, a number in the form of a string can be converted into a proper, mathematical integer. But if it is not an integer, it won’t be converted in the first place. We have seen two cases of 3 and 5, but there is one more:
print("5" + "3")
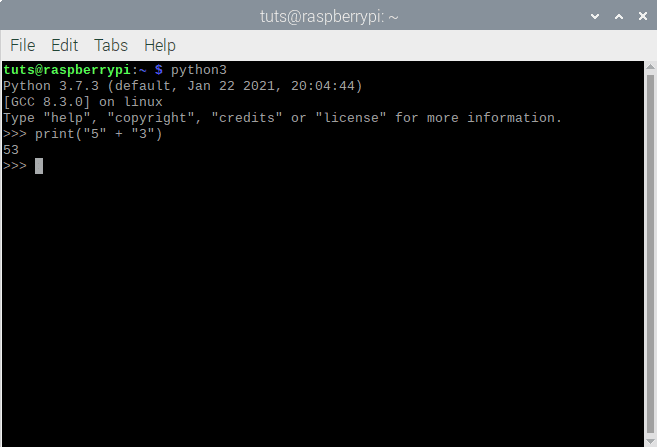
Adding strings together
That’s interesting, isn’t it? If you put a + sign between two strings, they will be joined end-to-end with no spaces. Let us see some more examples:
print("se7en")
print(se7en)
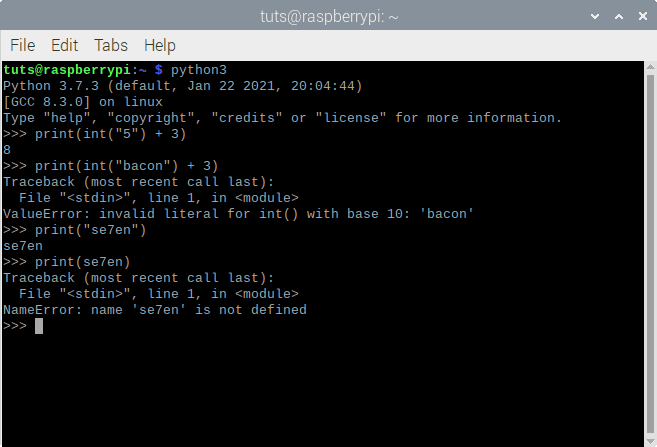
Interconverting data types for printing
The NameError here means that Python was under the assumption that ‘se7en’ is a variable. That is our next topic.
Declaring Variables
A variable is a name that is used in place of another value. The variable, as the name states, can represent any variable value. It is much like using pronouns in any conversational language. Say your name is John Doe, you don’t say “John Doe likes ice cream.” You say, “I like ice cream.” Here, ‘I’ is a variable that takes the place of the name of the person speaking. Let us see how that works in Python:
myname = "John Doe"
print(myname, "likes ice cream.")
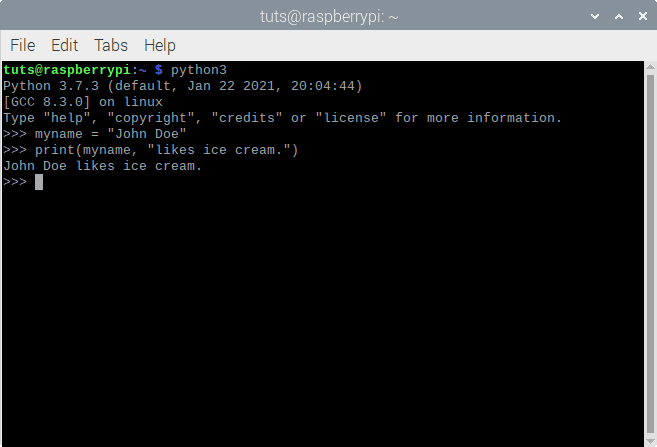
Declaring variables
It is clear from the example above that variables are not to be put inside double quotations. If you do that, it will be recognized as a string. I encourage you to think about what would happen if you do so and then try it out. There are rules with naming variables, though. I’ll list the important ones:
- The variable name has to start with an alphabet.
- You can’t use special characters in variable names. Alphabets and numbers are allowed.
- You can’t use keywords as variable names (we’ll touch on keywords later).
You can even identify numbers using variables. For example:
pi = 3.14
radius = 2
area = pi*radius*radius
print("If the radius of a circle is 2, the area will be", area)
If you try to see what type of variable radius is, you can do that using the code:
type(radius)
Here, it says that radius is an int, that is an integer. Now, if you check for the variable pi:
type(pi)
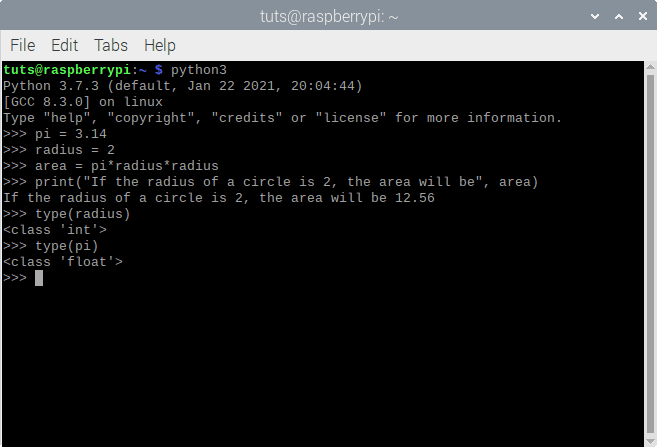
Using variables
You get a float. When a number has a decimal point in it, it is called a float. Even if there are just zeroes behind the decimal point, the presence of a decimal point makes it a float. string, int, and float and three of what are called ‘data types’ in Python. There are more types of data, which we will explore now.
Lists
A list is a collection of items. Those items can be strings, numbers, variables, or even lists. Lists will prove to be really useful later on. For now, let us take some examples.
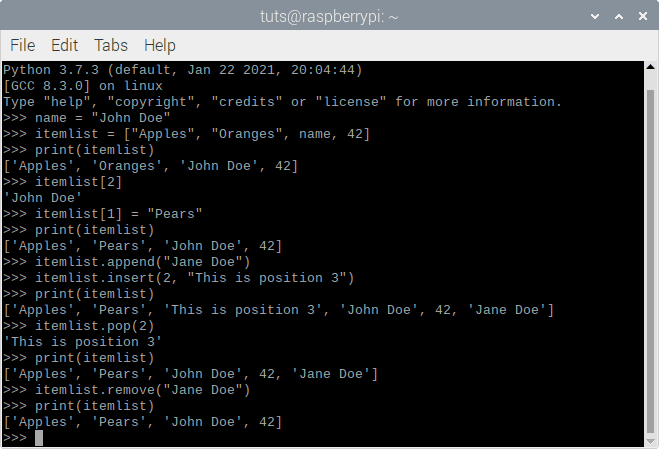
name = "John Doe"
itemlist = ["Apples", "Oranges", name, 42]
Here, we have made a list. If you print the list, you’ll see what the items on the list will look like if you use it.
print(itemlist)
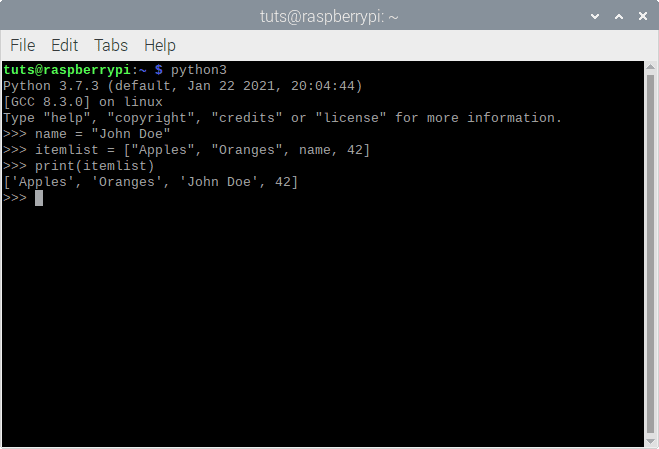
Creating list
Notice that itemlist is a variable assigned to the list we created. You can’t name it just ‘list’ because Python has many functions and operations associated with that name, and it will get confused if that is the name of a variable.
The way that you get an item from a list is by using the index of that item. For example, if you type in:
itemlist[2]
What? It shows the 3rd item, not the second. This is because Python starts counting with 0. This is quite common in programming. So the 1st item is actually at 0 index, the 2nd item at 1 index, and so on.
You can change the value of an item at a specific position:
itemlist[1] = "Pears"
print(itemlist)
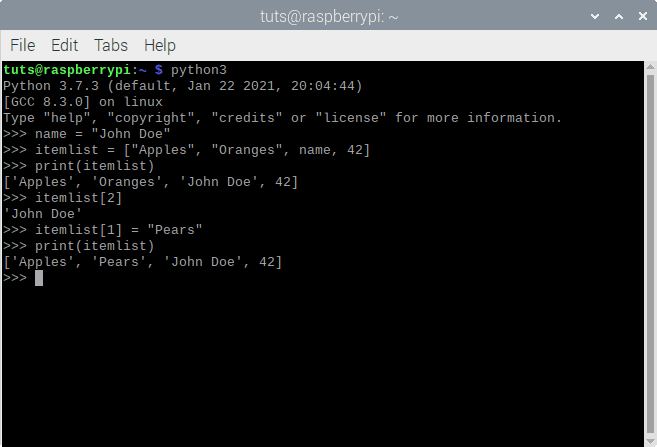
Using list index
Adding items to the list can be done in two ways. The first is to append an item to the list, which adds an item to the very end of the list. And second is to add an item at a specific index in the list:
itemlist.append("Jane Doe")
itemlist.insert(2, "This is position 3")
print(itemlist)
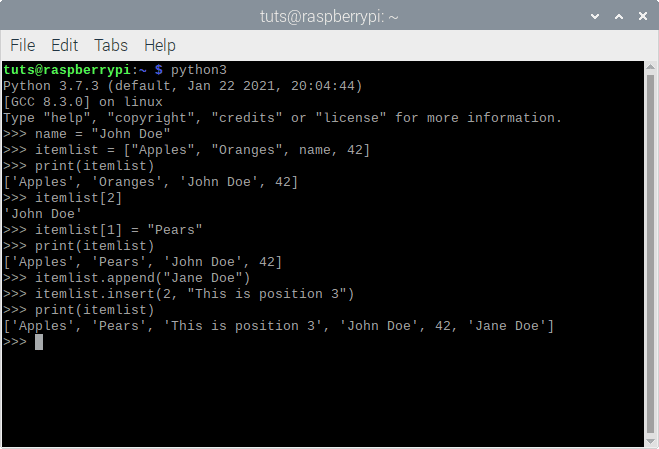
Adding items to list
Removing an item is also easy:
itemlist.pop(2)
print(itemlist)
By the way, this is actually the pop function, which is different from the remove function. The difference is that the pop function once prints the item before taking it out of the list, and the remove function requires not the index, but the value of the item itself, that you want to remove.
itemlist.remove("Jane Doe")
print(itemlist)
Removing items from list
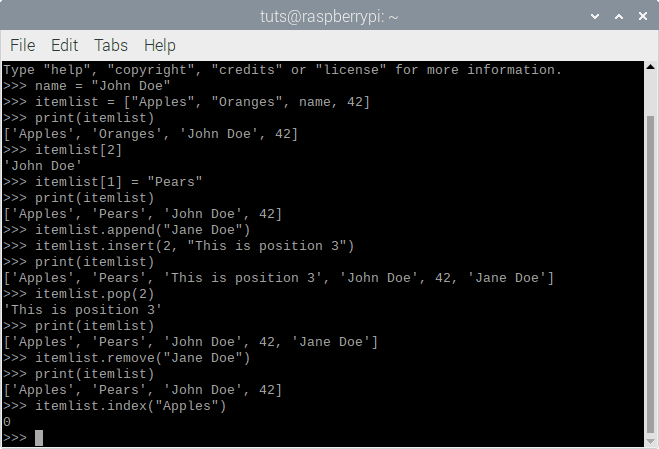
Lastly, if you want to know what the index of an item you know the value of is, say ‘Apples’:
itemlist.index("Apples")
Finding item index
This shows where in the list ‘Apples’ is. Neat, eh?
Dictionaries
Dictionaries are the next important data type. It is called a dictionary because it holds data in the key and value format (just like a dictionary has a word and its meaning). For example, here’s some information in the form of a dictionary:
name = "John Doe"
dict1 = {"Name" : name, "Age" : 20, "Profession" : "Linux Administrator"}
Let’s check out the dictionary once:
print(dict1)
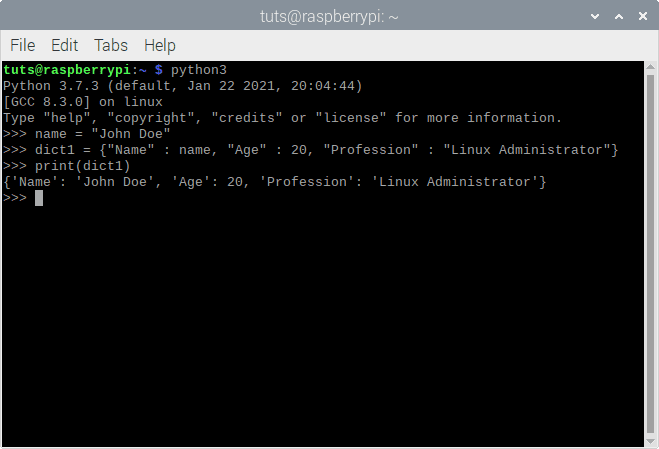
Creating dictionary
The first part of each entry is called the key, and the second is called the value. The difference in accessing items compared to a list is that you can’t use the index but the key. For example, if you want the profession, enter:
dict1[" Profession"]
You can change the value of a key:
dict1["Profession"] = "Ice Cream Inspector"
print(dict1)
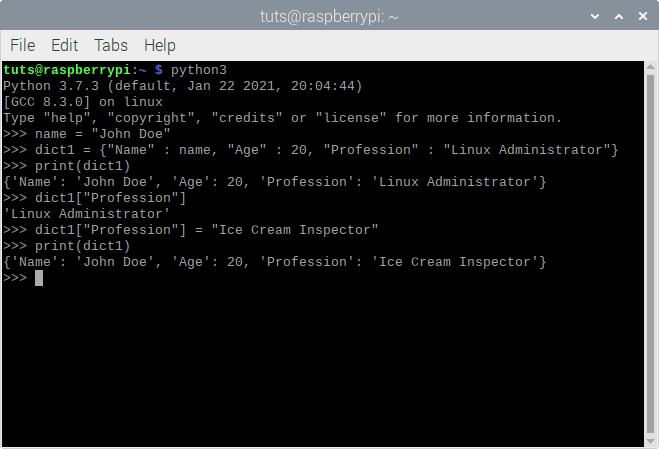
Changing value
You can add new items through the same syntax. It’s just that the key that you will enter will not already exist in the dictionary. For example,
dict1["Hair Color"] = "Black"
print(dict1)
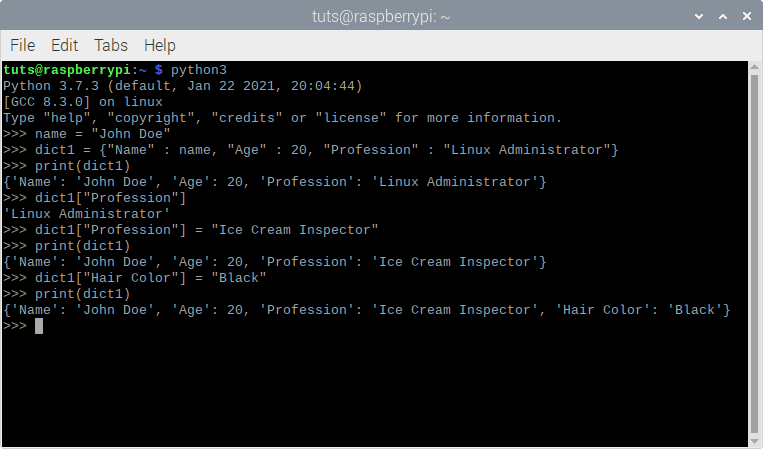
Adding items in the dictionary
Since the key “Hair Color” didn’t already exist, it will be created by Python. To remove an item, you can pop it off:
dict1.pop("Hair Color")
print(dict1)
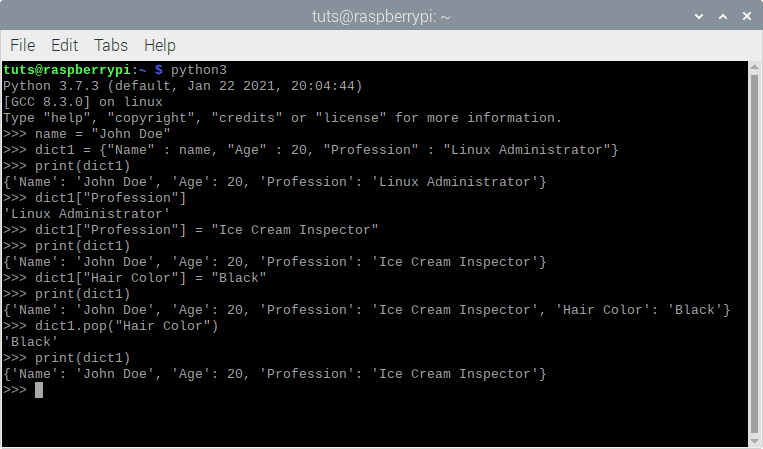
Popping dictionary items
Taking User Input
Eventually, the product of any programming project is for users, right? It will more often than not be necessary to take input from the user when creating actual projects later on. Doing it is fairly simple:
name = input("Please enter your name: ")
print(name)
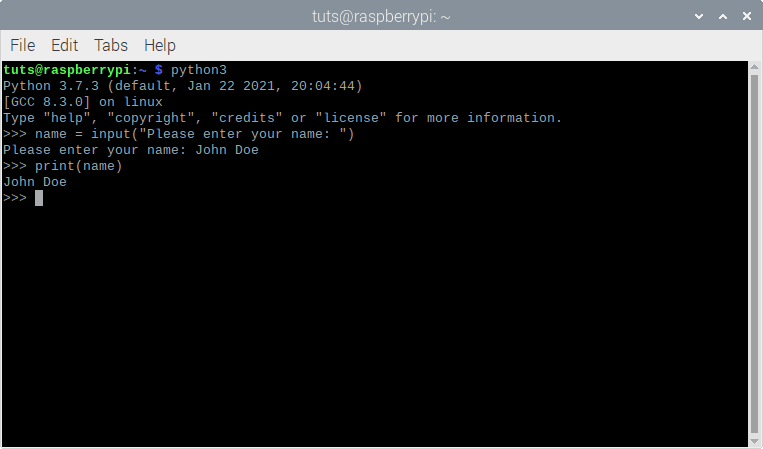
Taking user input
So first, you declare a variable, then write the keyword input, and then write the text that will be prompted to the user (the question). Note that the input taken in this manner is of the string data type, no matter the content. So if you are taking some input that involves numbers or math, make sure to convert it into int or float, according to your needs:
num = int(input("Enter the number you want to find the square of: "))
res = num ** 2
print(res)
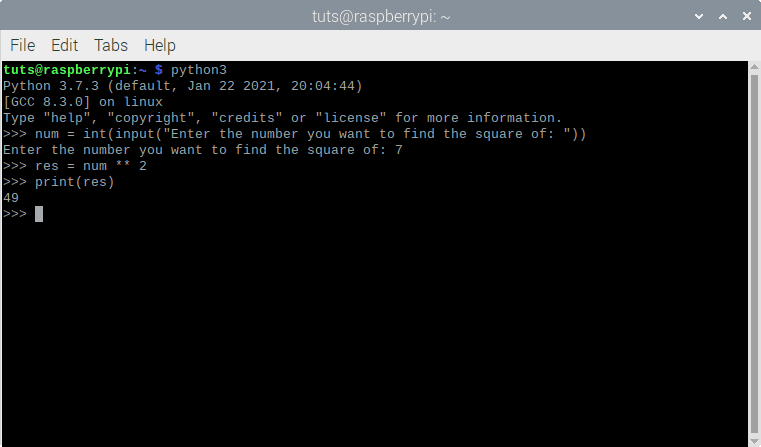
Using taken input
If-Elif-Else Statements
If-elif-else statements form an integral part of programming in any sort of programming language. As indicated by the name, it is the basis for conditional actions. If condition A is satisfied, do task B, or if condition C is satisfied, do task D and if none of them are satisfied, do task E. We will create a sample statement based on this scenario: You can get vaccinated if you are above 60 years of age. Otherwise, if you are greater than 45 years of age and have a morbid disease, you can also get vaccinated. If none of those conditions are met, you can not get vaccinated. Let us put this in the form of a program.
age = int(input("What is your age? "))
disease = input("Do you have a morbid disease? Press Y for yes and N for no: ")

if age > 60:
    print("You can get vaccinated.")
elif age > 45 and disease == "y":
    print("You can get vaccinated.")
else:
    print("Sorry, you cannot get vaccinated.")
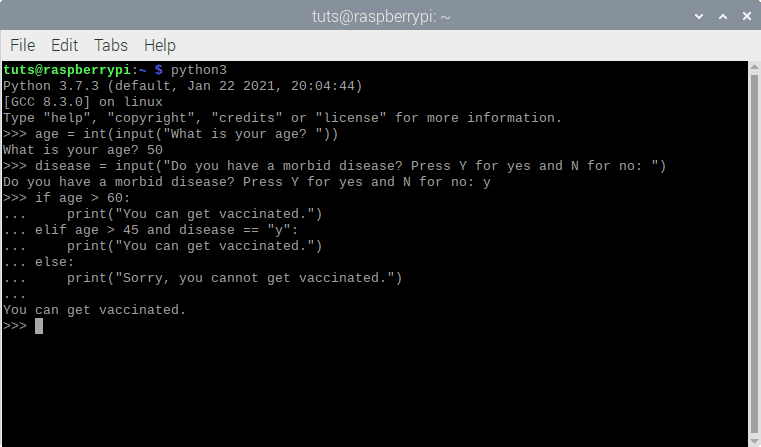
If-elif-else statement
First of all, notice the syntax of the if-elif-else statement. You can again very much read this as plain English. After the first if statement, you’ll see a gap at the beginning of the next statement. Press the Tab key to create that. This formatting using tabs is called indentation, and it is an important part of Python programming. It denotes the beginning of a new block of code in different scenarios. As you can see, we have used a mathematical comparison in the if statement at the beginning. Try reading the statement as if it was in usual conversation. If the age is more than 60, the user can get the vaccine.
For the elif (else if) condition, there are two factors. We have used the and keyword, which denotes that there are two conditions to be fulfilled for this to be true. Notice that to check the equality of a variable (here that variable is disease), we have used double ‘=’ characters. As you know, a single ‘=’ is used for the assignment of a variable, not to check the equality. Lastly, the else statement is executed if none of the conditions in the if and elif statements are met.
For Loop
A for loop is used when a specific block of code has to be executed a given number of times. I should explain this with an example:
numlist = [1, 3, 5, 2123, 14, 34, 14, 42, 523, 84, 23, 43, 46]
for number in numlist:
    if number > 40:
        print(str(number), "is greater than 40.")
for num in numlist:
    print(num + 10)
Now when you execute this, you will see what happens. For example, in the first for statement, we tell Python to check if a number is greater than 40. If so, we want it to print that the number is greater than 40. The twist is that we want Python to do this for every single number in the list numlist. So it checks the first number, 1, which is not greater than 40, then it passes on. Similarly, it goes through 3 and 5, finally reaching 2123, which is greater than 40, as so it prints. That is how it keeps going.
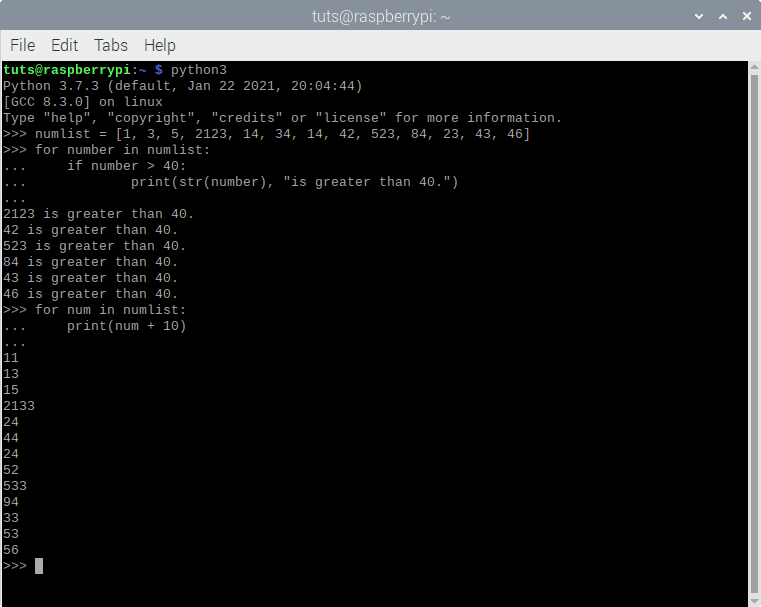
For loop
In the second for statement, we simply want Python to take every single number one by one and add 10 to it. It will easily do so. Notice that in the first for loop, I typed in number, but in the second loop, I used num. There’s an easy explanation for this: when the for loop starts, the word you type in after for (like number and num here) becomes the variable that temporarily holds the value of each item in the loop during its iteration. For example, in the first loop, when the loop starts, the initial value of number becomes 1 (as that’s the first item of the list), it checks if number is greater than 40, which it isn’t, and then passes on. That is one loop finished. Next, it attains the value of the second element, which is 3, and does the same. Then number becomes 5, then 2123, and so on. You can treat number just like you would treat a variable and do all kinds of things with it.
While Loop
Now you have a basic idea of what a loop is. The for loop loops through the definite number of elements of a list or something else with a specified limit. On the other hand, a while loop can go on forever if the condition isn’t met. Here’s an example:
while 1 > 0:
    print("This will never end.")
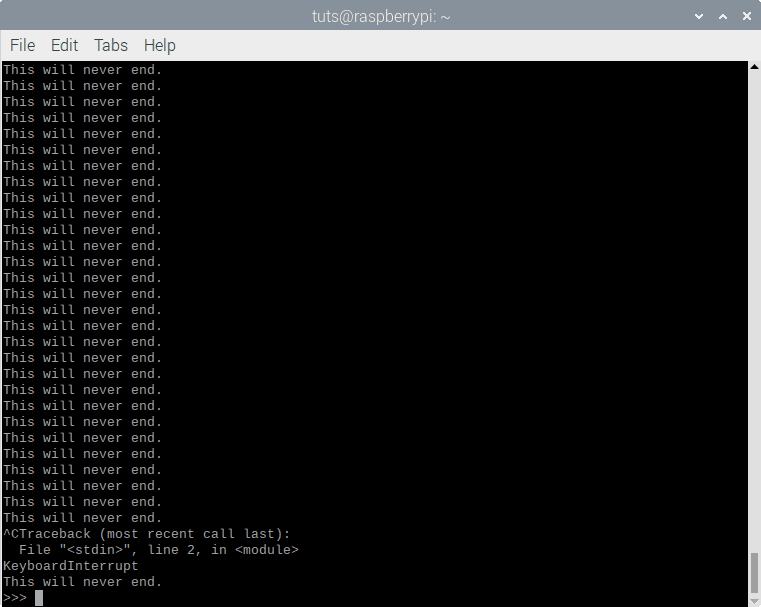
Infinity while loop
This will never stop running, as 1 will always be greater than 0. To stop it, you have to press Ctrl+C on your keyboard, which will make this program exit with a KeyboardInterrupt error. Of course, we won’t use this loop just for goofy purposes. Let us see what we can do with this. For example, I want to print numbers, starting from 0 till 99. That can be achieved easily here:
num = 0
while num < 100:
    print(num)
    num = num + 1
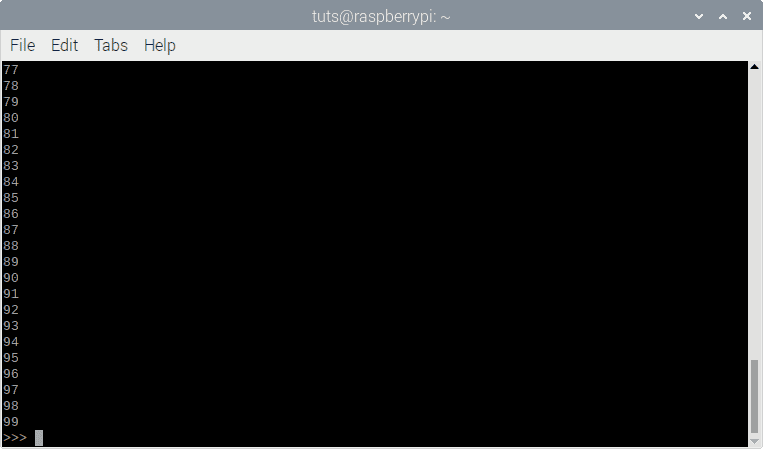
While loop usage
So when the loop starts, num is 0. 0 is less than 100, so the program will proceed. It will print 0, the value of num will become 0 + 1, which is 1. Then the same loop will be executed for 1, and so on until 99, which is the last number that is less than 100. After that, num becomes 100, it will no longer be less than 100, and the loop will end.
If-elif-else statements, for loops and while loops form the backbone of programming in any language, you may use. These are only the basics of the concepts. With some research and practice, all of these things will become second nature to you.
Keywords
Keywords are some of the words used in Python that have a special significance and cannot be used as the names for variables. For example, function names like print, input, etc., are keywords. If, elif, else, for, while, are all keywords. All data types are keywords, like int, list, dict, float, str, etc. You will know what a keyword is and what isn’t as you keep practicing.
Executing Python Code
Now that we have learned some basic Python, we can go ahead and create some actual scripts. There are two ways of writing and executing Python code on any given system.
1. Using Thonny Python IDE
So far, we only used the Python interpreter to execute miniature scripts. Let us dive a little deeper now and use an IDE. IDE stands for Integrated Development Environment. It is an application that allows users to write and execute code all in the same place. The best Python IDE for beginners that Raspberry Pi OS provides is the Thonny IDE. Let us explore it a little.

Thonny Interface
Here is the plain interface. The upper section is the area that can be used to write a script, and the lower section is where you can use the Python interpreter like we have been using so far. Let’s go ahead and write a script. We are going to make things a little more complicated now. This program will check if a number is a prime number or not. The logic is basic. We will divide the number with every number smaller than it, and if the remainder, in any case, is 0, we will declare it as a prime number (except 0 and 1, obviously).
print("This program checks if a number is a prime number.")
num = int(input("Please enter the number you want to check: "))

if (num == 0) or (num == 1):
    print(str(num), "is neither prime not composite.")
elif num == 2:
    print("2 is a prime number.")
else:
    for divisor in range(2, num):
        if num % divisor == 0:
            print(str(num), "is a composite number.")
            exit()
        else:
            pass
    print((str)num, "is a prime number.")
Here, there are a couple of new things. First, the range function. It is almost always used with a for loop, and it generates a list of numbers according to the specified parameters. Here, we specify 2 and num, in which case the function will generate numbers that start at 2 and end at num – 1. For example, try executing this separately:
for num in range(2, 10):
    print(num)
You will see that it starts at 2 and ends at 9. Next, there is the exit() function. This simply ends the program right then and there. Lastly, the pass keyword is used to actually NOT do anything. You can see it in the code as well. If the condition is met, we want it just to pass. The code continues over to the next loop.
Once you have written the code (and I recommend that you type it instead of copy and pasting), you should save it with any name you like and the extension .py. We are using the name primality.py here. To run the code, click on the Run button at the top. You will see the prompt in the bottom section of the window. Enter any number and see the code that you have just written work like a charm.
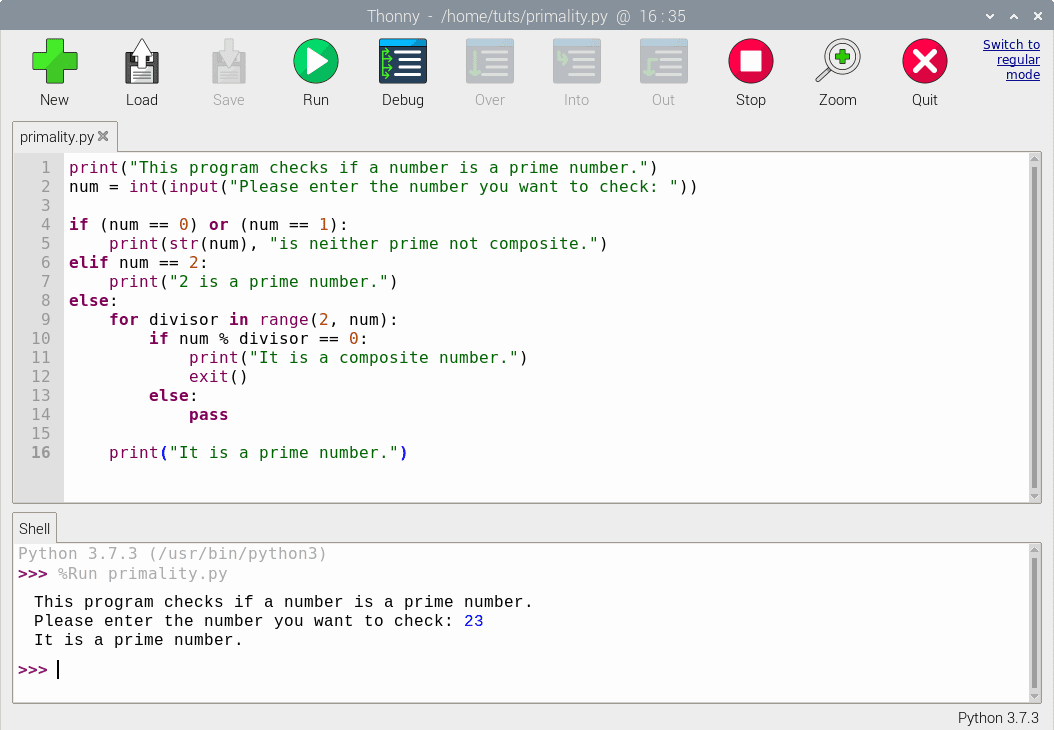
Executing the script in Thonny
These are the important aspects of using Thonny IDE. Many configuration options have been made available on Thonny to change the window’s layout, run the script in external Terminals, and even explore and install external plug-ins. I would encourage you to explore these options.
2. Using Terminal and Nano Editor
This is an alternate way of writing and executing Python scripts. Although a little more complicated than simply using an IDE, it is a more bare-bones method and will work on any Linux system at all. We are going to use the Linux command line to write as well as execute the script. We will create another script (but simple this time, as we only want to show the process) that takes in a number and tells if it is even or odd. First, we need to think of a filename. We suggest using the name parity.py (parity refers to the nature of a number, whether it is odd or even). So open up the Terminal and enter:
nano parity.py
The editor you have just entered is the Nano editor, which is baked into every common Linux-based system by default. It is arguably the easiest command-line-based text editor, and you can get used to it pretty quickly with some practice. You can navigate around using the arrow keys and erase and write as you would in any other graphical editor. Type in the following code:
num = int(input("Please enter the number: "))
if num % 2 == "0":
    print("The number is even.")
else:
    print("The number is odd.")
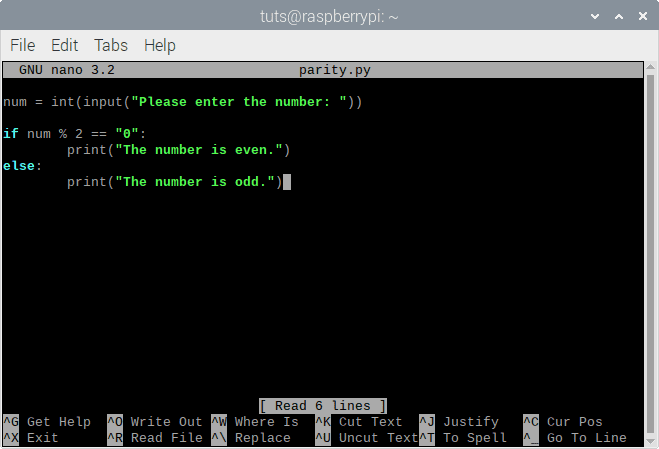
Writing a script in Nano
It is fairly simple how this works. Python uses the modulus operator, which gives the remainder after division. If a number is divided by 2, it can either leave the remainder 0, in which case it is even, or 1, in which case it is odd. To save, press Ctrl+X, then press Y and press Enter. The writing process is complete. Now execute the script using this command:
python3 parity.py
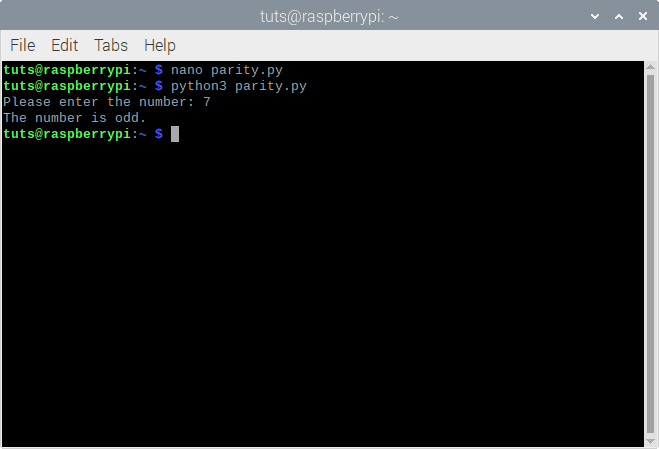
Executing Python script in the Terminal
The python3 command is used to execute .py scripts in the Terminal. This will prompt you with the question as you wrote in the script and execute the rest of it as intended. You can even try to run the primality.py file here.
Conclusion
Over the years, Python has been made very accessible. It is effortless to learn and use Python, especially on the Raspberry Pi. Talking about IDEs, you don’t even have to use Thonny. You can use Geany, which is not directed towards beginners (Thonny is, as you can interpret from the huge buttons and simple interface), but towards actual programmers. I recommend using the Terminal methods, if you can, as they are more platform-independent. Getting a practice of Nano will help you get to work on any Linux-based distribution you might use.
We hope you found this article useful. Cheers!