As you perform more resource-intensive tasks on your Raspberry Pi like running a media server, web server, etc., temperature monitoring becomes important. Even though this Small Board Computer is designed to operate even at very high temperatures than most standard laptops and Desktops, above 80 degrees, the CPU will throttle.
If you don’t take caution and it exceeds 85 degrees, the GPU will throttle. If you were using any graphical display, the images would start appearing distorted.
Monitoring temperature of your Raspberry Pi
This post will give you some techniques which you can use to monitor temperature on your Raspberry Pi. Follow along and see which method is most suitable for you.
Method 1: Command Line
It is one of the easiest methods you can use to check the temperature of your Pi. Execute the command below on your Pi’s terminal or via SSH.
vcgencmd measure_temp

Monitor Pi Temperature
If you want to get the exact number without any additional information, use the wild card command below.
vcgencmd measure_temp | egrep -o '[0-9]*\.[0-9]*'

Monitor Pi Temperature
If you want to monitor the temperature constantly, you can use the watch command, updating temperature information every two seconds.
watch -n 2 vcgencmd measure_temp
Method 2: Add Temperature Display to Your Pi Desktop
If you want to monitor your Pi temperature from the Desktop, you can add it to your Desktop panel next to the clock. Follow the procedure below:
- Right-click on the top panel on your Raspberry Pi Desktop
- On the menu that appears, select “Add/Remove Panel Items.”

Add panel
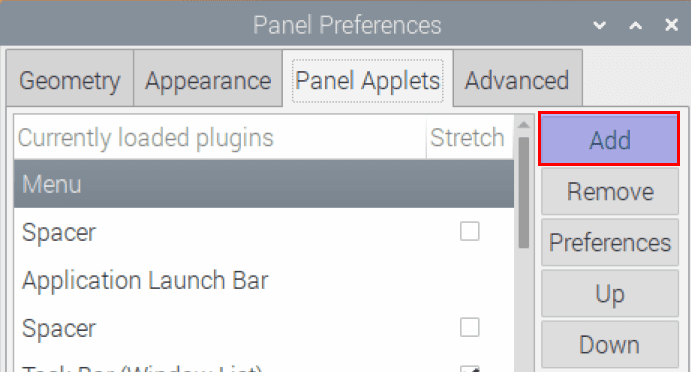
- The Panel Preferences window will open. Click on Add to add a new panel item.

Panel Preferences
- You will see a long list of all the available plugins you can add to your Desktop panel. Scroll down and select “Temperature Monitor” and click “Add.”
- Immediately, you will see the temperature display on the top panel next to the clock.

Monitor Temperature on Desktop
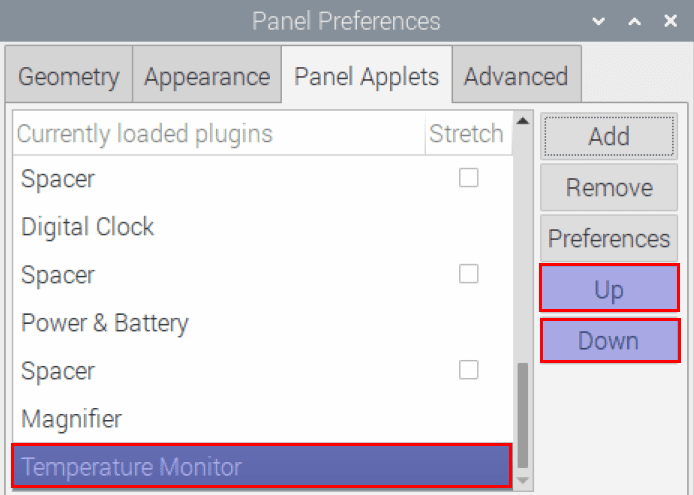
If you want to change the position of the temperature display, on the panel preferences window, select “Temperature Monitor” and use the “UP” and “Down” buttons to move their position on the panel.

Change display position
If you want to add some space between the panel items, all you need to do is add “Spacer ” between the panel elements. Follow the procedure below.
- Right on the top panel and select “Add/Remove Panel Items.”
- Click the “Add” button.
- On the “Available Plugins” list, scroll and select “Spacer.”
- Click “Add”=
- You can then use the “UP” and “DOWN” buttons to select the position where you want to put the “Spacer.” Depending on the spacing you need between the panel items, you might need to add several “Spacer” plugins.
Additionally, you can change the Temperature settings like Normal temperature color, high-temperature color, and threshold. Follow the steps below.
- Right-click on the “Temperature Display” on your Desktop.
- Click on “Temperature Monitor Settings”

Change Temperature display settings
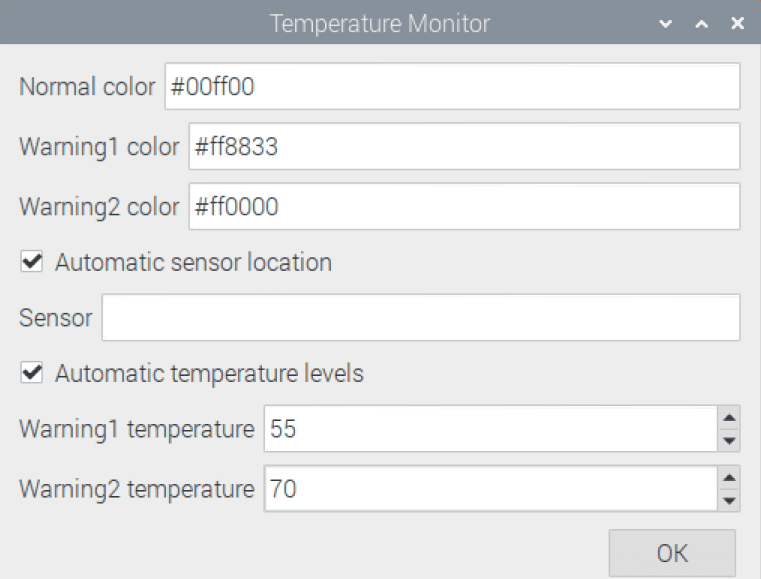
- A window will open, showing all the available configuration options. Change the settings as you wish and click “OK.”
Below are my settings.

Temperature Monitor Settings
Method 3: Use Python Script
If you are a Python developer and want to incorporate temperature monitoring in your code or have a temperature monitoring script, this method is for you. We will use the Gpiozero library. As of writing this post, the library comes pre-installed. If it’s not for you, install it with pip3.
Import the module using the command below:
import gpiozero as gz
You can read the temperature and store it in the cpu_temp variable as shown below:
cpu_temp = gz.CPUTemperature().temperature
If you want the temperature to be shown to one decimal place, use the command below:
cpu_temp = round(cpu_temp, 1)
The image below shows how I have executed and even printed the output of each command.

Read Pi Temperature with Python
Method 4: Use Bash Script
Other than Python scripting, You can also use Bash to read the temperature of your Pi. That can come in handy if you are working on various projects and need a script to monitor the temperature as you perform other tasks. Unlike the other methods discussed above, this returns an integer value with no decimal places. But I don’t think that can be an issue for most projects/ tasks.
The script below gives you both the CPU and GPU temperature, as shown in the images below.
#!/bin/bash
cpuTemp0=$(cat /sys/class/thermal/thermal_zone0/temp)
cpuTemp1=$(($cpuTemp0/1000))
cpuTemp2=$(($cpuTemp0/100))
cpuTempM=$(($cpuTemp2 % $cpuTemp1))

echo CPU temp"="$cpuTemp1"."$cpuTempM"'C"
echo GPU $(/opt/vc/bin/vcgencmd measure_temp)
m0rgo
Posts: 6
Joined: Wed Mar 20, 2013 10:00 pm

Read Temperature with Bash
Conclusion
Those are four methods you can use to read the temperature on your Raspberry Pi. Feel free to share any other method you use with our readers in the comments below.


