
The Raspberry Pi is a popular Small Board Computer (SBC) that can be used for software and hardware projects. A web developer can easily set up the Pi for web development, while somebody with a Robotics project can still use the Pi for development. Additionally, you can still use the Pi for non-development projects. For example, you can set it up as a media server or game server or make a Raspberry Pi mirror.
Unfortunately, the Raspberry Pi has one major limitation. It does come with a connected monitor, keyboard, or mouse. You must look for all these peripheral devices and connect them to your Pi. That can be easy if you have them. Unfortunately, there are situations when you might not have access to an external monitor, keyboard, or mouse. The best solution is to use your laptop as a monitor for the Raspberry Pi.
Using your laptop as a monitor for Raspberry Pi
This post will give you a step-by-step guide on how to use the laptop as a monitor for Raspberry Pi. It doesn’t matter which operating system you use, as it can work for Windows, Linux, or macOS.
Prerequisite
- You will need the following for this project.
- A Raspberry Pi Board (any board will be okay)
- The official Raspberry Pi OS installed.
- An active internet connection.
- Reliable power supply.
Step 1. Enable SSH on the Raspberry Pi
The first step to using your laptop as a Raspberry Pi monitor is establishing an SSH connection. Unfortunately, enabling SSH on a headless Raspberry Pi (without a monitor) is a bit technical. Follow the steps below.
First, you will need to remove the SD card from the Raspberry Pi and insert it into your laptop using an SD card reader.
Open the file manager on your laptop, and you should see a partition called “boot” on the SD card.
Open the “boot” partition and create an empty file called “ssh.” Please note that this file should be empty and have any extension like “.txt.” If you are on a Linux machine, we highly recommend using the touch command to create this file, as shown below.
touch ssh
After creating this file, remove the SD card from your laptop and insert it into the Pi. Now connect the power supply to the Raspberry Pi to power it up. That’s it! You have successfully enabled SSH on the Pi.
Step 2: Connect your Raspberry Pi to a Network
There are two main ways that you can use to connect your Raspberry Pi to a network.
- Ethernet
- WiFi
We highly recommend using ethernet as it’s much faster and more reliable. To connect your Pi via ethernet, plug in the ethernet cable from your router/ switch to the ethernet port on the Raspberry Pi. That’s it! Your Pi s now connected to the Internet.
You must connect your Pi to the network via WiFi if you don’t have an ethernet cable. That is easy if you have a monitor attached. All you need is to click on the network icon at the top-right corner and select the WiFi network you want to use. See the image below.
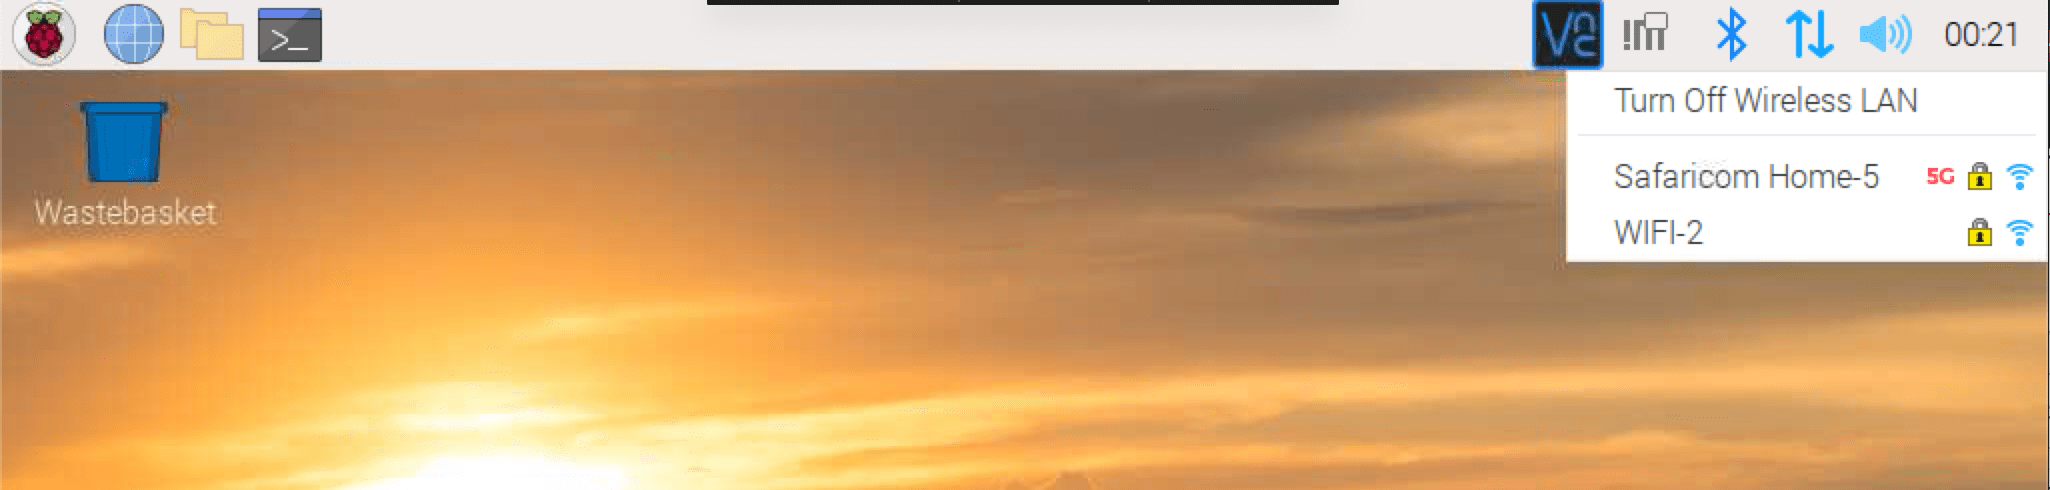
Connect Pi to WIFI
However, if you are using the Raspberry Pi in headless mode (without a monitor), connecting to a WiFi network can be pretty technical. Luckily, we have a comprehensive post that gives you a step-by-step guide – Connecting to WiFi & Enabling SSH Without Monitor on Raspberry Pi.
Step 3. Establish an SSH Connection (Command-line Access)
Up to this point, this post assumes you have already enabled SSH on your Pi and connected it to a network either via Ethernet or WiFi. Now all you need to do is connect and establish an SSH connection from your laptop.
Launch the Terminal and use the command below to establish an SSH connection if you are on Linux or macOS.
ssh pi@[IP-ADDRESS]
e.g
ssh pi@192.168.1.36
If you are on Windows, you must use a tool like Putty. In our case, we will establish an SSH connection using the Terminal, as shown below.
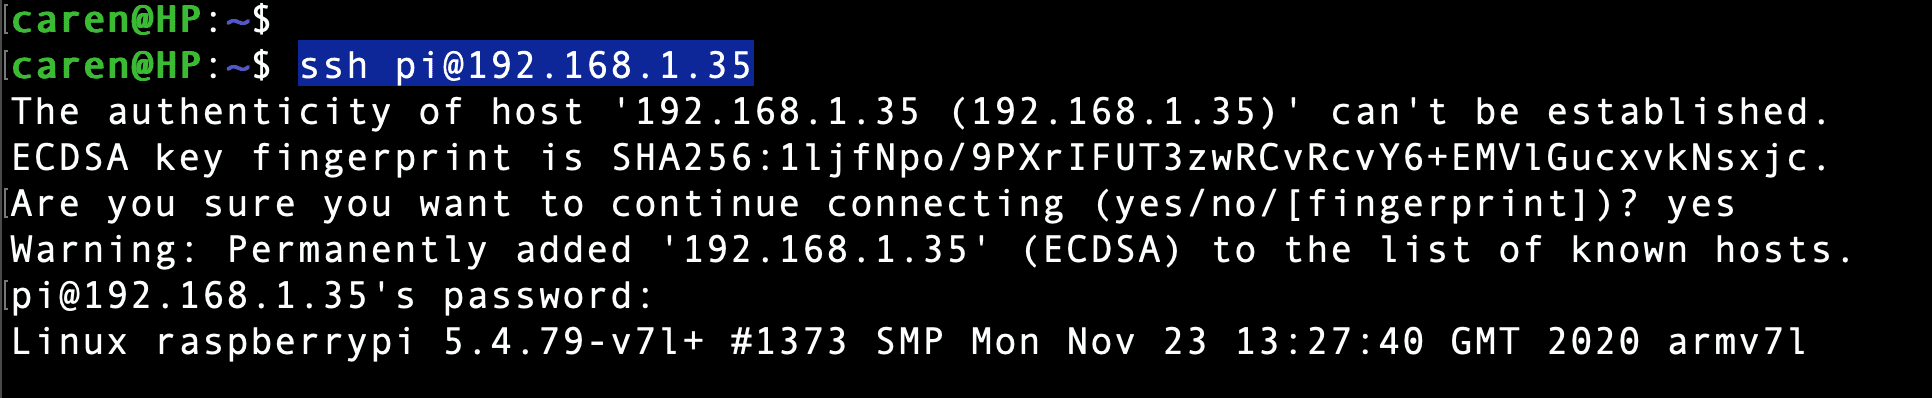
Establish an SSH Connection
Up to this point, you now have command-line access to your Raspberry Pi. You can install/uninstall applications, create and delete files, and more.
Depending on what you want to do with the Pi, this type of connection might be enough. However, if you wish to access the Raspberry Pi graphical interface, you must enable VNC.
Step 4. Enable VNC on the Raspberry Pi
VNC, or Virtual Network Computing, is a protocol that allows you to access another computer remotely over a network. You will need two things to create a successful VNC connection.
- A VNC server – You will enable this on the Raspberry Pi
- A VNC client – You will install this on your PC.
There are two main methods that you can use to enable VNC on the Raspberry Pi. Either from the Graphical Desktop or the command line. This post will show you how to allow VNC from the command line. Follow the steps below.
Launch the Terminal or establish an SSH connection.
Execute the command below to launch the Raspberry Pi Configuration tool.
sudo raspi-config
Use arrow keys to scroll the various options on the screen that appear. Select “Interface Options” and hit “Enter.”
Select “VNC” on the next screen that appears.
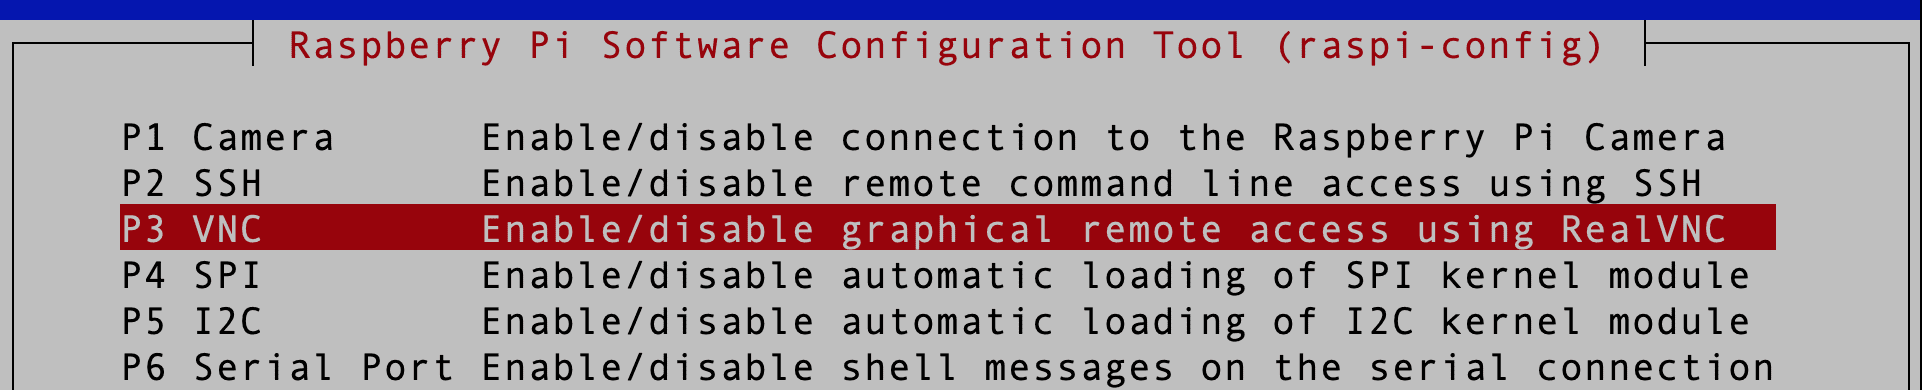
Enable VNC Pi
You will see a prompt to “Enable” VNC; select “Yes” and hit “Enter.”
That’s it! You have successfully enabled VNC on your Raspberry Pi.
The next step is to install a VNC client on your laptop. You can install various VNC clients, including RealVNC, VNC viewer, Tiger VNC, etc. This post will install the VNC viewer by Real VNC as it is available for Windows, Linux, macOS, and Raspberry Pi.
To establish a VNC connection, launch the VNC viewer and enter the IP Address Raspberry Pi, as shown below.
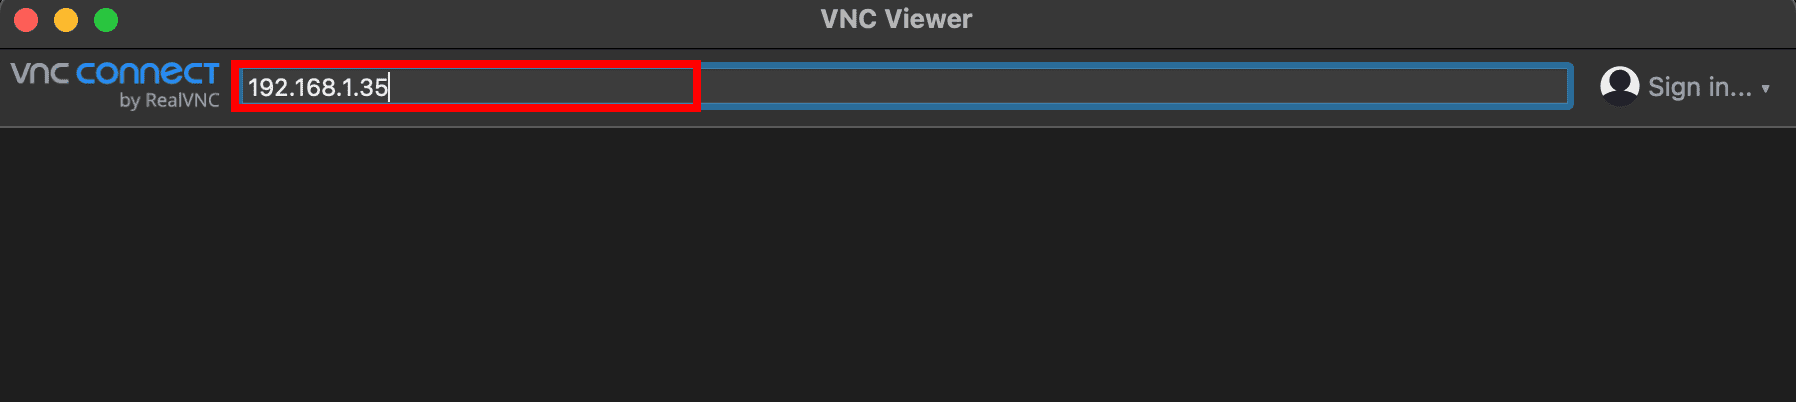
Enter Raspberry IP
You will see a prompt to enter the username and password of your Raspberry. Unless you have changed these details, the default Pi credentials are:
- Username – pi
- Password – raspberry
After a successful connection, you should see the Raspberry Pi Graphical Desktop pop up on your laptop. You can interact with this GUI the same way you interact with your laptop screen. See the image below.
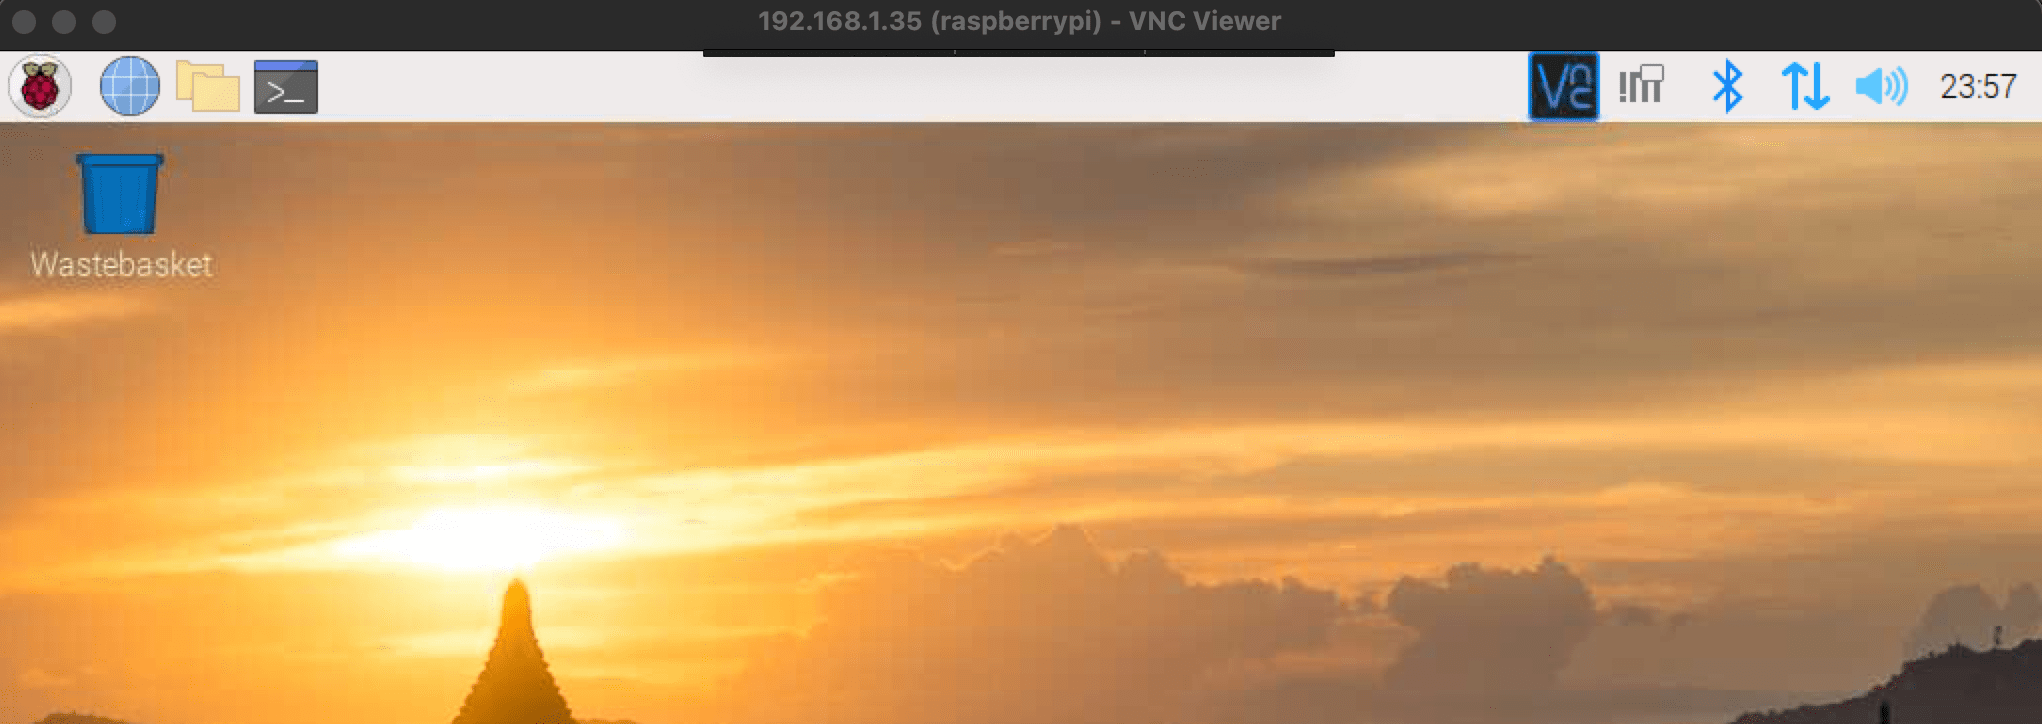
Raspberry Pi GUI
Conclusion
The Raspberry Pi is a mighty small board computer that you can use for development projects or setting up other non-development solutions. Since it doesn’t come with an embedded monitor, using the laptop as a monitor is always the first solution. You can set up SSH for command line access or VNC for graphical access. This post has given you a comprehensive guide on How to use a laptop as a monitor for Raspberry Pi. Do you have any questions or comments? Please don’t hesitate to let us know in the comments below.