Since Raspberry Pi 3 in 2016 release, the Raspberry Pi foundation included support for built-in Bluetooth connectivity in all the following Raspberry releases. That came as a relief to users who wanted to utilize the Bluetooth feature to connect wireless peripherals like headsets, other PCs, game controllers that support Bluetooth connectivity and carry out Bluetooth-related projects. However, if you are running an earlier version of the Raspberry, which did come with Bluetooth support, you will need to use a Bluetooth USB dongle and install the necessary drivers. Some of these earlier models include:
- Raspberry Pi 1 B (Released Feb 2012)
- Raspberry Pi 1 B+ (Released July 2014)
- Raspberry Pi 1 A+ (Released Nov 2014)
- Raspberry Pi 2 (Released Feb 2015)
- Raspberry Pi Zero (Nov 2015)
Setting up Bluetooth on a Raspberry Pi
If you are running the official Raspberry Pi operating system, Bluetooth should be enabled by default on your system. However, you will need to follow this instruction to connect to another device with Bluetooth support successfully.
Tip: If you have faced an issue where you connect your Pi to a Bluetooth device like a headset, but you can’t still hear the audio, these instructions should also fix that issue. We will look at both the Graphical method (for users with a graphical Desktop) and the Terminal method (for users running Raspberry Pi OS Lite, which lacks a graphical desktop).
What we will look at:
- How to install Bluetooth manager utility (Requires a Graphical Desktop)
- How to use Blueman Bluetooth Manager (Requires a Graphical Desktop)
- Setting up Bluetooth on Terminal (Doesn’t require a Graphical Desktop – Possible over SSH)
- Using Bluetooth on Raspberry Pi
1. How to install Bluetooth manager utility (Requires a Graphical Desktop)
Tip: If you are running Raspberry Pi OS Lite or accessing your Pi over an SSH connection, its method might not be reliable for you as it requires a graphical Desktop. Skip to Step 3. To use a graphical Desktop on Raspberry Pi, you need to connect to an external monitor or use a VNC connection. In this, we are connecting to the graphical Desktop of our Pi over a VNC connection.
If you are running the full version of the Raspberry Pi OS, it comes with a basic Bluetooth settings button on the Taskbar, enabling you to enable/disable Bluetooth and connect to other Bluetooth devices.

VNC Connection
Unfortunately, it doesn’t have additional features required when managing devices like headsets and game controllers. That is one of the reasons why you might successfully connect to a headset, but you still can’t hear the sound. So instead, follow the steps below to install the Bluetooth manager tool.
Launch the Terminal on your Raspberry Pi and execute the command below. You can use the keyboard shortcut (Ctrl + Alt + T).
sudo apt update -y && sudo apt upgrade -y
This will check for any package updates and install them.
Install the Bluetooth manager with the command below.
sudo apt install bluetooth pi-bluetooth bluez Blueman

Install Bluetooth Manager
If the command executes successfully without any errors, Reboot the Pi. You should now see a second Bluetooth icon with a blue background on the taskbar, as shown in the image below.

Bluetooth manager
2. How to use Blueman Bluetooth Manager (Requires a Graphical Desktop)
When you click on the Blueman Bluetooth icon, you will see various options that you can use to connect and manage your Bluetooth devices.
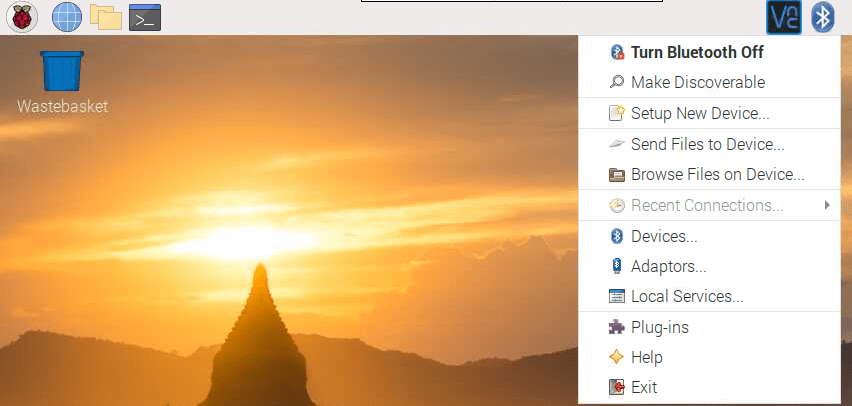
Bluetooth manager menu
This post will demonstrate how to use the Blueman Bluetooth manager by connecting to a Bluetooth headset. Follow the steps below:
- Click on the Blueman icon on the taskbar to reveal the options menu.
- If Bluetooth is already enabled, click on the “Turn Bluetooth On” button.
- Next, click the “Make Discoverable” button to enable other devices to see the Pi’s Bluetooth.
- Now, click the “Setup New Device” to enable you to connect to other Bluetooth devices.
- That will open the ‘Bluetooth device setup assistant window.’ Click Next.
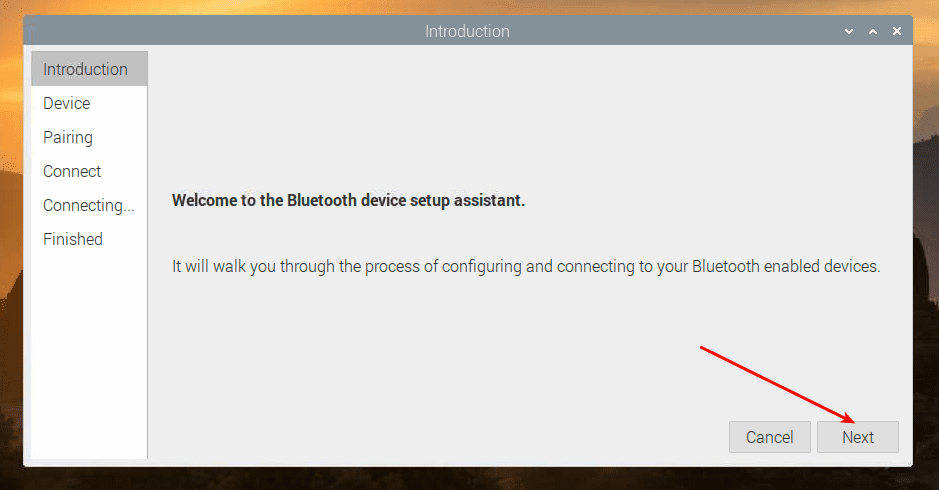
Bluetooth setup assistant window
Click on the search icon at the bottom to scan for available Bluetooth devices on the next screen.
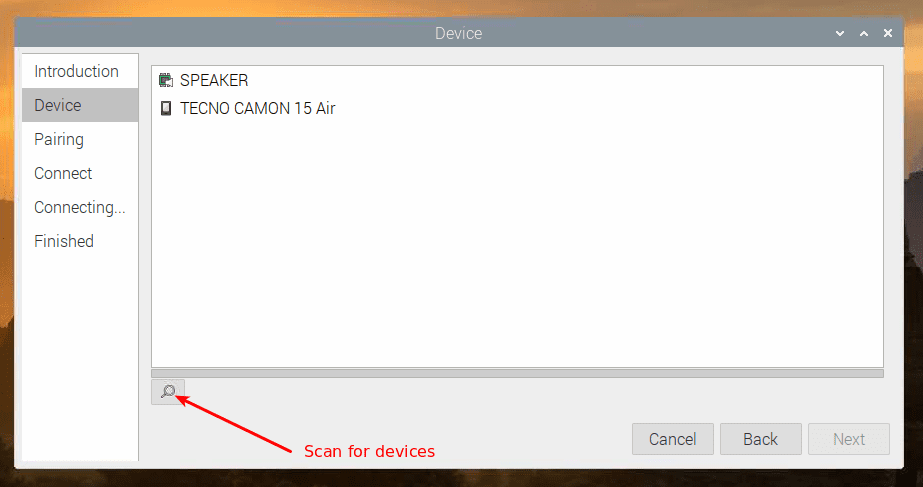
Scan for devices
If your device is listed among the connected devices, select it and click Next. You will be prompted to pair the device or proceed without pairing on the new screen that appears. Select the “pair device” radio button and click Next.
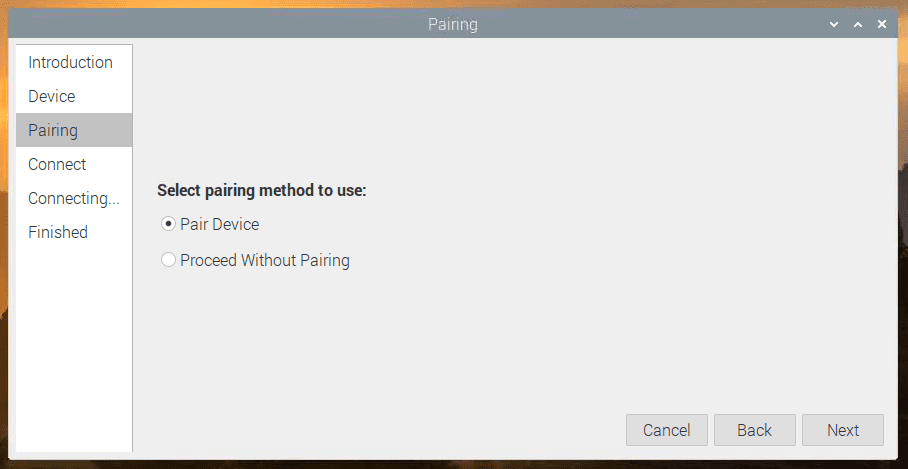
Pair Device
If the pairing were successful, a new screen would appear, and you will be prompted to sync audio. Check the Audio Sink radio button and click Next.
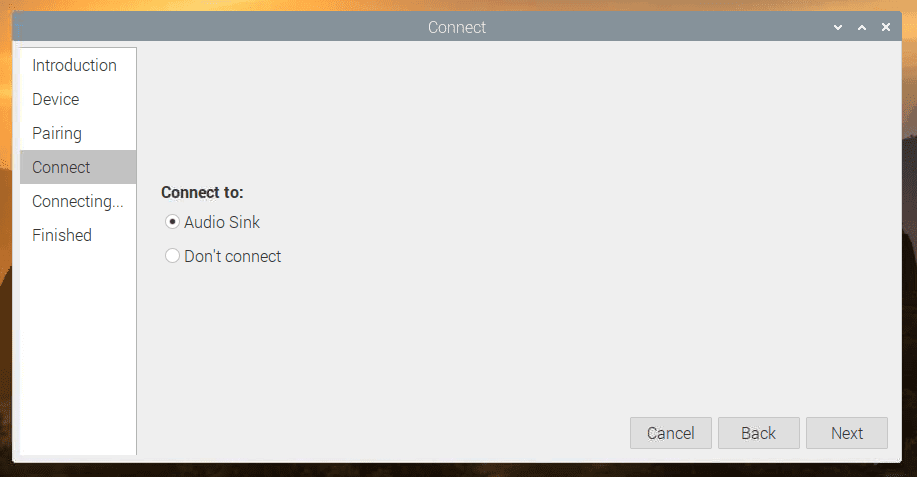
Audio Sync
A new window will appear, and you will see the success message, as shown in the image below.
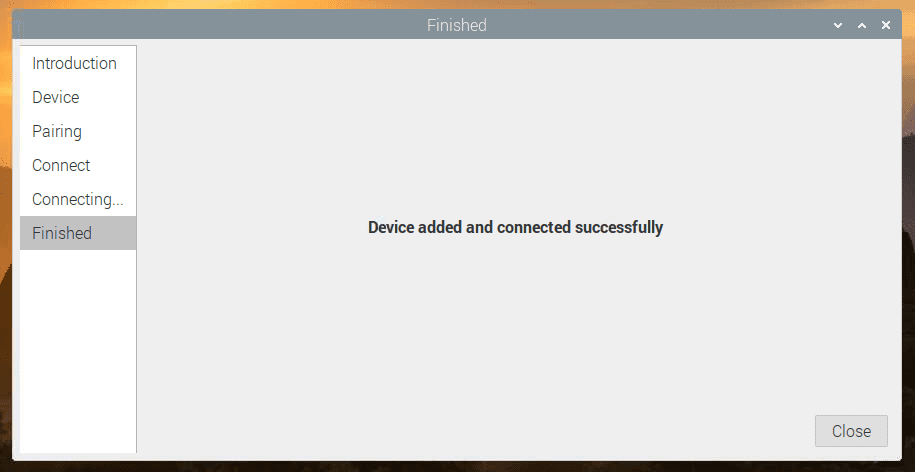
Successful Bluetooth connection
At this point, you should now be able to control and use your Bluetooth device as you wish. In our case, we can now hear any audio from our Pi on the Bluetooth headset. Furthermore, if you are connected to a device like a phone or another PC, you can even view files and transfer files using the “Browse Files on Device” or “Send Files to Device options.”
3. Setting up Bluetooth on Terminal (Doesn’t require a Graphical Desktop – Possible over SSH)
If you are running Raspberry OS Lite or accessing your Pi over an SSH connection, use the following steps to enable and connect to other Bluetooth devices on your Pi. If you are probably wondering how to connect to your Raspberry Pi over SSH, read our post on – How to SSH to Raspberry Pi.
Follow the steps below:
Execute the command below to update and upgrade your system.
sudo apt update -y && sudo apt upgrade-y
Then, execute the command below to install the Blueman Bluetooth manager command-line utility.
sudo apt install bluetooth pi-bluetooth bluez

Install the Command-line utility
When done, reboot the Pi.
sudo reboot now
After enabling a connection again to the Pi, execute the command below to launch the Blueman command-line configuration utility.
sudo bluetoothctl

Bluetoothctl
You will now see the Terminal prompt change to [bluetooth]
To scan for available Bluetooth devices, execute the command scan on as shown below. All the available devices will be listed together with their MAC addresses and name.

Scan On
Tips: Sometimes, not all devices will be listed under their names. In such a situation, it’s recommended you only turn the Bluetooth of the device you wish to connect to. That prevents having numerous devices listed on the Terminal. Additionally, the scanning process might take a while to detect your device, therefore, give it a few more seconds or minutes even if your target device is not listed.
To connect to the device, copy its MAC address and use the pair command as shown below.
pair D7:BC:FF:1F:1F:2F
If the pairing was successful, you should see the message “Pairing successful,” as shown below.

Pair
To connect to the device, use the connect command as shown below.
connect D7:BC:FF:FF:FF:FF
If the connection was a success, you should see a “connection successful” message on the Terminal. Additionally, if you plan to connect to this device regularly, use the trust command to put the device in the trusted list, as shown below.
trust D7:BC:FF:FF:FF:FF

Trust device
When done, type exit to close the bluetoothctl utility.
If you are connecting to an audio headset, these steps are enough to get you started. However, other devices like gaming controls might require additional configurations. You can check some of the other commands you can use by typing help on the bluetoothctl command-line prompt.
Conclusion
This post has given you a step-by-step guide on installing the Bluetooth Manager tool on your Raspberry Pi and using it to manage Bluetooth devices either from the command-line or the graphical desktop. The raspberry pi being a device developed primarily to be used in exploring the computing field, they are numerous projects which you can carry out by utilizing the Bluetooth feature. Some of the projects you can try include:
- A Smart Phone Controlled Home Automation project
- A Robot / Drone controlled over a Bluetooth connection
- Control Bluetooth LE Devices
Do you have any questions or additional tips you wish to share with our readers? Feel free to hit the comments section.
