
The Raspberry Pi is one of the most popular small board computers (SBC) we have today. It’s ideal for handling various projects ranging from software development, networking, cybersecurity all the way to simple IoT projects like smart irrigation or even controlling a camera in the wild. The last example is the main reason I wrote this particular article.
I previously worked on a project contest where I needed my Raspberry Pi 4 to power and control a wildlife camera. Basically, I had a motion sensor that triggered the Raspberry pi to turn on and make the camera snap a picture of whatever was passing. Since this is an outdoor project, the Pi relied on solar and battery power. That was a major challenge because I had to figure out a way of saving power. Finally, I came up with this solution – the Pi would forever be OFF until triggered by the motion sensor.
That was reliable logic, but it also had its drawbacks. The total boot time of my Pi was around 20 – 25 seconds. That might be considered average to most people, but it’s very long considering the situation at hand. For example, imagine the motion sensor detects a passing animal, and the Raspberry Pi boots up after 25 seconds to take a picture. Honestly, whatever was passing will be long gone! So, I had to figure out how my Pi will boot much faster (under 5 seconds).
Fast boot Raspberry Pi 4
Are you struggling with slow boot time on your Raspberry Pi? This post will give you a detailed guide on how to boot your Raspberry Pi much faster. So let’s dive in and look at the simple tips and tricks you can apply.
Requirements
We will use the official Raspberry Pi OS. If you haven’t installed it yet, please check out our post on Installing the official Raspberry Pi OS. Depending on the project you are working on, you might need to get rid of the GUI as it also adds up some boot time and takes up resources. For that, you might need to establish an SSH connection. Check out our post on how to enable SSH on boot time on your Raspberry Pi. If your project requires an internet connection, then use ethernet. WiFi also adds up some boot time.
Hoping you have all that is required, we can get started with enabling fast boot on our Raspberry Pi.
Step 1: Edit the /Boot/Config.txt File
For this step, we will perform several configurations in the /boot/config.txt file. You can either insert the Raspberry SD card on your PC or access it remotely over SSH in your Pi. Open the config.txt file present in the /boot directory or partition. In my case, I will use the nano editor.
sudo nano /boot/config.txt
Add the following lines at the bottom of the config.txt file.
- disable_splash=1: This line disables the rainbow splash screen that appears on booting your Raspberry Pi OS. It is also present in other raspberry Linux distro.
- dtoverlay=disable-bt: This line disables Bluetooth connections in your system. Therefore, if your project utilizes Bluetooth, you shouldn’t add this.
- boot_delay=0: By default, this value is set to 1second if not specified.

Edit config file
Step 2: Overclock the Raspberry Pi
Normally, the Raspberry Pi 4 board operates at 1500MHz or 1.5GHz. However, did you know we can overclock it to operate at 2400MHz or 2.4GHz? Luckily, we have done a comprehensive post on How to overclock your Raspberry Pi 4. Please check it out, and when done, be sure to come back right here so you can check out the other steps and tips.
In my case, to achieve a speed of 2.147GHz, I added the following lines in my config file.
sudo nano /boot/config.txt

Overclock Raspberry Pi
Step 3. Reduce Kernel Verbose on Boot
When you boot your Raspberry Pi and have a display monitor connected, you will see lines of code running down the screen. That is basically the kernel outputting whatever it is doing. This information can be quite useful, especially if you are trying to troubleshoot a problem. However, in our case, we need to reduce the boot time as much as possible; we can omit this part.
We will edit the /boot/cmdline.txt file. You can do this over SSH, command line, or physically by inserting the SD card in your PC. I will use the nano editor.
sudo nano /boot/cmdline.txt
Please be cautious as you can easily corrupt the boot process. You will see a long line of preset configurations, as shown below. Please don’t alter the line arrangement; this is the default setting.
console=serial0,115200 console=tty1 root=PARTUUID=71a81b7a-02 rootfstype=ext4 elevator=deadline fsck.repair=yes rootwait splash plymouth.ignore-serial-consoles
Note: Some of the parameters you see might be a little different from yours. But that shouldn’t worry you.
We will make the following edits:
- delete the
splashparameter - Add
quietparameter
Hint: Add these lines after the rootwait parameter and remember that all these should be in a single line. After doing the changes, you should have an output similar to this:
console=serial0,115200 console=tty1 root=PARTUUID=71a81b7a-02 rootfstype=ext4 elevator=deadline fsck.repair=yes rootwait quiet plymouth.ignore-serial-consoles
Step 4: Use Systemd-Analyze Blame
After performing the above configurations, we now need to dive into service and check which are to blame for this long booting process. Execute the command below:
systemd-analyze blame
You will get an output similar to this below:
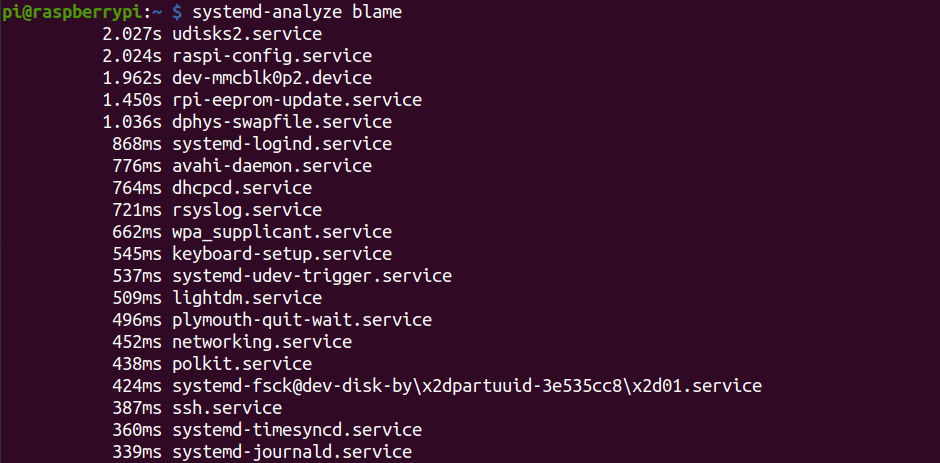
systemd-analyze blame
From the output I got from my Pi, below are some of the services that I disabled.
sudo systemctl disable dhcpcd.service
sudo systemctl disable networking.service
sudo systemctl disable ntp.service
sudo systemctl disable dphys-swapfile.service
sudo systemctl disable keyboard-setup.service
sudo systemctl disable apt-daily.service
sudo systemctl disable wifi-country.service
sudo systemctl disable hciuart.service
sudo systemctl disable raspi-config.service
sudo systemctl disable avahi-daemon.service
sudo systemctl disable triggerhappy.service
Please proceed with caution in this step as you might disable the services you need for your project or are required by the Pi running.
Step 5. Re-Compile the Linux Kernel
To remove any unnecessary stuff that could be adding up time during initialization, you can recompile the Linux kernel. For Linux newbies, this might not be a simple task. Luckily there is a complete guide on carrying out this task on the official Raspberry Pi foundation page. During the compilation process, use “CONFIG_PRINTK_TIME” and “CONFIG_KALLSYMS” to analyze any unnecessary tasks being carried out on boot. To reduce the initialization time even much more, consider using the LZO compression algorithm instead of GZip.
Step 6. Add your code/task as a service
To improve the execution speed of the task or code you want to run, set it up as a service. For example, I could call my service as wild_camera.service. Use the command below to create the wild_camera.service file in the /etc/systemd/system/ directory.
sudo nano /etc/systemd/system/wild_service.service
Paste the code below. Remember to replace the italicized statements accordingly.
[Unit]
Description=Start Wild Camera Service

[Service]
ExecStart=/home/pi/wild_camera.sh
StandardOutput=syslog
StandardError=syslog
SyslogIdentifier=piservice
User=pi
Group=pi
WorkingDirectory=/root/wild_camera/

[Install]
WantedBy=basic.target
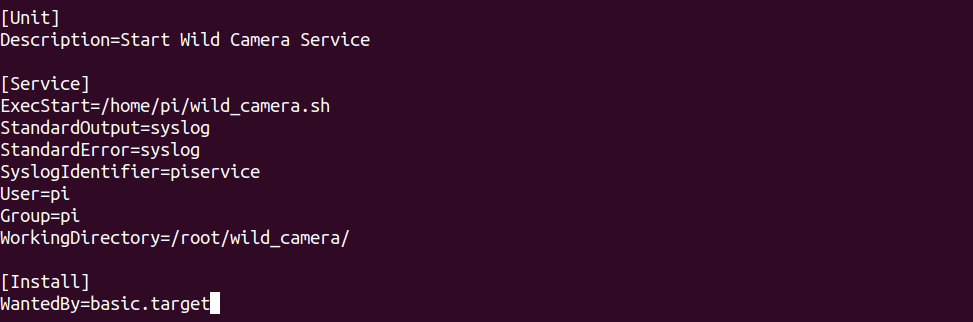
Set up code as a service
Step 6. Remove Plymouth
To disable any systemd init messages, we will remove Plymouth. Execute the command below:
sudo apt purge --remove plymouth
Additional tricks to speed up the boot process
- Don’t remount the /boot partition. You can do this by editing the
/etc/fstabfile. Comment the line the remounts the /boot partition. - If you don’t need GUI for your project, you can remove it with the command below:
sudo apt remove --purge x11-common
sudo apt autoremove
- Assign a static IP if the
dhcpcd.serviceis taking too long.
Conclusion
I believe this post has given you a clear guide on how to fast boot your Raspberry. However, I believe many more tricks can be applied to reduce the boot time even much more. If you have such an idea, please free to share it with our readers below.
5 comments
Hai,
This is what I am looking for.
By the way, the 5s boot time, you counted from adapter switch of RPi4 is turned ON or start from the text appeared in the terminal?
I have tried the steps, but still cannot get the boot time less than 15s.
Can you shared the OS image please?😁
hi
I could not decrease boot time by following the steps you mentioned.
could you please provide us your operating system or project files?
We need to reduce our boot time to do a project.
Unfortunately, with the steps you mentioned, we did not even reach the time of 15 seconds.
try to remove rainbow window and logo of rpi then it will reduce to 10-11sec
Will this commands will work for Rpi 3 also..??
If the dhcpcd.service is takes too long, disable the ‘wait for network at boot’ in raspi-config.