
This article will walk you through the phases needed to run flask applications using the NGINX web server. Generally, Flask is a microframework for Python that allows one to create web-based applications on your Raspberry Pi.
Raspberry Pi has its own web server. However, most developers recommend running Flask under a more established and stable web server such as NGINX or Apache. This is because of the robust traffic it deals with while executing functions.
Below are the steps required for you to run Flask under NGINX on the Raspberry Pi
Running Flask under NGINX on the Raspberry Pi
Step 1: Update packages
After powering on your Raspberry Pi machine, copy and paste the following command that will aid in updating and upgrading all the packages in your machine.
sudo apt-get update
update command
sudo apt upgrade
update command
Once you have updated and upgraded the packages, you should now have an operational Pi ready to install the required software.
Step 2: Installing the required software
Next, install Nginx on Raspberry Pi with apt-get-
sudo apt-get install Nginx
installing Nginx
Step 3: Install pip
After installing Nginx, we will install pip, a package-management system written in Python whose main aim is to install and manage software packages. What it does is connecting your PC to an online Python Package Index, either Pip 2 for python 2 series and Pip 3 for Python 3 series. In our case, we will go with Python 3 series
sudo apt-get install python3-pip
installing pip3
Step 4: Installing Flask
Thereafter install Flask using the following command:
sudo pip install flask

installing flask
Step 5: Install uWSGI:
Next, we will install uWSGI, a software application that hosts services. The first step is to install build-essentials and python-dev on our PC using the following command:
sudo apt-get install build-essential python-dev
installing build-essentials
After that, go ahead and install uWSGI using pip3
sudo pip3 install flask uwsgi
installing uwsgi
Note: At times, you may receive the Y/N prompts during the installation process. Press Y to proceed with the installation.
Step 6: Create flask app
Here, we will create a folder in the home directory (“/home/pi”) but first, ensure you are in the /home/pi directory using:
cd ~
After that, create a sample app that we will use. In this instance, we will create a folder called “flasktesting”:
mkdir flasktesting
creating the flasktesting directory
After the creation of the folder, we will alter the settings a bit to group the folder as a “www-data” using the following command:
sudo chown www-data /home/pi/flasktesting

setting it to group owner www-data
Once we have grouped the folder, we will navigate to the created directory as shown below:
cd flasktesting

navigating to flasktesting directory
After that, we will create a new file named “fossapp.py” in our “/home/pi/flasktesting directory
sudo vi /home/pi/fossapp.py

create the fossapp.py
Upon creation of the file, copy and paste the following code into the “fossapp.py” file
from flask import Flask

app = Flask(__name__)


@app.route("/")

def index():

  return "<html><body><h1>Test site running under Flask</h1></body></html>"


if __name__ == "__main__":

  app.run(host='0.0.0.0',debug=True)
Step 7: Testing of the Flask app using Python
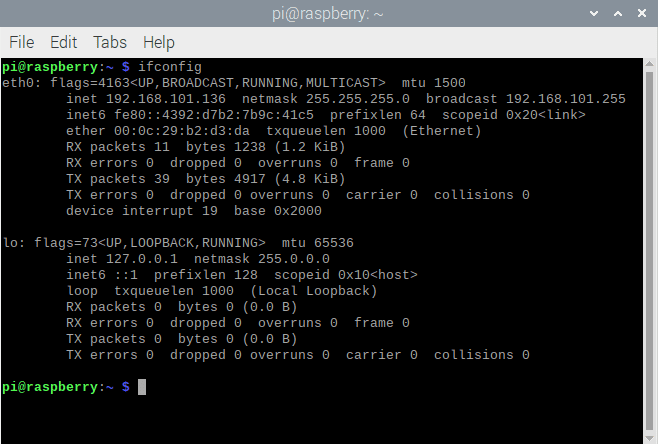
In this section, we will check out our IP address before testing the app using the following command:
Ifconfig
ifconfig command
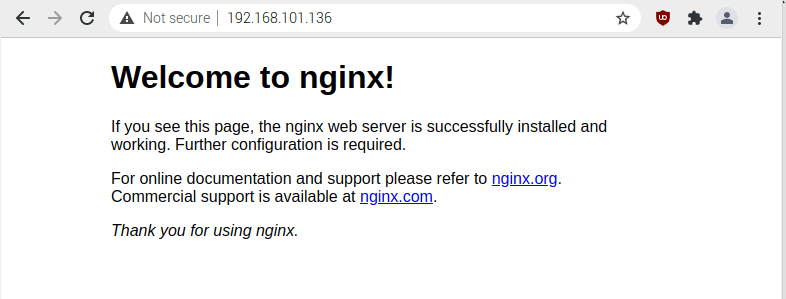
In our case, our Pi machine uses the IP address 192.168.101.136. You should, however, not use this address as they differ depending on your computer. If you run the ifconfig command on your terminal, you will see your PC’s address either on the eth0 for wired connections or wlan0 for wireless connections.
After that, type in your PC’s IP address on your browser as shown below:
http://192.168.101.136
This should display the default NGINX welcome page:
the welcome screen
Step 8: Testing uWSGI
Here we will run a test to check if our uWSGI is working as expected using the following command:
uwsgi --socket 0.0.0.0:8000 --protocol=http -w fossapp:app

testing uwsgi
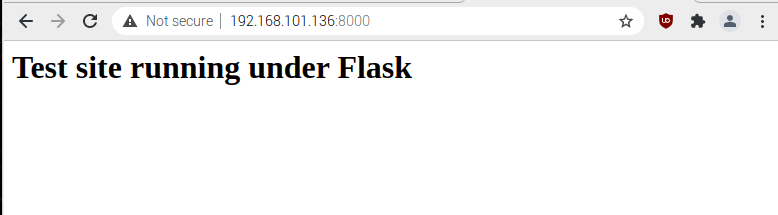
This should allow you to visit the same IP address as before. However, in this section, we will use port 8000:
http://192.168.101.136:8000
Once you run the IP address on your browser, you should see such a page:
apps default page on 8000 port
The above command merely means that you can now test your app using port 8000 with Raspberry Pi’s IP Address ((http://x.x.x.x:8000/)
Note: To return to the terminal, use the CTRL-C button.
Step 9: Create uWSGI initialisation file
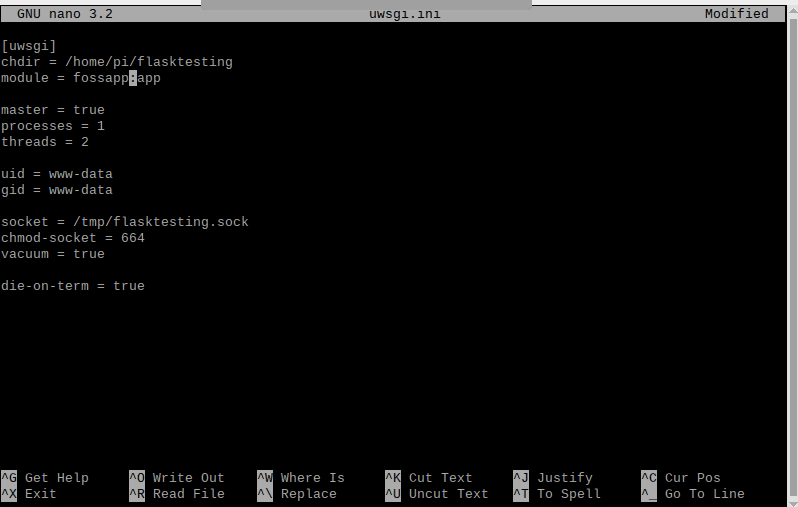
In this step, we will provide additional settings to uWSGI by creating an initialization file:
sudo nano uwsgi.ini
The nano editor will be opened once the command is run. At the top of the nano editor, start with:
[uwsgi]
After that, copy and paste the following code:
chdir = /home/pi/fosstest

module = fossapp:app


master = true

processes = 1x

threads = 2


uid = www-data

gid = www-data

socket = /tmp/flasktesting.sock

chmod-socket = 664

vacuum = true


die-on-term = true
creating uwsgi initialisation file
Note: the file contains references to the project directory (/home/pi/flasktesting) and the flask python file “fossapp.py.” In this part, the “flasktesting.sock” file does not exist at the moment. However, the file will automatically be created when needed by the uWSGI. Use the CTRL X, CTRL Y, and ENTER options to save and exit the nano editor.
Step 10: Test uWSGI initialisation file
To test our uWSGI file, type in the following command
uwsgi --ini uwsgi.ini
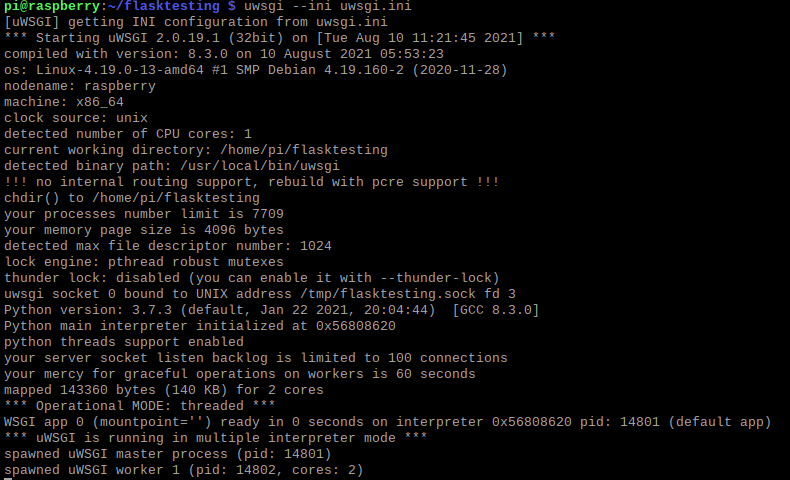
test the uwsgi file
After that, using a second SSH connection, check that the socket file has been successfully created using the following command:
ls /tmp

socket file
Upon running the command, you should see “flasktesting.sock” enlisted among the files. Unfortunately, this file only appears while the uWSGI is running. This, therefore, means that you will have to open two terminal tabs (one to keep the uWSGI file running and the other to check the listed files).
At this point, the uWSGI is not using a standard port number, so only the Nginx page will be available in your browser.
Note: Make use of CTRL-C to stop uWSGI from running.
Step 11: Configure Nginx to use uWSGI
In this section, NGINX can now be configured to drive traffic to uWSGI. This is usually referred to as “reverse proxy.”
So, the first step is to delete the default site:
sudo rm /etc/nginx/sites-enabled/default

delete default site
After that, create a new file named “flasktesting_proxy”:
sudo nano /etc/nginx/sites-available/flasktesting_proxy

run to open the nano editor
Then copy the following into the flasktesting_proxy file:
server {

listen 80;

server_name localhost;


location / { try_files $uri @app; }

location @app {

include uwsgi_params;

uwsgi_pass unix:/tmp/flasktesting.sock;

}

}
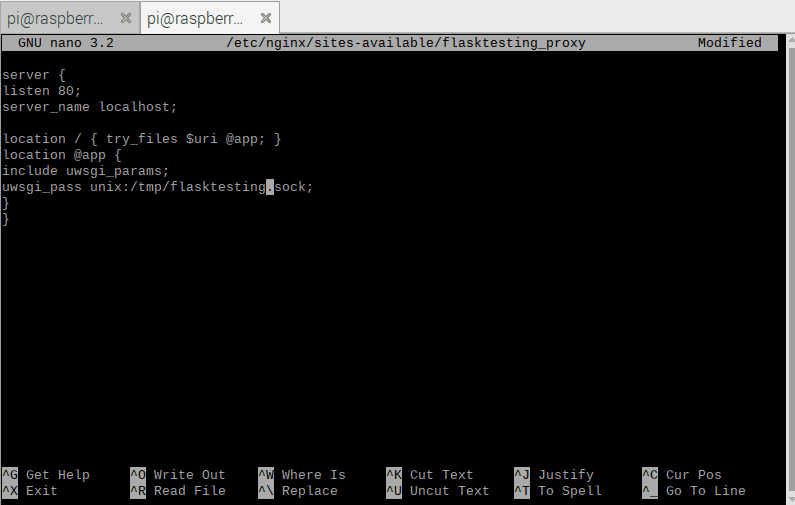
insert into the flasktesting_proxy file
Note: Use CTRL-X, CTRL-Y, and ENTER options to aid in saving and exiting the nano editor.
To finalize, create a symlink from this file to the “sites-enabled” directory using:
sudo ln -s /etc/nginx/sites-available/flasktesting_proxy /etc/nginx/sites-enabled

link creation
Step 12: Restart Nginx
Once you are through creating the link from the file, now restart the NGINX using the following command:
sudo systemctl restart nginx
restarting Nginx
Note: If you visit your IP address upon restarting the NGINX, you should receive a “502 Bad Gateway” error. This should be the expected output because the uWSGI is currently not running, and NGINX is trying to pass it the browser request, hence the error.
Step 13: Running uWSGI when pi boots
Normally, uWSGI should auto-start every time Pi restarts. To achieve the auto restart, we will use the systemd service.
To achieve this, first, maneuver to the system directory:
cd /etc/systemd/system

navigating to the systemd directory
After that, create a unit file for uWSGI:
sudo nano uwsgi.service
command to create a new unit
and insert the following:
[Unit]

Description=uWSGI Service

After=network.target


[Service]

User=www-data

Group=www-data

WorkingDirectory=/home/pi/fosstest/

ExecStart=/usr/local/bin/uwsgi --ini /home/pi/fosstest/uwsgi.ini


[Install]

WantedBy=multi-user.target

Note: Use CTRL-X, CTRL-Y, and ENTER to save and exit the nano editor.
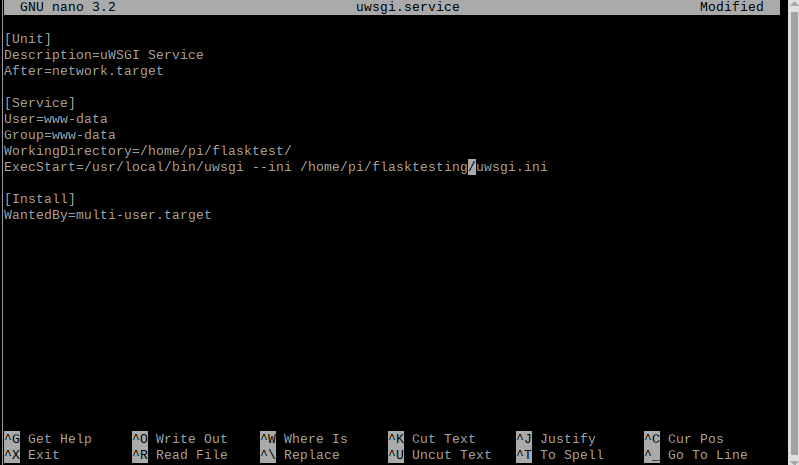
uwsgi service
For the daemon to pick up the new unit, we will restart it using the following command:
sudo systemctl daemon-reload
restart daemon
Now start the service
sudo systemctl start uwsgi.service
starting the service
To finalize, let us run a status check on the service:
sudo systemctl status uwsgi.service
Once you run the status check command, you should be able to see such a screen:

status check
On the screen, the most critical section is the line detecting “active(“running”). This shows that the service is up and running. To return to the command prompt from the service, press CTRL-C.
Use the following command to make the service auto-start on every reboot:
sudo systemctl enable uwsgi.service
Once the command runs, you will receive such an output:
“Created symlink /etc/systemd/system/multi-user.target.wants/uwsgi.service /etc/systemd/system/uwsgi.service”

make it run after every reboot
Step 14: Reboot and test
At this point, you can restart the Raspberry Pi using:
sudo reboot

First, give the machine some time to boot. After that, on your PC, visit the Pi’s IP address as we did before. You should now see the Flask app page automatically in the browser because of the auto-restart we configured. To this point, you should be delighted with yourself since you now got a flask app served by NGINX.
Step 15: Touch-reload(optional)
This step is optional. With the current setup changes to the “fossapp.py” file, the file won’t be displayed despite refreshing the browser. It can only be displayed when the uWSGI service is restarted.
You can get the uWSGI to auto-pick the changes made to the file by adding the “touch-reload” directive to the uwsgi.ini file.
Make use of the following command to edit the file:
sudo nano uwsgi.ini

command to edit the file
Thereafter, place the directive on a new line:
touch-reload = /home/pi/flasktesting/fossapp.py

touch reload on nano
Use CTRL-X, CTRL-Y, and ENTER to save and exit the nano editor.
After that, reboot the Pi for the new setting to take effect:
sudo reboot
After the Pi has booted, all the changes made will be visible in the browser when the page is refreshed.
Conclusion
We first looked at how you can update your Pi packages, install Nginx, pip, flask, and uWSGI. Thereafter we created our first Flask application, then tested the app using python. We also tested the uWSGI to see if it worked as expected, which it did. We further went to create a uWSGI initialization file and also tested it.
Configuring Nginx was our next step, which after configuring, we restarted it, ran uWSGI when Pi boots, and finally rebooted our system to complete the guide.
As you can see, running flask under Nginx on Raspberry Pi is super easy. We hope you found this article useful, and we hope it helped you comprehend how to run flask under Nginx on Pi. Thanks for reading.
3 comments
Thank you very much. This is the fifth tutorial I follow and it is the only one to work. it is also remarkably explained. Nice work, thank you very much!
Thank you so much! Your tutorial was very straight-forward and I was very easily able to deploy a test app, like the example shown. However, how would I go about deploying a flask app that requires modules in a virtual environment to run properly? I couldn’t find anywhere in the tutorial that specified the version of python to use. I’d really appreciate any help you could possibly provide.
Thank you very much, once again, and I look forward to hearing back from you soon.
A great many THANK YOU’s for this! I first followed all steps from start to finish, that worked OK, then I followed along with my own small Flask app.
One remark about the very last step: it’s not necessary to put this in a separate uwsgi.ini in /etc/systemd/system, it can be added to the uwsgi.ini in the project directory (created in step 9). Also, it’s important that the argument for touch-reload is a full path to a file that was changed by the app.
At first, I thought it had to point to the main python script, but in my app, that does not change.