
If you are a developer, you have probably come across terms like Git and Github in your programming career. That’s what we will be looking at in this post. The only difference is that you have probably used Git on your PC running Windows, macOS, or a developer Linux distribution like Ubuntu, Arch Linux, etc. However, in this post, we are working with a Raspberry Pi. Think of it as “bringing Git to Raspberry Pi board.”
Before we dive into the technical part, there are two keywords that we need to discuss. What is the difference between Git and Github? Are they the same thing?
Git vs. GitHub: What’s the Difference?
To better understand these two keywords, let’s first look at a term you will always come across while working with Git –Version Control. Think of version control as a savings program for your project. When you are developing something, say a webpage, the version control program will log all the changes you make to your code and even enables you to restore the code to earlier versions in case of an error. Take a look at the image below:
Version Control
We have the current code on the right side, and the left side is a previous version of the same code. I can decide whether I want to remain with the current or previous version or even go ahead and merge the changes. Now that you have a clear understanding of version control let’s look at Git and Github.
Git is one of the most popular version control systems used by most developers today to manage their projects. What makes it much more reliable it is installed in your local system rather than using the cloud. It is available for Windows, Linux, and macOS. One more exciting feature about Git that sets it apart from other version control systems is the support for Branching. With branching, you can create independent local branches for your project, enabling you to test new ideas and a production branch. You can have as many branches as you want.
Github is different from Git, but they work together to achieve the same thing. While Git is installed in your local system, Github works on the cloud. It’s an online database that keeps track of your version-controlled projects and allows sharing outside your local computer. Github also offers you a web interface to manage your projects if you are not a ‘commands person.’ With that said, let’s dive in and get started with Git on Raspberry Pi.
Requirements
- A Raspberry Pi board – In our case, we are working with Raspberry Pi 4
- An active internet connection
- The Official Raspberry OS image available for download via the link below.
Download Raspberry Pi OS
However, you are not limited. You can still use any other Linux distribution available for Raspberry Pi. - Balena Etcher
These items are enough if you are planning to access your Pi remotely via SSH or VNC server. You can check out our post, which will give you a detailed guide on How to SSH into Raspberry Pi or How to Set up VNC Server on Raspberry Pi. If you want to have a full desktop setup with a monitor, you will require the items below:
- A monitor/TV Screen with HDMI support.
- An HDMI to micro-HDMI cable/connector.
To get started, burn the Raspberry Pi OS image onto the Pi’s SD Card using Balena Etcher. You can check out our post on How to install Raspbian on Pi for a detailed guide.
Installing Git on Raspberry Pi
As discussed above, Git is available for Windows, Linux, and macOS. Most of the operating systems available for Raspberry are Linux distributions. Therefore, we can easily install it on our PI, just as we would do on a Linux system.
Launch the Terminal and execute the command below to update the system.
sudo apt update
sudo apt upgrade
Execute the command below to install Git.
sudo apt install git

Install Git
From the image above, Git is already installed in the system. You can check the version using the command below:
git --version

Git –version
Github Account
If you don’t have a Github account yet, you can create one at https://github.com/. Here, you can store your online repositories and manage them with your Git version control program on your local system. Keep note of your Github username and email as we will need them for our Git configuration.
Configure Git
Now that we have Git installed, we need to link it to our Github account. You will be required to enter your Github username and email. Use the commands below:
git config --global user.name "Github_username"
git config --global user.email "Github_Email"
Remember to replace the username and email above accordingly. To check whether you have entered the correct details, use the command below:
git config --list
These configurations are stored in the ~/.gitconfig directory. If you are good with Terminal commands, you can edit these files using the nano editor to make any changes by hand. Let’s look at some more useful Git commands.
Git Status
This command gives you detailed information about your local repository. That includes untracked files, modified files, index files, and even the branch you are currently working on.
git status
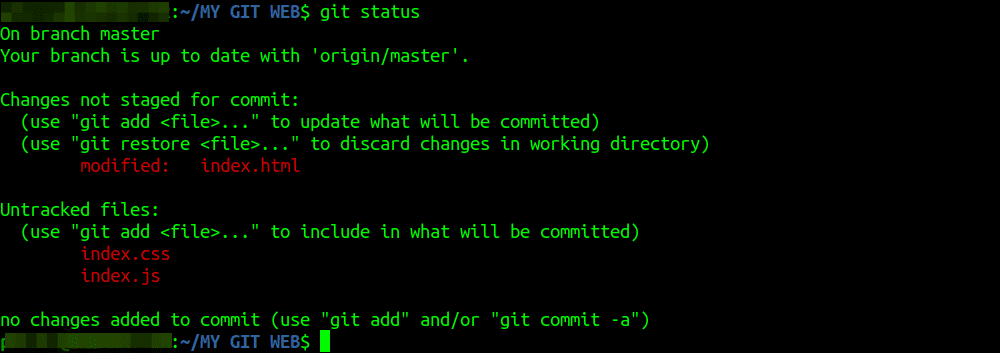
Git Status
Git Add
This command adds untracked files and changes in your working repository to index files ready for commit. You can add a single file or multiple files. For a single file, we can execute the command below.
git add index.css
To add all untracked files and modified changes, we can use the asterisk symbol as shown below:
git add *

Git Add
Git Remove
git rm --cached
The Git remove command removes the untracked file we added with the Git Add command described above. For example, to remove the index.css file we just added, we will use the command below:
git rm --cached index.css

Git Remove
Git Commit
git commit
This command saves all the changes in your local repository to be pushed in your remote repository. This command takes three arguments:
-
- -m: This argument lets you leave a message for any changes you push to your remote repository. That enables collaboration, especially when working with colleagues.
git commit -m "Homepage Design Update"
- -a: This allows you to commit a snapshot of all the changes in your local repository.
git commit -a
- –amend: This command adds the current changes to the last commit instead of creating a new commit. Additionally, it will open the default text editor, and you can modify the previous commit message.
git commit --amend
- -m: This argument lets you leave a message for any changes you push to your remote repository. That enables collaboration, especially when working with colleagues.
Git commit
Git Push
git pushThis command takes all the changes you committed in your local repository and uploads them to the remote repository.
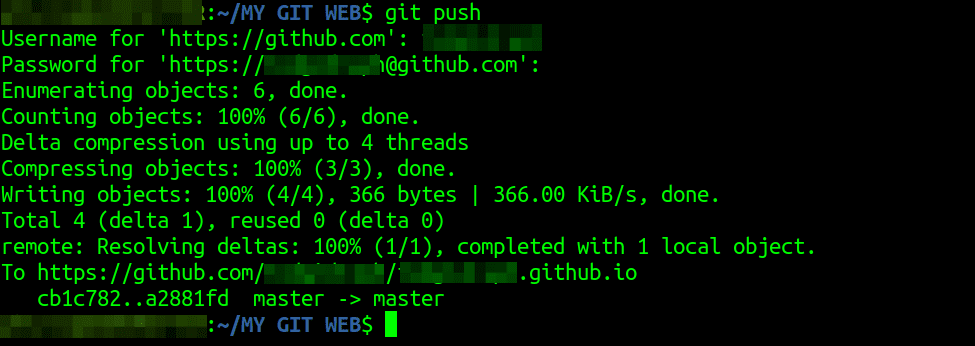
Git_Push
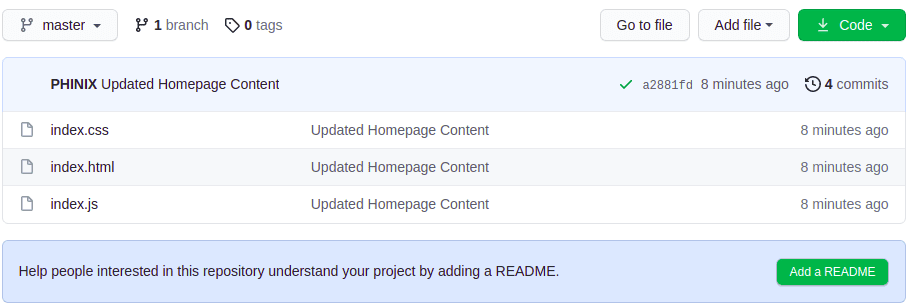
If your changes were successfully pushed to the remote repository, you should be able to see them on your Github account webpage. From the image below, we can see the index.html, index.css, and index.js files were successfully uploaded to our local repository.
Github Repository
Conclusion
I believe this post has given you a detailed guide on getting started with Git and Github on your Raspberry Pi. There are many more Git commands available than what we have just covered. You can find them on the official GitHub guide webpage. I hope you have also had a clear understanding of the difference between Git and Github. Do you have a Git command that you find useful and want to share with our readers, please feel free to write in the comments below.