The default storage for the Raspberry Pi is the Micro SD card with a max theoretical speed of 50 MB/s on the latest Raspberry model (Pi 4) and 25 Mb/s on earlier models (Pi3, Pi2, etc.). Unfortunately, from the tests we have conducted on different Raspberry Pi boards, we saw that most of the SD cards we use on the Pi never reach speeds greater than 38 MB/s.
That had us wondering, is there any other storage that we can use and significantly improve the read and write speeds? We tried using the USB flash drive, but the SD card’s performance was worse. We did a post on that – ‘How to boot Raspberry Pi from a USB drive.’ Please take some time to check it out and give us your thoughts.
In this post, we want to try using the SSD and compare its performance to the Micro SD Card and the USB flash drive. However, we expect it to be much better with write and read speeds not less than 120 MB/s. Below are three main advantages of using an SSD instead of the Micro SD Card.
Advantages of the SSD
Faster Boot-Time
SSDs have faster boot times compared to the Micro SD card. Therefore, the SSD would be a great option if you are working on a project that requires the Raspberry to boot in fast (like turning on a flashlight). If you still want a fast boot time on the micro SD card, check out our post – ‘How to fast boot Raspberry Pi.‘
Longevity
An SSD has a longer lifespan compared to the Micro SD card. The SD card is also prone to many problems, including heat and hardware failure.
With that in mind, let’s dive in and get started.
Booting Raspberry Pi 4 from SSD connected by USB
Requirements
For this project, we will need the following items.
- A Raspberry Pi board. We highly recommend the Pi 4 for faster read and write speed.
- An active internet connection.
- Micro SD card. We will need it to do the initial configurations. Please check out our master guide – ‘How to install Raspbian on the Raspberry Pi.‘
- An SSD
The above requirements are enough if you plan to access the Raspberry Pi over VNC or SSH. However, if you want to access it directly, you must include the items below.
- A display monitor
- A Keyboard
- A mouse
- A compatible HDMI cable
If you prefer SSH or VNC, the following posts will be pretty handy.
Step 1. Update the System
This section assumes you already installed the official Raspberry Pi OS on the SD card and have the Pi up and running. As a tradition for any Linux system, execute the commands below to ensure you are running the latest packages.
sudo apt update
sudo apt upgrade
To apply the updates, reboot your system when done.
sudo reboot now
Step 2. Install the Latest Boot ROM
Once the system is back online, launch the Terminal and execute the command below to open the Raspberry Pi configuration window.
sudo raspi-config

Advanced Options
Use the arrow keys and select ‘Advanced Options.’ Press ‘Enter.’ A new screen will appear. Scroll down and select the ‘Bootloader Version‘ option. Hit ‘Enter’

Bootloader version
We need to set the Raspberry Pi to boot from the latest ROM on the new screen that appears. Select the option ‘Use the latest version boot ROM software.’ See the image below.

Use the latest ROM
Press ‘Enter.’ A notification screen similar to the image below will pop up. Select ‘Yes‘ and hit ‘Enter.’

Notification
You will see the message ‘Boot ROM reset to defaults.’ Press ‘Enter’ then select ‘Finish.’ You will see a prompt to reboot the Raspberry Pi and apply the changes. Select OK.
Step 3. Enable USB Boot
Once the system is back online, we will proceed to enable USB boot since we are connecting the SSD via the USB port. Execute the command below to launch the Raspberry Pi configuration window.
sudo raspi-config
Scroll down and select ‘Advanced Options.’ See the image below.

Advanced Options
Press ‘Enter.’ On the new screen that appears, scroll down and select the ‘Boot Order‘ option. Here, you can set network or USB boot. Hit ‘Enter‘

Boot Order
On the new screen, select ‘USB Boot’ and hit ‘Enter.’ You will see the message, ‘USB is the default boot device.’ Press Enter.

Boot Order
When done, you will see a prompt to reboot your Pi. Press ‘Enter‘ to apply the changes.
Step 4. Confirm USB Boot
Once your Raspberry Pi is back online, we must verify whether the USB boot was successfully enabled. Launch the Terminal and execute the command below.
vcgencmd bootloader_config
If the BOOT_ORDER is set to 0xf14, USB boot is successfully enabled on your Raspberry Pi. See the image below.

USB Boot Enabled
Step 5. Clone the Micro SD Card to SSD
Up to this point, you can now proceed to connect the SSD card and use it to boot your Raspberry Pi. However, you first need to flash an operating system. You can decide to use Balena Etcher and install the official Raspberry Pi OS on the SSD card. But that won’t be a good option if you have important data stored on the SD card. We will cone the SD card to the SSD card for this post. That way, we won’t lose any critical data and files.
By default, the SD card is listed as mmcblk0. Insert your USB drive and execute the command below.
lsblk

USB devices
The image above shows that our SSD is listed as sda, and the SD card is listed as mmcblk0. With that information, we can now proceed the cloning process.
Click on the ‘Menu‘ icon -> Accessories -> SD Card Copier.

SD Card Copier
The SD Card Copier window will open, as shown below. In the ‘Copy from Device‘ section, select the SD Card labeled as mmcblk0. In the ‘Copy to Device‘ section, select the SSD storage. In our case, it’s labeled as sda. Click ‘Start‘ to start the cloning process.

SD Card Copier window
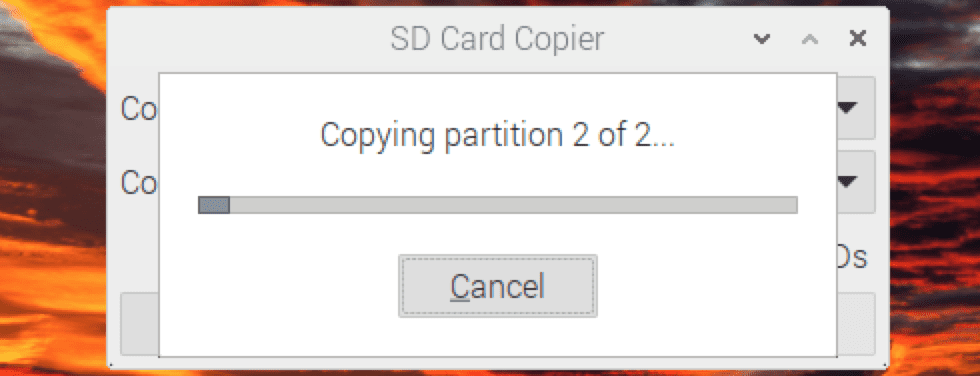
You should see a progress window similar to the image below.

Progress window
This process might take a while. Please, be patient.
Step 6. Boot from SSD
After the process is completed successfully, power off the Pi, remove the Micro SD card, ensure the SSD is connected via the USB 3.0 port, and power up the Pi to boot from the SSD. The operating system should boot like you were using a Micro SD card.

Raspberry Pi Desktop
Wrapping up
This post has given you a detailed guide on enabling the Pi to boot from SSD and how to clone the Micro SD card. Even though this will significantly improve the read and write speed, connecting devices that sap a lot of power from the Raspberry can dramatically impact the pi’s performance.
Therefore, if you plan to connect other devices ether via the USB or the GPIO pins, we recommend using external devices with their power source. Please share your thoughts on the SSD card compared to the Micro SD card with our readers.
