
Java is one of the most popular object-oriented programming languages for developing high-end applications and systems. Java can run all standard operating systems (Windows, Linux, macOS, etc.) hence the catchy phrase “Write Once Run Anywhere (WORA).” There are two main Java implementations:
- OpenJDK
- Oracle Java JDK
Let’s have an in-depth look at these two Java versions.
OpenJDK vs Oracle JDK
Before moving any further, there are a few things you need to know. There are various JDK vendors in the market today; however, both Open JDK (open source) and Oracle JDK (commercial) are maintained and released by Oracle. Since OpenJDK is an open-source implementation, most of these other JDK vendors build their JDK releases on top of the Open JDK. They tweak a few proprietary features, add several features that perform well on a specific platform, and ensure that the JDK passes the TCK compatibility (Java Technology Certification Kit).
Oracle Java JDK is a commercial version of the Java JDK released by Oracle under the Oracle Technology Network Licence (OTN). This release is free for personal use if you are developing, testing, or demonstrating Java software. If you are a developer or a student, you won’t need to pay anything to use this version of JDK. However, if you are a company executing Java programs using the Java Virtual Machine included in that Java Development Kit (JDK), you will need to pay for the license.
OpenJDK is an open-source version of the Java programming language and the Java Development Kit (JDK), which Oracle also releases under the GNU classpath exception license. Now, if you understand how open-source works, then you know that any programs released under the GNU license require the developers to make the source code of the program available to the public together with any other components of the program released under the GNU license. However, in this case, we are talking about the GNU plus Classpath Exception License, which doesn’t require the developer to provide the source code.
installing Oracle Java JDK on Raspberry Pi
This post will guide you on installing Oracle Java JDK on the Raspberry Pi. Let’s get started.
Project Requirements
- The Oracle Java JDK is only available for the 64-bit ARM architecture. Therefore, you will need to use a Raspberry Pi 3 or Pi 4 running a 64-bit operating system. As of writing this post, Raspberry Pi has released a 64-bit Operating system (Raspberry Pi OS – BullsEye). However, don’t feel limited; below are other 64-bit Linux distributions you can install on your Raspberry Pi.
How to install Ubuntu 18.04 LTS on your Raspberry Pi
How to install Ubuntu Mate on Raspberry Pi 4
How to install Debian on Raspberry Pi 4
How to install Pop_OS on Raspberry Pi 4 - An active internet connection
- A display monitor (optional)
Alternatively, if you want to go headless (without a monitor), you can connect to your Raspberry Pi via SSH or VNC. If you decide to use the Raspberry Pi 64-bit OS, you will need to use Raspberry Pi Imager so that you can set the SSH username and password.
Download the Oracle JDK
Launch your browser and open the official Oracle download page to get started. Here, you will need to be careful as you might find yourself installing OpenJDK (open-source release) instead of Oracle Java JDK (commercial release). This page is divided into two main sections – the top section where you can download the OpenJDK release and the bottom section where you can download the Oracle Java JDK.
In our case, we are interested in the latter. Therefore, scroll to the bottom until you get to the section about “Jave SE subscribers.” Below, you will see various Oracle JDK packages for multiple platforms and distributions. In our case, we are interested in the ARM package. Download the “ARM Compressed Archive”
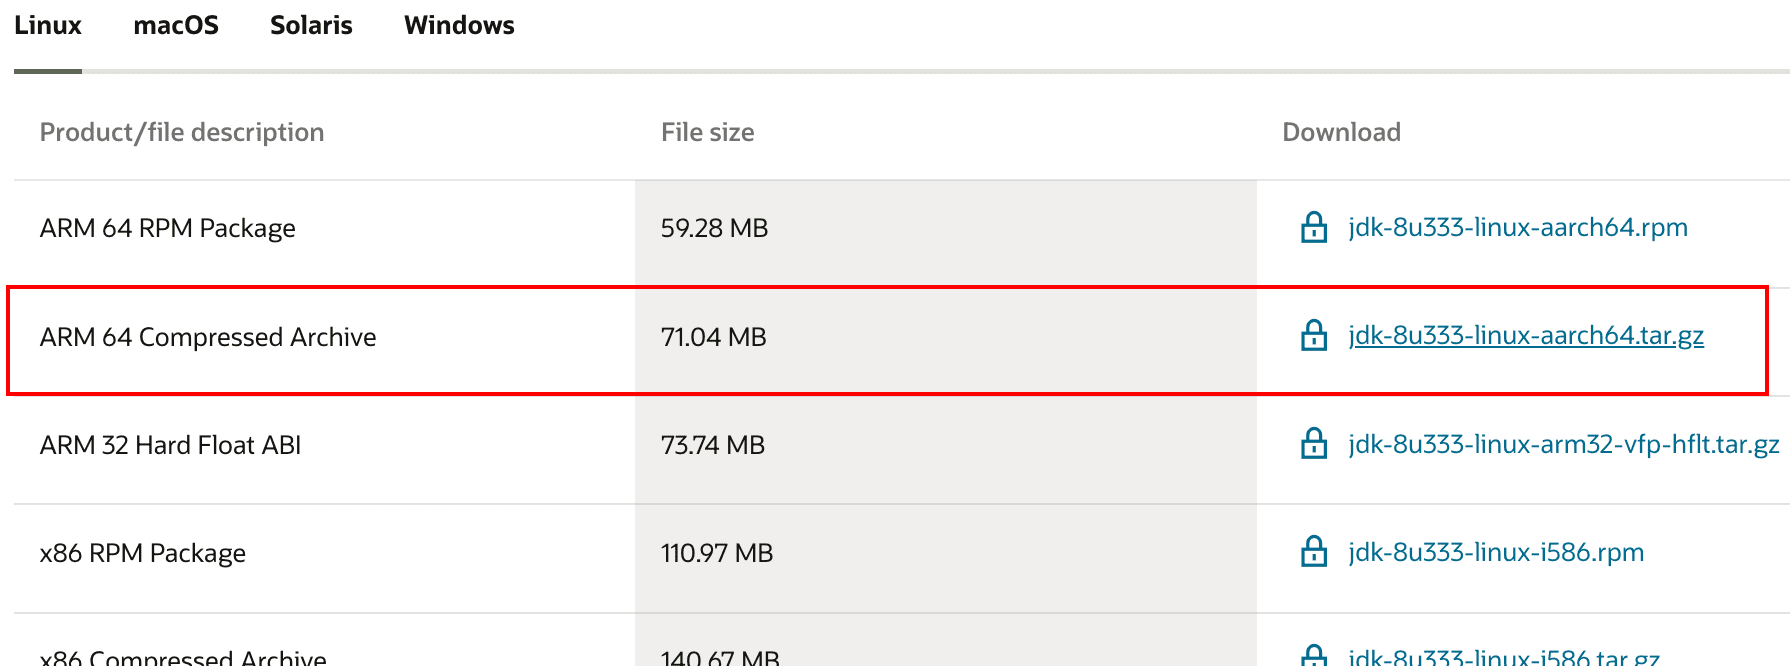
Download ARM Oracle JDK
You will be redirected to a login where you must sign in with your Oracle account to download the setup file. If you don’t have an account, you can easily create one with your email address. When done, we can now proceed to the installation step. In our case, we downloaded the Setup file on our computer and had to copy it with a USB to our Raspberry Pi. If you are using a headless setup, you can use FTP or SCP to copy the file to your Raspberry Pi.
Installing Oracle JDK on a Raspberry Pi
Up to this point, we believe you have the Oracle JDK file downloaded on your Raspberry Pi. You will notice that the file is compressed using the ‘tar.gz’ format. In our case, we have the file in our Desktop folder. Use the command below to extract the files.
tar -xzf jdk-8u333-linux-aarch64.tar.gz
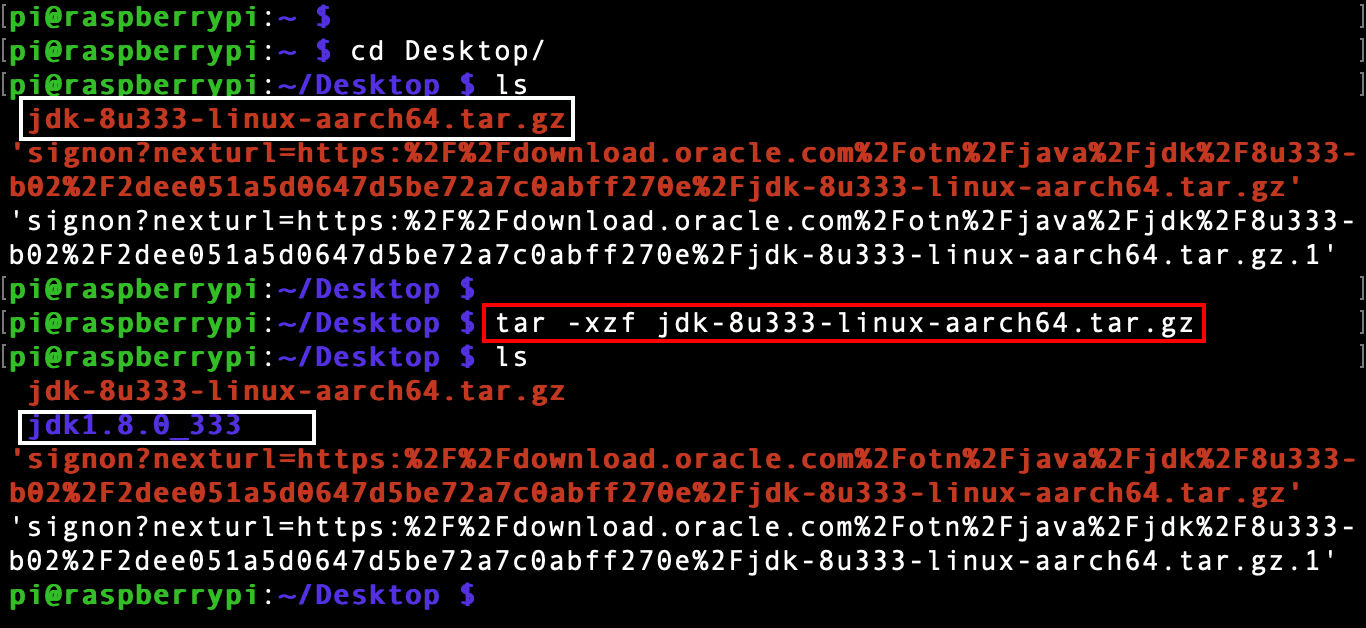
Extract files
You will new a folder created on your Desktop. In our case, it’s called ‘jdk1.8.0_333.’ Now, move this folder to the /opt directory using the syntax below.
sudo mv -R [folder-name] /opt
e.g.,
sudo mv -R jdk1.8.0_333 /opt

Move folder to opt
Now, we need to add the Java JDK to our system path. To get started, navigate to the /etc/profile.d and create a bash script. In our case, we will call it ‘jdk8.’
cd /etc/profile.d
sudo nano jdk8.sh

Java bash script
Paste the lines below in the script below.
export JAVA_HOME="/opt/jdk1.8.0_333"
export PATH="$PATH:${JAVA_HOME}/bin"
Note: Please remember to change the name ‘jdk1.8.0_333‘ to the name of the folder you copied in the /opt directory.

Add java to the system path
Save the file (Ctrl + O, then Enter) and Exit (Ctrl + X). Reboot your Raspberry Pi to apply the changes to your system.
sudo reboot now
Verify Java Installation
Once your system is up, you can verify the java installation using the command below.
java --version
javac --version

Java version
Testing Java on Our System
Before we wrap up, let’s write a simple Java program and see how it will run on our Raspberry Pi system. In our case, we won’t install any Java editors (Eclipse, Netbeans, etc.). We will use the Nano editor since we are writing a simple “Hello World” program.
sudo nano myFirstProgram.java
public class HelloWorld {
  public static void main(String[] args) {
    System.out.println("Hello World!");
  }
}

Java program
To run the program on our system, use the syntax below.
javac [java-program-name]
e.g.,
javac myFirstProgram.java
After running the javac command, you will see a new file called ‘myFirstProgram.class’ created on your system. That shows our Java program was successfully compiled on our system. Now run the Java program using the syntax below.
java [java-program-name]
e.g.,
java myFirstProgram
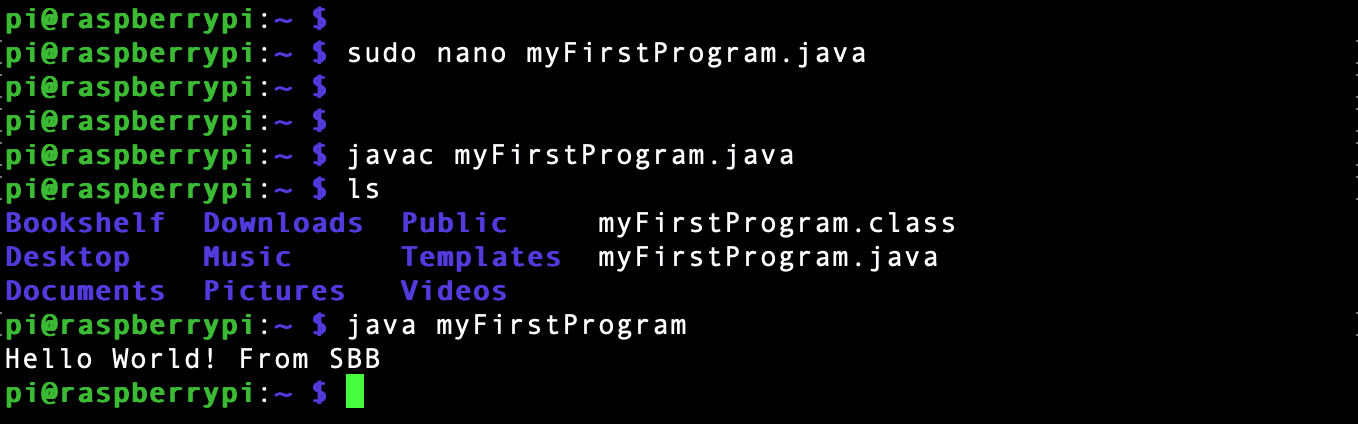
Run java program
From the image above, you can see that we have successfully compiled and executed the Java program on our system.
Conclusion
That’s it! This post provides a step-by-step guide for installing the Oracle Java JDK on your system. It was pretty simple, right? If you are starting with Java programming, we have also shown you how to compile and execute Java programs on your Raspberry Pi. Please let us know your thoughts about this post in the comments below.