
Raspberry Pi machine is an affordable mini PC board the size of a credit card. The small size is one of the most significant reasons people fall in love with this superb machine. Are you looking for a machine to help in sorting electronics, robotics, and maker-like projects? If yes, then Raspberry Pi is the best shot for you.
Raspberry Pi supports 40 General –purpose input/output pins, popularly known as GPIO, an uncommitted digital signal pin on an integrated circuit or electronic circuit board that can be used as an input, output, or even both. The pins are controllable by the user at runtime.
Ubuntu Server
Ubuntu server is a server operating system developed by Canonical and open-source programmers worldwide that work with nearly any hardware or virtualization platform. It can serve up websites, file shares, and containers, as well as expand your company offerings with an incredible cloud presence. Ubuntu Server is a specific addition that differs a little bit from Ubuntu desktop to facilitate installing the operating system on servers. It was first released on the 20th of October 2004, and it has been steadily improving and spreading its reach ever. Additionally, it can run on all major architectures: X86-64, X64, ARM v7, ARM64, IBM system z mainframes via LinuxOnes and POWER8.
Generally, Ubuntu is a server platform that anyone can use for the following and even much more:
- Database server.
- Email server.
- File and print platform.
- FTP.
- Cloud services.
- Container deployment.
- Websites.
- Development platform.
The Ubuntu server has several requirements, which include:
- A minimum of 1GHz CPU speed.
- A minimum of 512MB of Random Access Memory(RAM).
- A minimum of 1GB of disk space for storage and 1.75GB for all features to be installed.
In this tutorial, we will use the Raspberry Pi Imager program to install the server OS. A raspberry pi imager is software used to install operating systems to a microSD card.
With that being said, let us get going! In this article, we will take you from end to end in the installation process of the Ubuntu Server on a Raspberry Pi. After that, we will stretch further to connect it to the internet and use it remotely before summarizing it all.
Requirements
- A Raspberry Pi 2,3 or 4
- A micro-USB power cable (remember it is USB type C for the pi 4)
- A computer with a microSD card drive
- A microSD card with a minimum of 4GB; however, we recommend 8GB in our case.
- An Ethernet cable or a Wi-Fi network
Step 1: SD card Preparation
In this section, we will prepare our SD card using the Raspberry Pi Imager. An important point to note here is that these steps will clear every existing content on the SD card. So, as a precautionary measure, ensure you clear your SD card or back up all the stuff inside the SD card before proceeding with the article.
First things first, we will start by installing the Raspberry Pi Imager we talked about earlier. The application is available for many operating systems: Ubuntu, Windows, and macOS. Before installing the Imager, ensure to crosscheck to avoid installing an incompatible version of the tool. Once confirmed, proceed to insert the microSD card into your computer.
Ubuntu users can alternatively make use of the following command to install the Imager:
sudo snap install rpi-imager
Step 2: OS Selection
Once you are over with the tool installation, start it and select the “CHOOSE OS” option in the start menu.
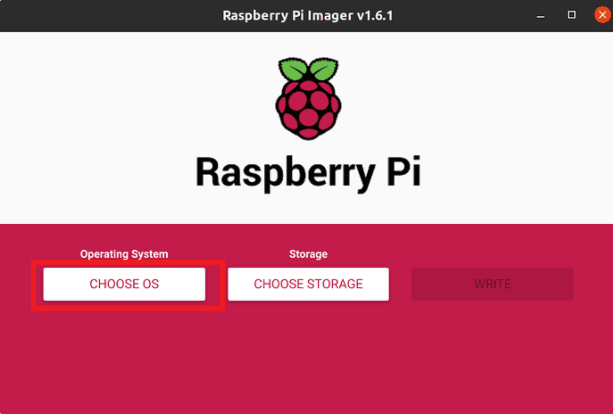
OS-selection
Step 3: OS Specification
Here, the Operating Systems window will appear, requiring you to specify the OS type. Since the Ubuntu server is not in the drop-down menu, scroll down to “Other general-purpose OS.”
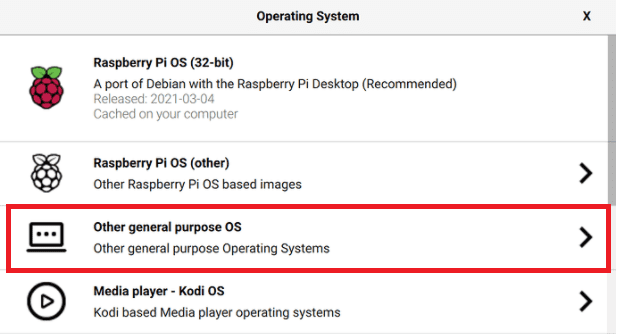
select-general-purpose
Upon clicking “other general-purpose OS,” several Ubuntu OS options will appear. For the sake of this tutorial, we suggest selecting Ubuntu 20.04 LTS 64 bit.
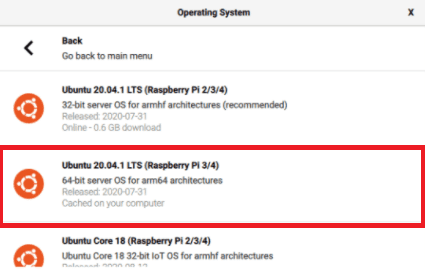
select Ubuntu 64 bit
However, if you have Raspberry Pi 2, you are limited to the 32-bit image.
Step 4: SD card selection
In the next step, select your microSD card from the “SD Card” option in the start-up menu. After that, click on “WRITE.” This will take a while, so be patient, and in case of errors in this section, we suggest you repeat the process, and you should be good to go.
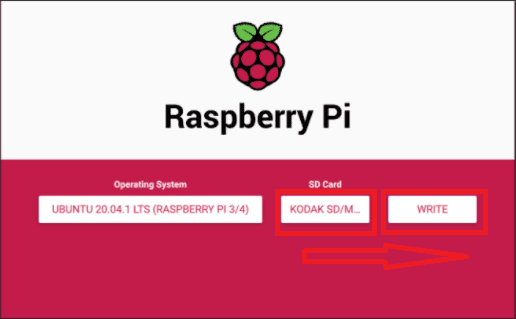
sd card selection
In the end, you will be alerted, “ You can now remove the SD card from the reader” upon completion. Once you have removed the SD card, click “Continue” to proceed.
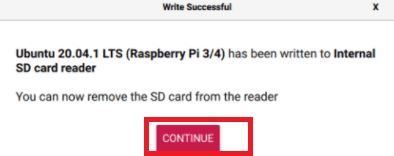
You-will-be-notified-upon-completion
Step 5: Wi-Fi or Ethernet connection
Once microSD flashing is done, then we are almost there. However, there is one step you need to carry out before using it: adding Wi-Fi support. We suggest carrying this step here since you will struggle a lot later to connect to the Wi-Fi from the terminal in the Ubuntu server.
So, open the file manager and locate the “system-boot” partition with the SD Card still inserted in the card reader. The file you should be looking for in this section is named “network-config.”
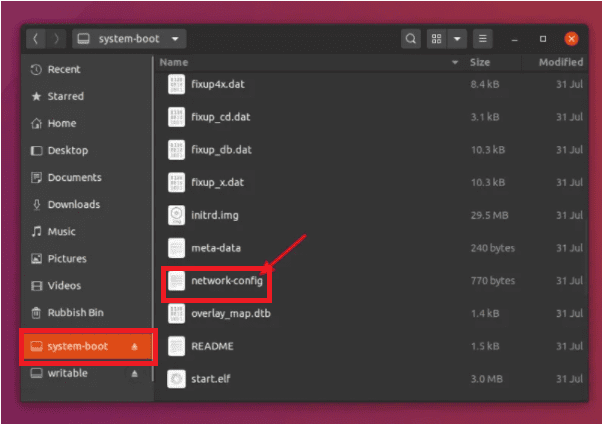
network configuration
All this process is not only possible in Ubuntu but can also be carried out on Windows and macOS too. Next is editing the network-config file to add our Wi-Fi credentials.
To do this, you will uncomment the “#” at the beginning and edit the following lines. To uncomment refers to removing the “#.”
#wifis:

#  wlan0:

#    dhcp4: true

#    optional: true

#    access-points:

#      “your Wi-Fi name”:

#        password: "Your Wi-Fi password."
For instance :
wifis:

  wlan0:

    dhcp4: true

    optional: true

    access-points:

      "SingleBoardBytes":

        password: "SBBytes"
Note: The network must be enclosed in quotation marks.
After editing the file, save it and remove the card from your PC. Another important note is that your Pi machine will try to connect to this network during the first boot. However, it will fail for the first time. To configure this correctly, reboot your Pi machine using “sudo reboot,” It should now work correctly.
Step 6: Boot your Ubuntu Server
Ensure you are plugged in before powering the Pi to see the boot process on the screen. During the first boot, a tool called cloud-init will still be carrying out some configurations, so wait until it is finished before logging in again. Typically, it takes less than 2 minutes, but there might be a break between the login prompt and cloud-init completion. So make sure you don’t interrupt the process since you will have to start it again. Some people often ask how they will know when it is done. To know it is done, you will see some more output lines after the login prompt has appeared.
Once the cloud-init completes, log in using “Ubuntu as both the password and login ID/username. ” After 60 seconds, Ubuntu on your Raspberry Pi will have fully started up and linked to the network. In cases where you are using an Ethernet cable, and you are still not connected to the net at this point, copy and paste the following command to your terminal:
sudo dhclient eth0
Step 7: Connect remotely to your Raspberry Pi
You only need two things to connect to your Raspberry Pi remotely: your IP address on the local network and an SSH client, a communication protocol between machines.
To determine your PI’s IP address, enter the following command in the terminal:
arp -na | grep -i "b8:27:eb"
If this fails to work and you are on the latest version of the Pi 4, use this:
arp -na | grep -i "dc:a6:32
Next, depending on the version of your Ubuntu, you might want to install the net-tools package. This package contains a collection of programs that form the base of the NET-3 networking distribution for the Linux OS. Use the following command to install it:
sudo apt install net-tools
After installing the tools, try the arp command again, and this should now work.
Step 8: Using SSH client
If you are an Ubuntu or macOS user, an SSH client is already installed in your machine. Nevertheless, this does not mean that all of them will have the configuration. Follow the steps to install one in case you don’t have one.
Open the terminal and run the following command:
ssh ubuntu@raspberry_pi_ip_address
After that, you will be queried to confirm the connection with the following message:
Are you sure you want to continue connecting (yes/no/[fingerprint])?
Type “yes” to confirm.
You will then be prompted to change the password. As mentioned earlier, you will use “ubuntu.” Then you will be asked to change the password.
Once you have entered your preferred password, you will be automatically logged out, and you will use your new password to reconnect.
Enjoy your Ubuntu Server on a Raspberry Pi, folks!!
Final Thoughts
The steps we covered in this article clearly show that installing Ubuntu Server on a Raspberry Pi is a straightforward process. The article has covered the necessary gaps in the installation of Ubuntu Server on a Pi machine, and hopefully, you got sorted out well.
To this end, we hope you are good to go. Thank you for reading! In case of any issue, reach out to us through the comment section.